
Experts in ORIA Reasoner
Experts in ORIA Reasoner
An Expert is a pre-configured starting point. It groups a set of nodes, tools, and reference files together so that every session started from it begins completely ready—without the need to re-select the same parameters each time.
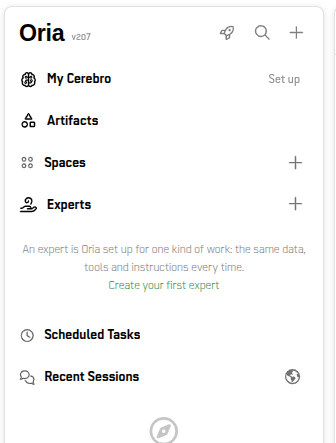
How to Navigate to Experts
To manage or use Experts within the platform:
- Location in the Left Panel: In the left sidebar, you will find the Experts section.
- Viewing Experts: Clicking on the Experts dropdown menu displays the full list of experts you currently have access to.
- Creation: To create a new expert, click the
+button located next to the Experts section header.
How to Create an Expert and What Each Option Does
To create a new Expert, click the + button next to the Experts header in the left panel. This opens the Expert configuration screen where you can set up the following options:
| Field | Purpose |
|---|---|
| Expert name | The name as it will appear in the Expert list (e.g., Monthly close). |
| What is it for? | An optional description displayed in the list to provide context on the expert's purpose. Includes a Write with AI option to assist with drafting. |
| Standing instructions | Permanent instructions added to every session started by this expert. They define how Oria works (e.g., "always reconcile to the general ledger and report in USD"). Includes a rich text editor and Write with AI support. |
| Opening prompt | Pre-filled text in the composer when a new session starts. Nothing is sent until the user presses send. |
| Starter buttons | Custom suggestion buttons displayed on the initial screen of every session started by this expert (replacing generic suggestions). They allow you to configure a title, a short description, and the exact prompt sent when pressed. Multiple buttons can be added using the + Add a button control. |
| Preferred model | Allows you to define the preferred AI model for sessions started by this expert. It acts as a session preference: if the user running it lacks permissions for that model, their default model is used instead without failing. |
| Reference files | Files shared across all sessions created under this expert. Upload once, and they become available to both future and existing sessions. |
| Scope | Defines the data reach and capabilities. The nodes, tools, MCP collections, and actions selected will remain fixed across all sessions created within this expert. |
Saving Note: Click Save expert to retain changes, Close to exit without saving, or Discard to delete the current draft.
Note: Not all fields are required to build an Expert. You only need to fill in the parameters necessary for the specific workflow or task you are setting up—customize it as lightly or heavily as needed.
How to Configure the Scope
The Scope determines what information and capabilities Oria will have available within the Expert. The primary resources making up the scope are Tools, Ontology Nodes, and Documents/Files.
There are two ways to add and configure these resources within your Expert's reach:
- From the Expert Creation Form/Panel:
You can use the dedicated Reference files section directly within the editor screen to upload reference documents, as well as adjust global parameters and model preferences before saving. - From the Left/Right Side Panel (Scope Panel):
The side interface lists all available assets (ontology nodes, tools, and documents). You can select and attach resources directly from this panel while the Expert editor remains open.
When adding resources via either method, a dynamic summary appears at the bottom of the editor displaying the exact count of included elements (e.g., n nodes · n tools · n MCP · n actions).
Standing Instructions Cannot Widen Scope
Standing instructions change behavior; the Scope configuration changes reach.
An instruction cannot grant Oria access to a node, tool, or action that was not previously selected in the Scope. This separation ensures that natural language instructions cannot accidentally expand the data or tool permissions assigned to the expert.
Reference Files Apply Retroactively
Files uploaded in the Reference files section become immediately visible to sessions that already exist, not just new ones.
This is especially useful when updating shared reference documents or policies. However, keep in mind that for auditing or reproducing past analyses, the underlying file context of an older session may change if new reference documents are added to the expert later.
Shared Experts and Store/Catalog in ORIA Reasoner
When an Expert is created, it can be shared across the organization or workarea using flexible privacy settings. Other team members can explore, install, and execute shared Experts from the Expert Catalog/Store without altering the original configuration.
1. Sharing Options (Privacy & Governance)
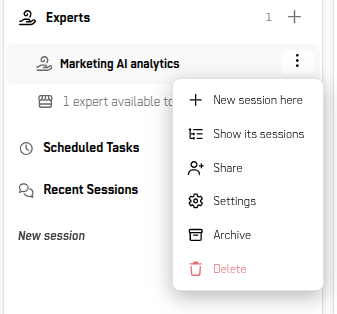
An Expert can be shared in two ways: by clicking the three-dots menu (⋮) next to an Expert in the left sidebar and selecting Share, or directly from the Expert creation/edition interface. Both paths open the Share this expert modal, where the author determines who can access and install it.
Available Sharing Levels
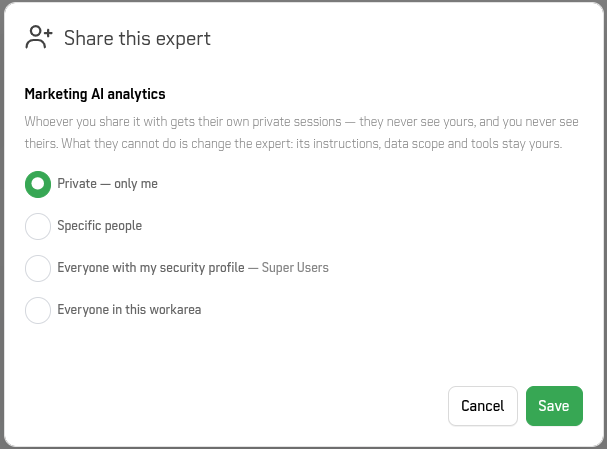
Private — only me: The Expert is restricted exclusively to the creator.
Specific people: Grants access to designated users within the platform.
Everyone with my security profile: Shares the Expert with all users who hold the same security profile (e.g., Super Users).
Everyone in this workarea: Publishes the Expert to the entire workarea/tenant catalog.
Fundamental Rules of Shared Experts
- Isolated Sessions: Every user who runs a shared Expert gets their own private sessions. The author cannot see other users' chat histories or outputs, and users cannot see each other's sessions.
- Locked Scope and Configuration: Users who install a shared Expert cannot modify its structure. The standing instructions, tools, nodes, and reference files remain governed strictly by the owner.
2. Accessing the Experts Catalog (Store)
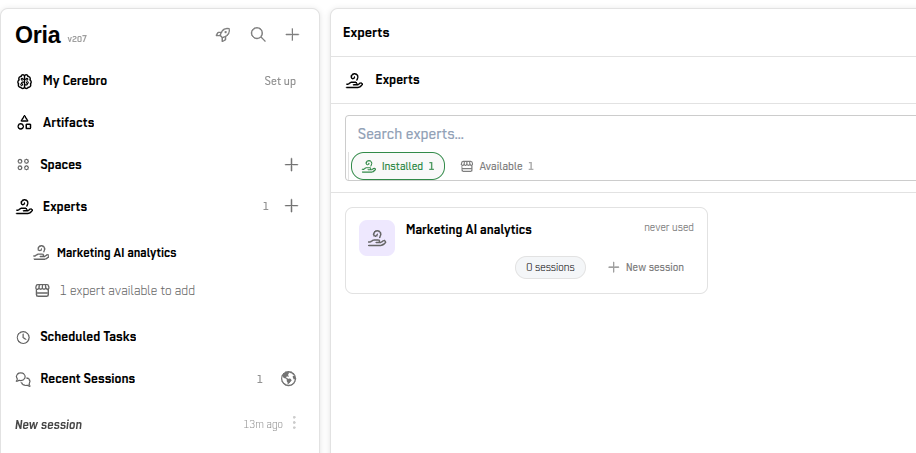
Users can discover, install, and run Experts shared with them through the central catalog.
Catalog Tabs
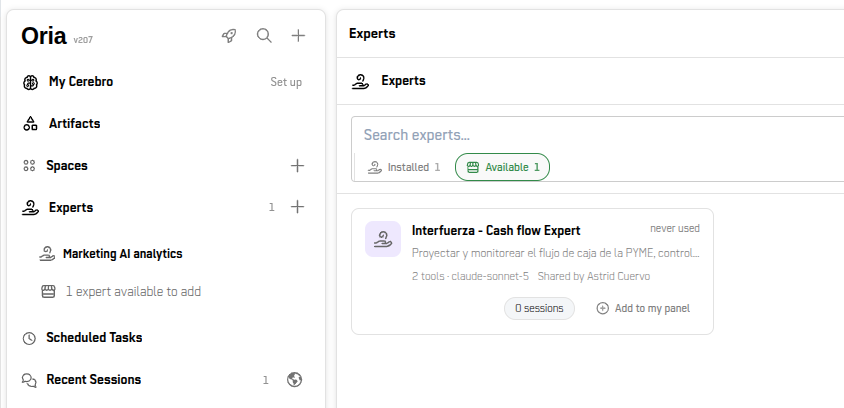
- Installed: Displays the list of Experts already added to the user's personal side panel.
- Available: Displays all shared Experts accessible to the user that have not yet been installed (showing the count, e.g., Available 1).
3. How to Install and Use a Shared Expert
To start using a shared Expert:
- Locate the Expert: Navigate to the Available tab in the Experts modal.
- Review Details: Each card displays:
- Expert Name & Description: Purpose and domain focus (e.g., Cash Flow Expert, Inventory Expert).
- Author: Shows who created and shared the Expert (e.g., _Shared by Luis).
- Resources Included: Summarizes attached tools, nodes, and preferred model (e.g., 2 tools · claude-sonnet-5).
- Install to Panel: Click the
+ Add to my panelbutton on the card. - Execution: Once installed, the Expert becomes visible under the Experts section in the user's left navigation sidebar, ready to launch new pre-configured sessions.
When to Use an Expert
| Situation | Solution |
|---|---|
| A recurring analysis using the exact same nodes and tools every time | Expert |
| A working convention or rule applicable across a team or project (units, formats) | Consider a Space |
| A quick, one-off query | Start a Simple Session |
Tip: Experts work best when the scope is genuinely stable. If you find yourself manually adding nodes to individual sessions within an expert frequently, update and widen the scope directly from the Expert editor.
Next Steps
- Adding Ontology Nodes — Configure your data sources
- Session Tools — Enable capabilities for your Expert
- Typical Workflow — See how Experts fit into your work
Updated 22 days ago