
Deploy SPA's in ARPIA AI APP Studio
Build and deploy custom web apps and dashboards inside ARPIA, powered by the built-in code editor and AI assistant.
Overview
Single-Page Apps (SPA) let you build and deploy custom web apps inside your ARPIA Workarea — dashboards, tools, and visualizations that run in the browser and can read your ARPIA data.
You can build a SPA two ways:
- Inside ARPIA with the built-in Edit Code editor and the ARPIA Codex AI assistant — no external tools needed. (Recommended.)
- On your own computer, then upload a ZIP. (For people with an existing IDE/toolchain.)
New here? Jump to the Quickstart below. Everything after it is reference material you can read later.
Quickstart: Build Your First SPA in 5 Steps
The fastest path to a working app — no setup, no data wiring, no ZIP files.
- Create the app. Go to AI Apps Studio → + CREATE APP. Name it, pick Private, click CREATE.
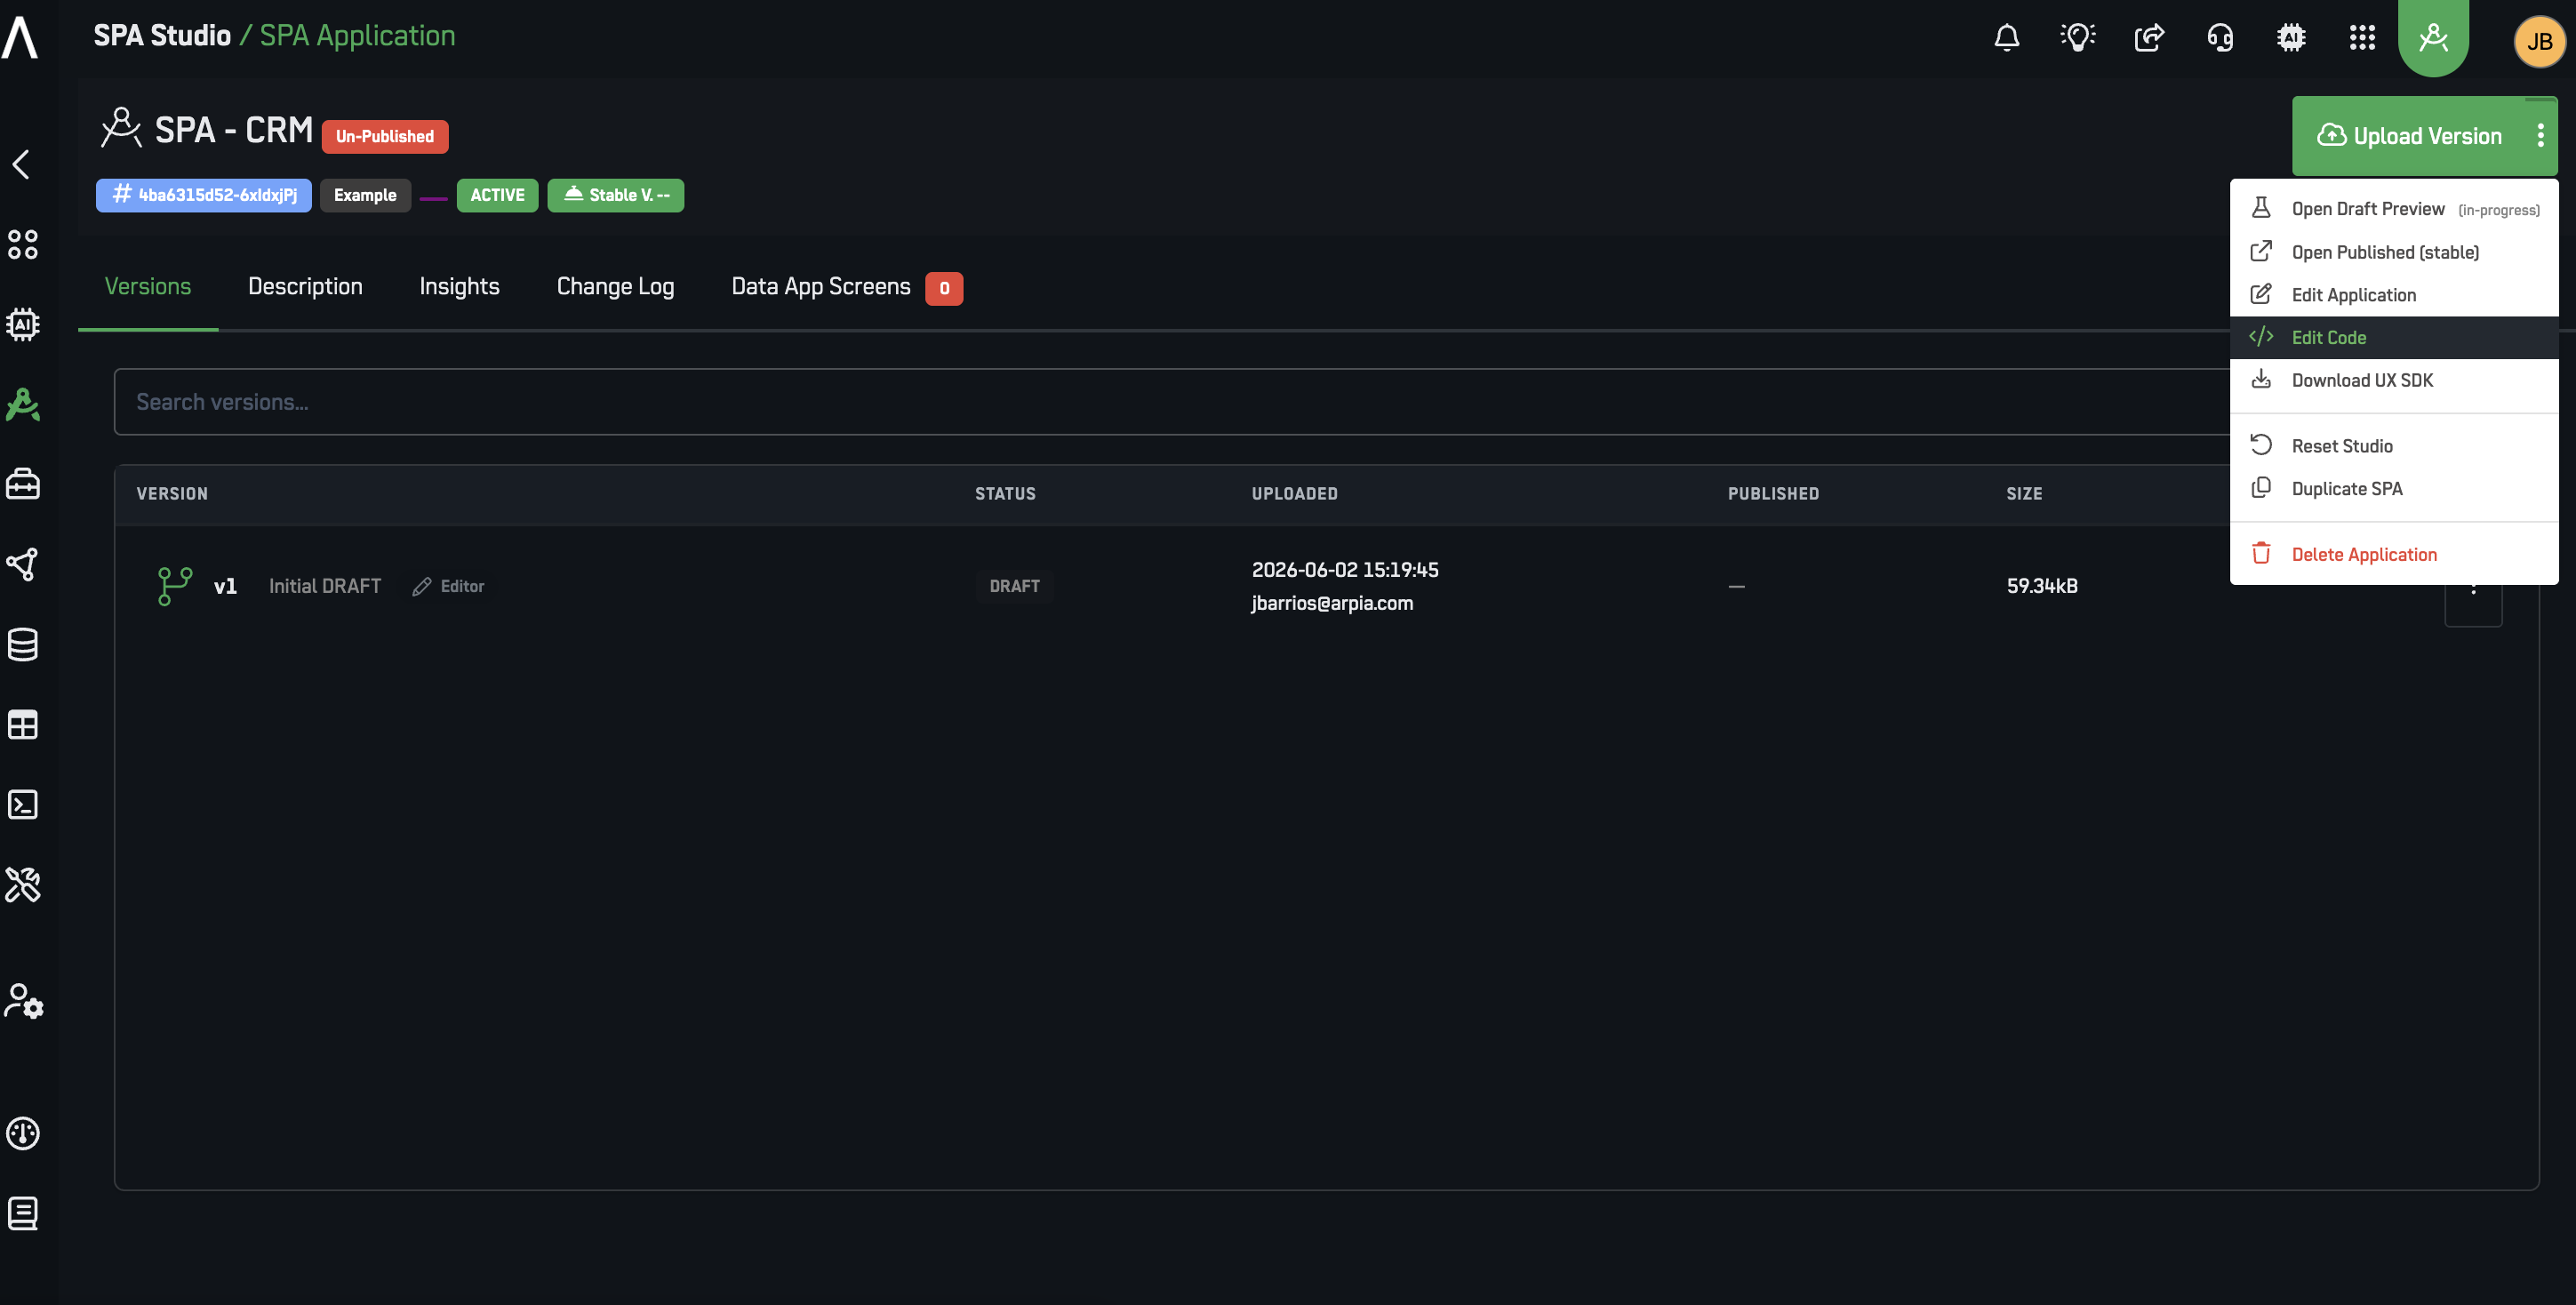
- Open the editor. On your app's page, click Edit Code. A starter
index.htmlis already built for you. - Ask Codex to build it. Open the ARPIA Codex panel, set mode to Build, and type what you want — e.g. "Make a page with a title and three cards."
- Preview it. Click Preview to see it live. Use Console if something looks off.
- Publish. Click Save a Version, then Actions → Publish Version. Your app is live.
✅ That's a working SPA. To connect data, add AI tools, or develop locally, read on.
Key Terms (read once, then move on)
| Term | What it means |
|---|---|
| Node | A table in ARPIA's knowledge base. Where your data lives. |
| Action | A tool that saves, updates, or deletes data on a node. |
| Knowledge Ontology Relationship | The screen where you pick which nodes your app can read and which Actions it can run. |
| ARPIA Codex | The built-in AI assistant inside Edit Code that writes/edits your app code. |
| Workarea | Your workspace in ARPIA. "Private" apps are limited to its members. |
How to Create a Single-Page App
Prerequisites
Minimum to start (Quickstart / Path A):
- An ARPIA account with access to a Workarea
Also needed for data-connected apps:
- MCP configured in ARPIA with the nodes/workspaces you'll use — required only for private SPAs that expose MCP Collections or a Workshop API
- (Path B only) An external IDE such as Cursor or VS Code
Step 1: Create the SPA in ARPIA
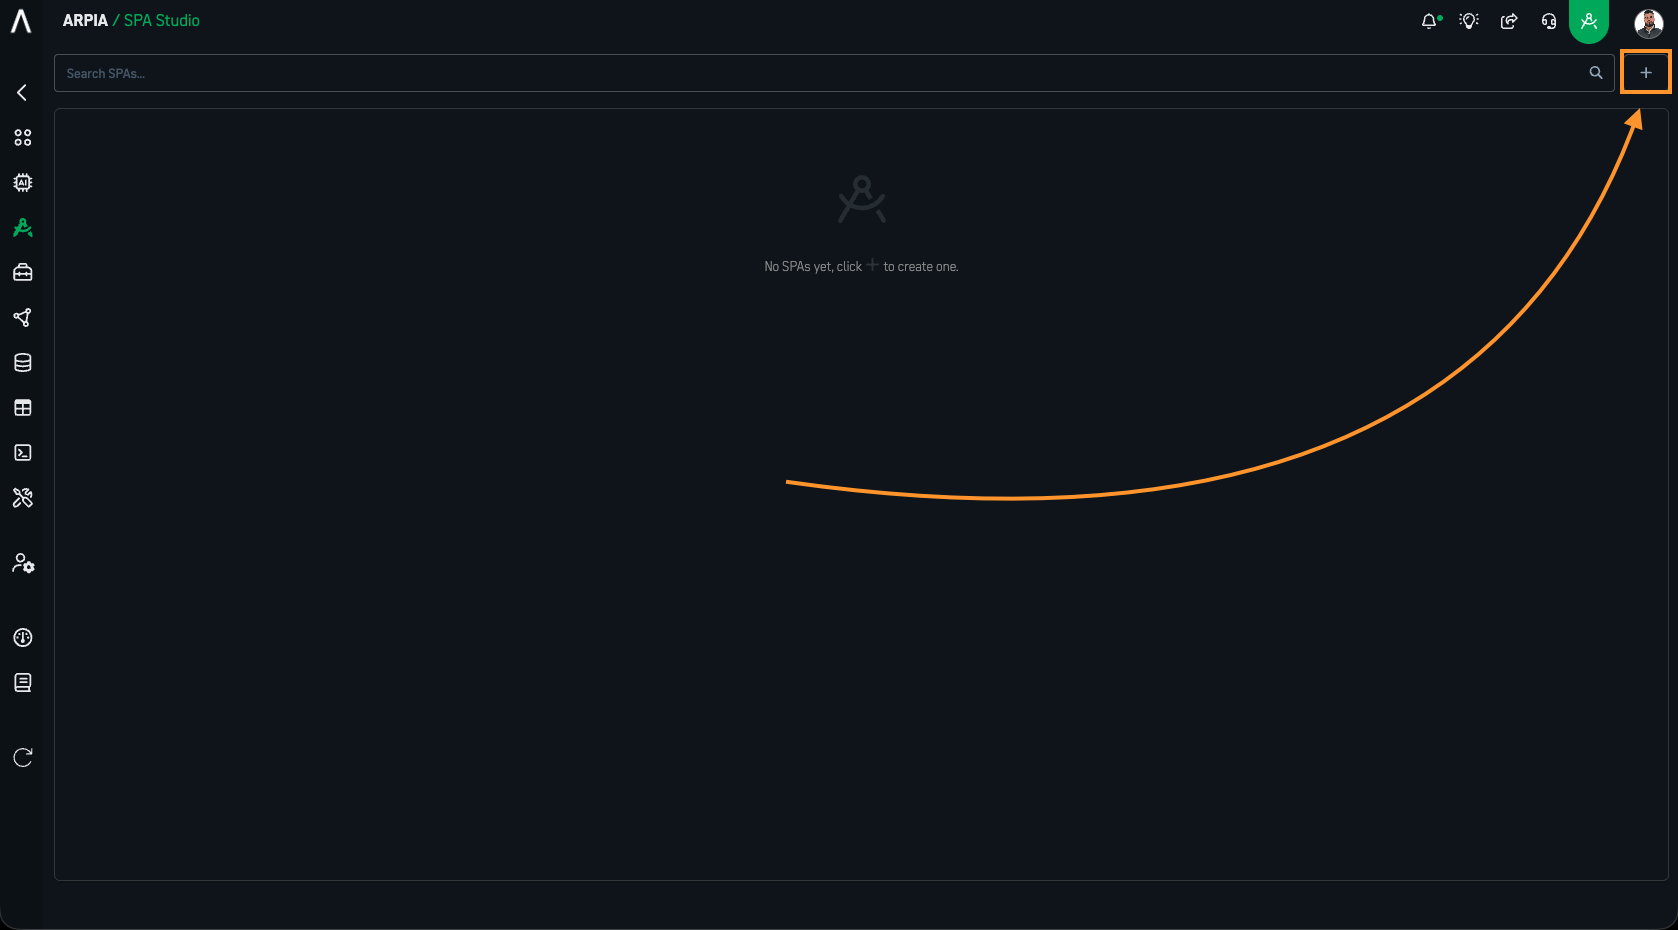
- Navigate to AI Apps Studio in your Workarea
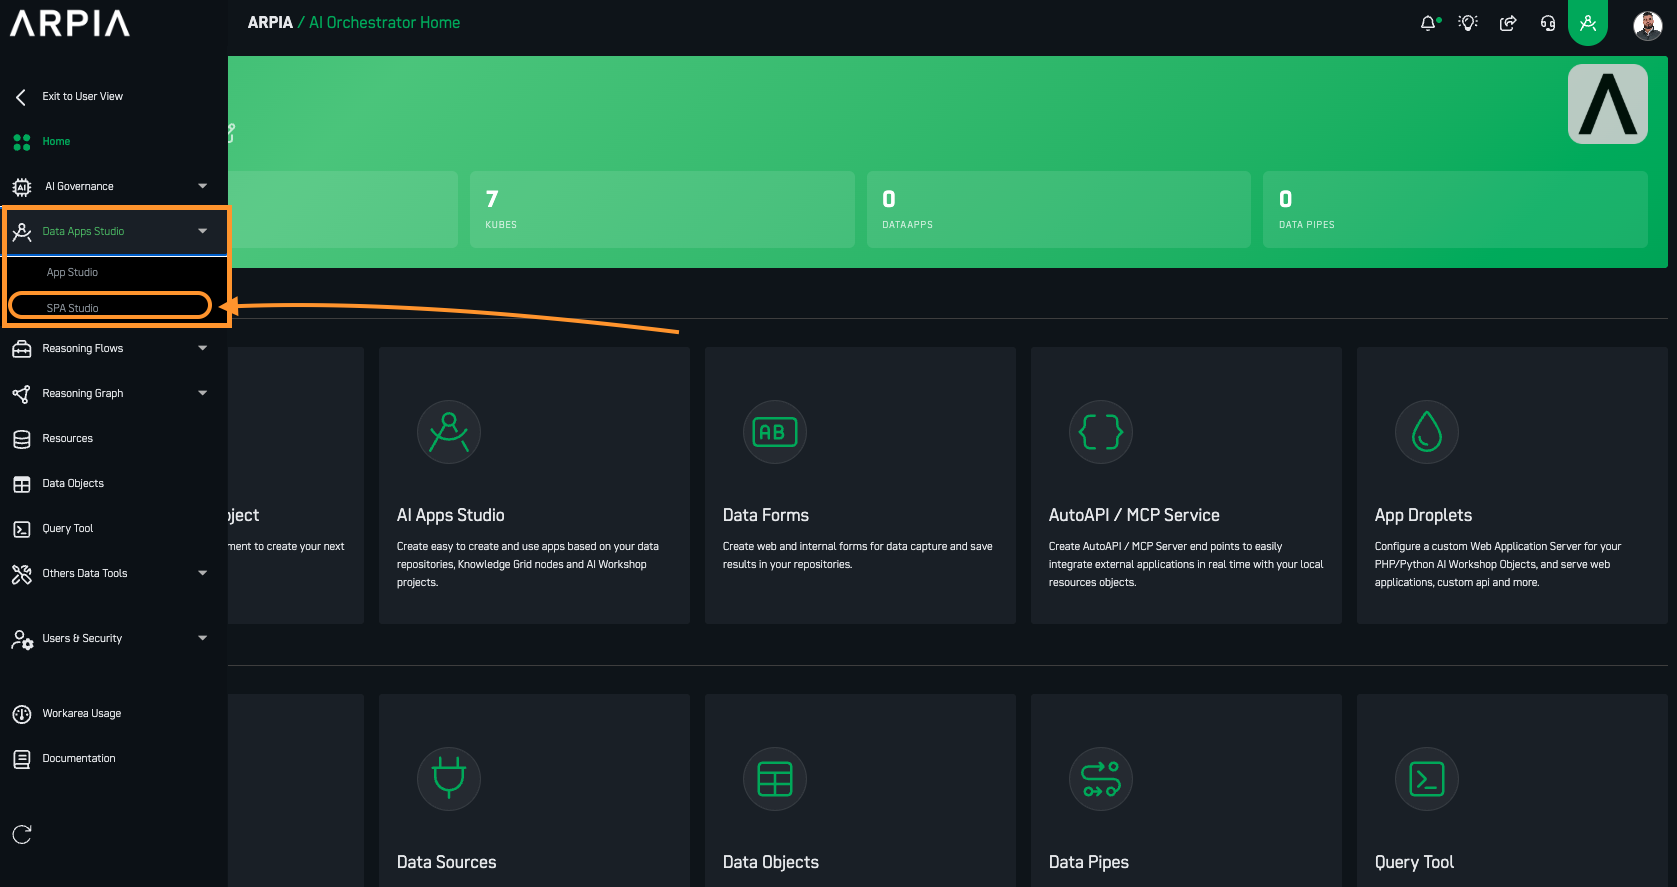
- Click "+ CREATE APP"
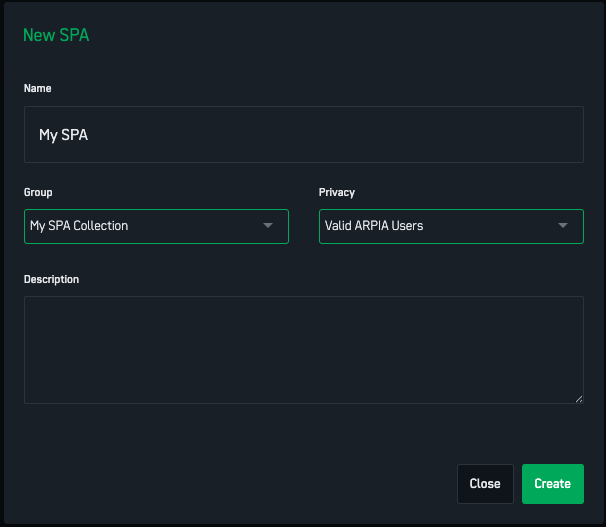
- Enter a name for your application
- (Optional) Add it to a group to stay organized — select an existing group, or type a new name and press Add
- In Privacy, choose Public or Private.
Not sure? Pick Private if you'll use AI tools or Workshop APIs, or want it limited to your Workarea. Pick Public for a read-only widget any ARPIA user can open.
- (Optional) Add a Description of what your SPA does
- Click "CREATE"
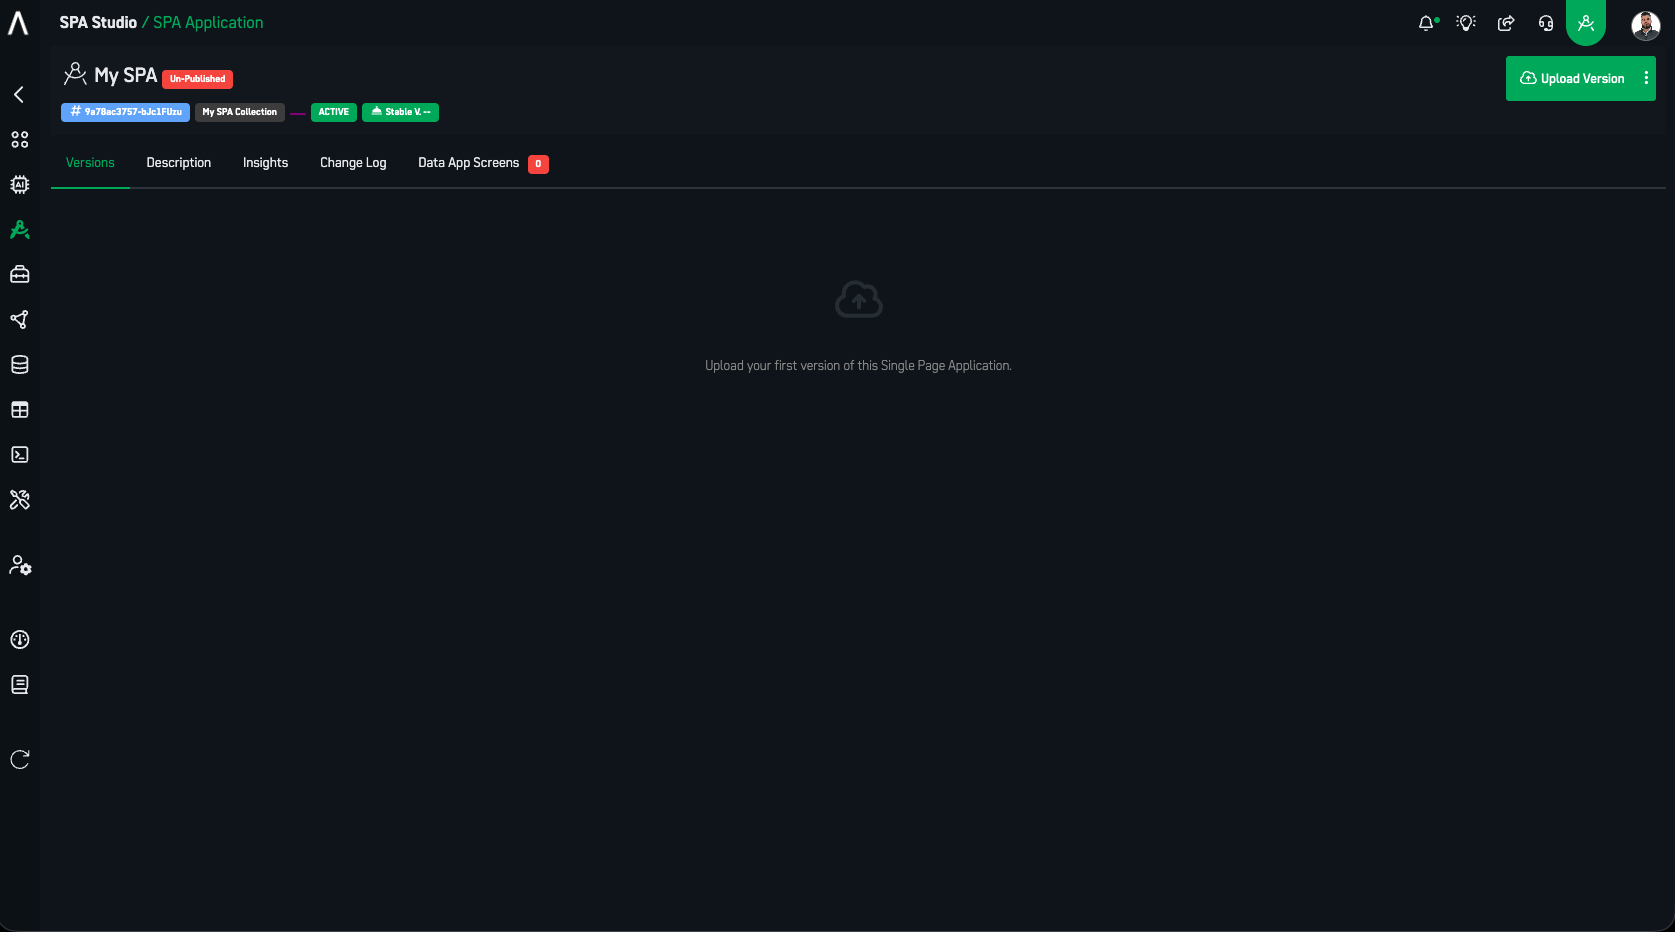
You'll land on your SPA's main configuration page.
Step 2: Choose Your Path
New here? Use Path A. It's the recommended path and needs no external tools. Skip Path B until you specifically need an offline/IDE workflow.
- Path A — In-Platform (Edit Code): Build inside ARPIA with Edit Code, Codex, live preview, and native data wiring. Recommended for most users.
- Path B — External + ZIP Upload: Develop locally in your own IDE, then upload a ZIP. Advanced / optional.
Both paths share the same publishing and access steps (Step 3 and Step 4).
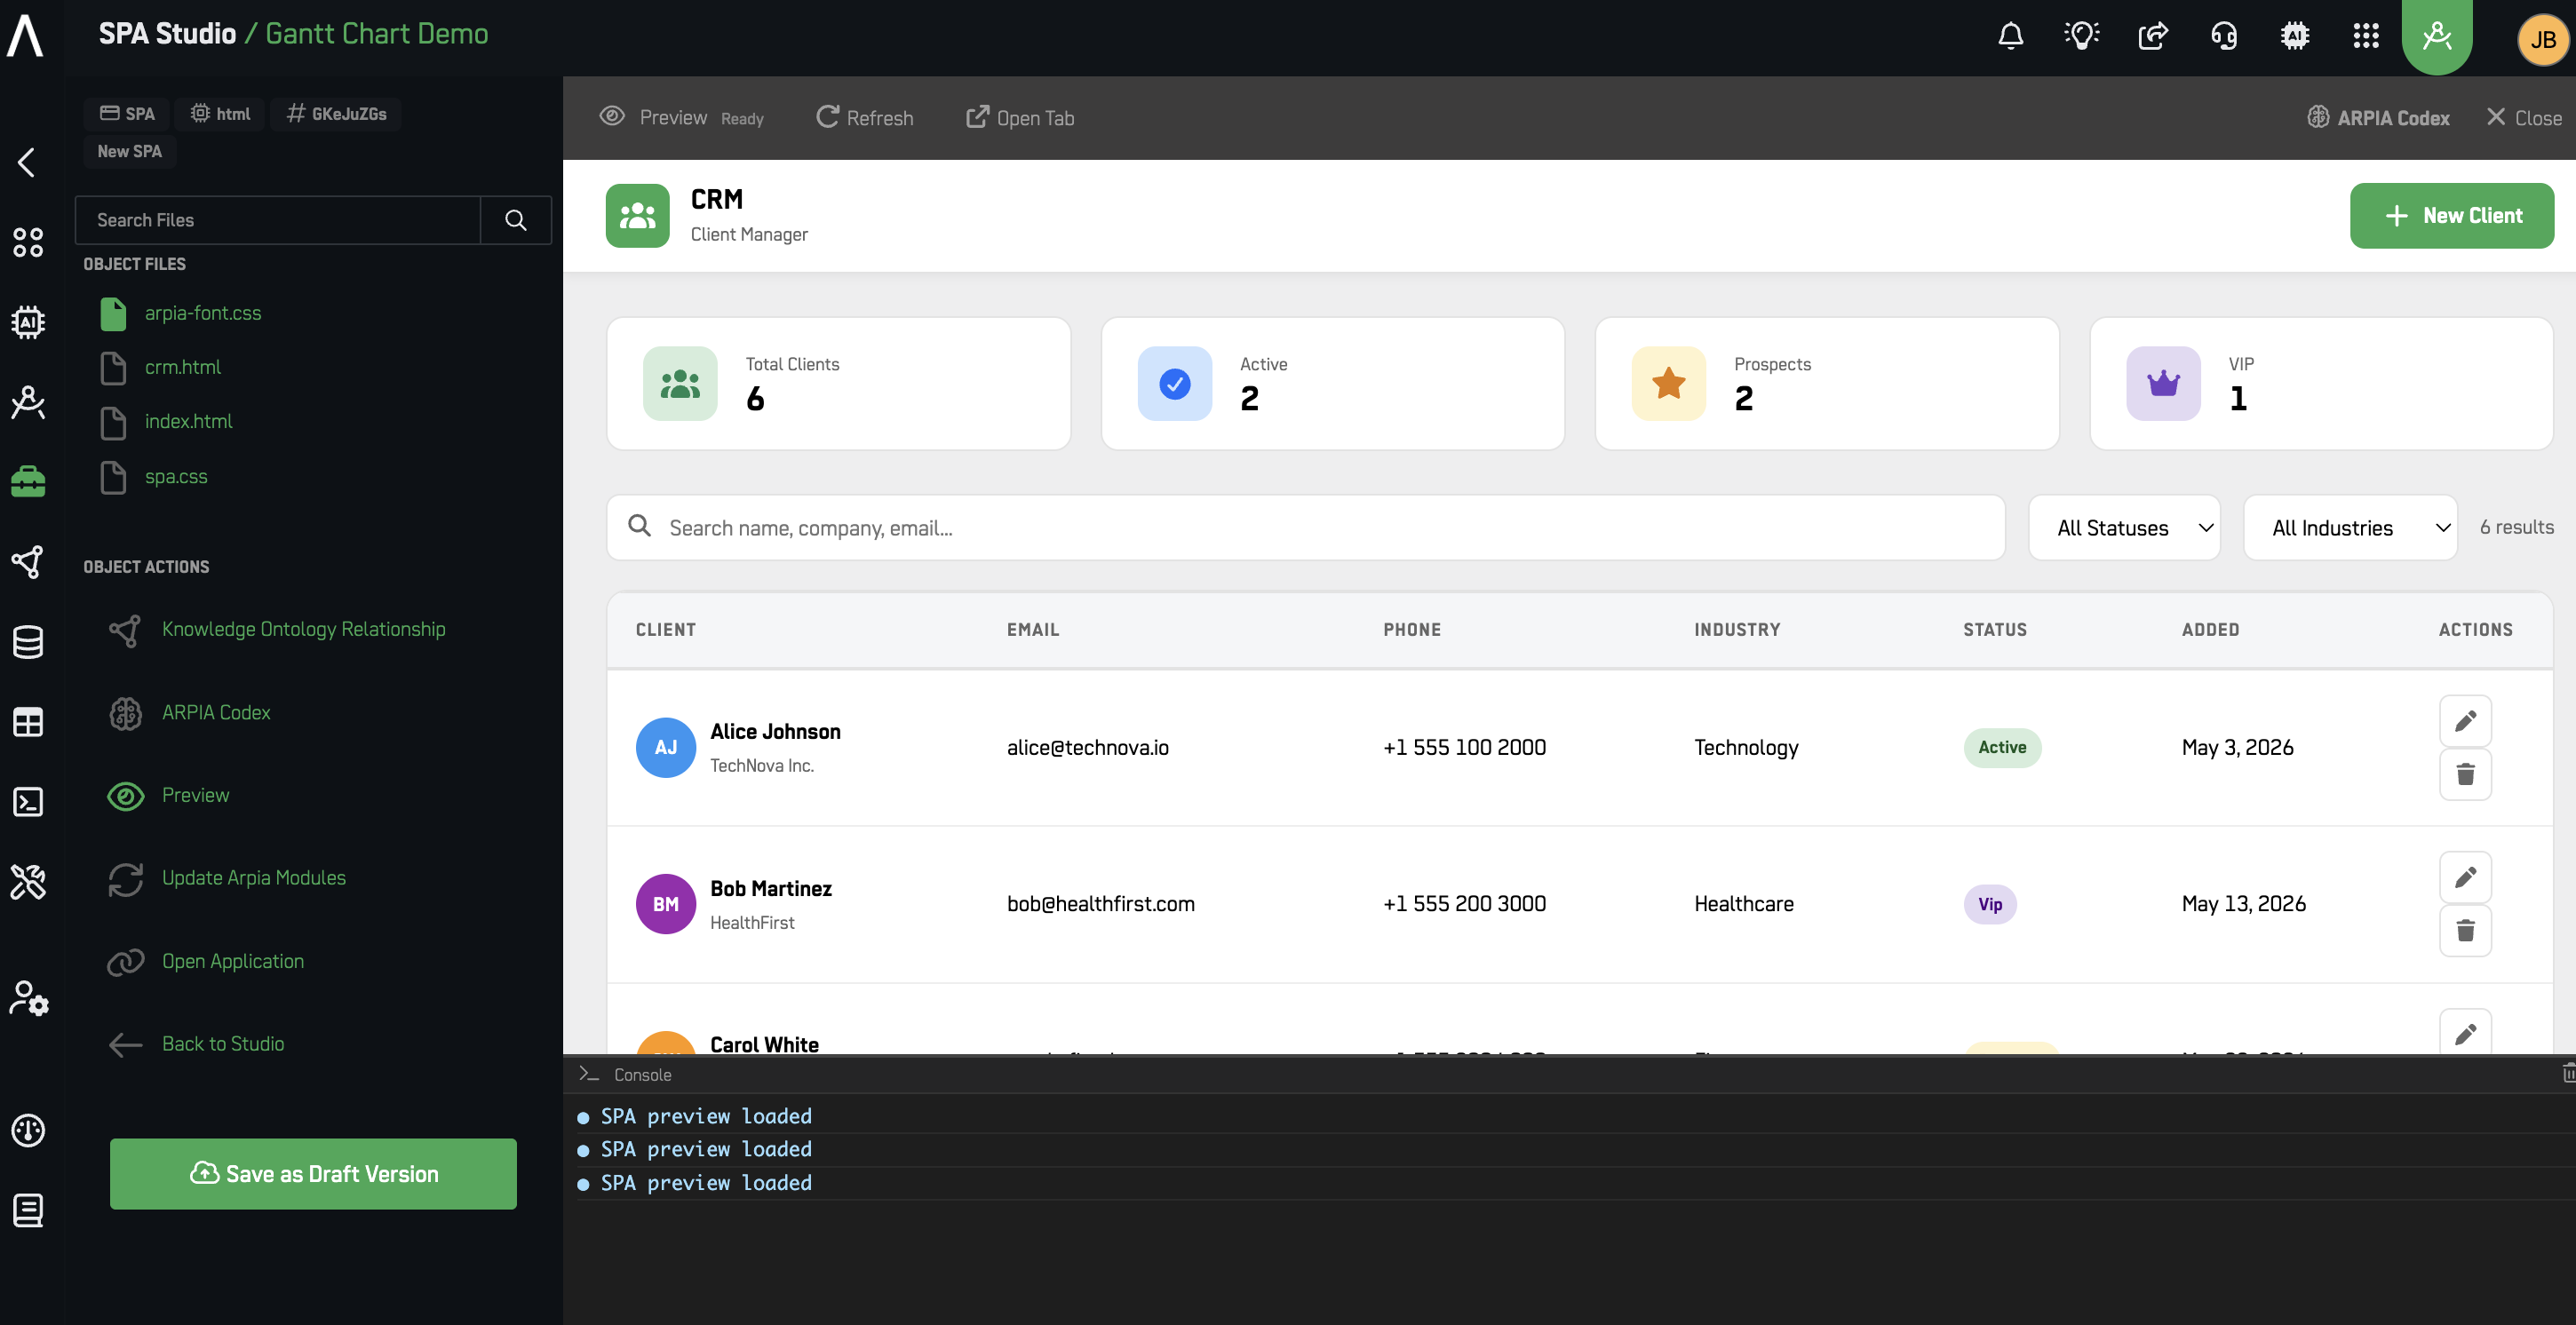
Path A — In-Platform Development with Edit Code
The fastest way to build. Everything happens inside ARPIA.
A1. Open the Editor
From your SPA configuration page, click Edit Code.
A new SPA opens pre-scaffolded with:
index.html— your entry point (keep it at the root)arpia-font.css— ARPIA fontsspa.css— ARPIA UX SDK styling
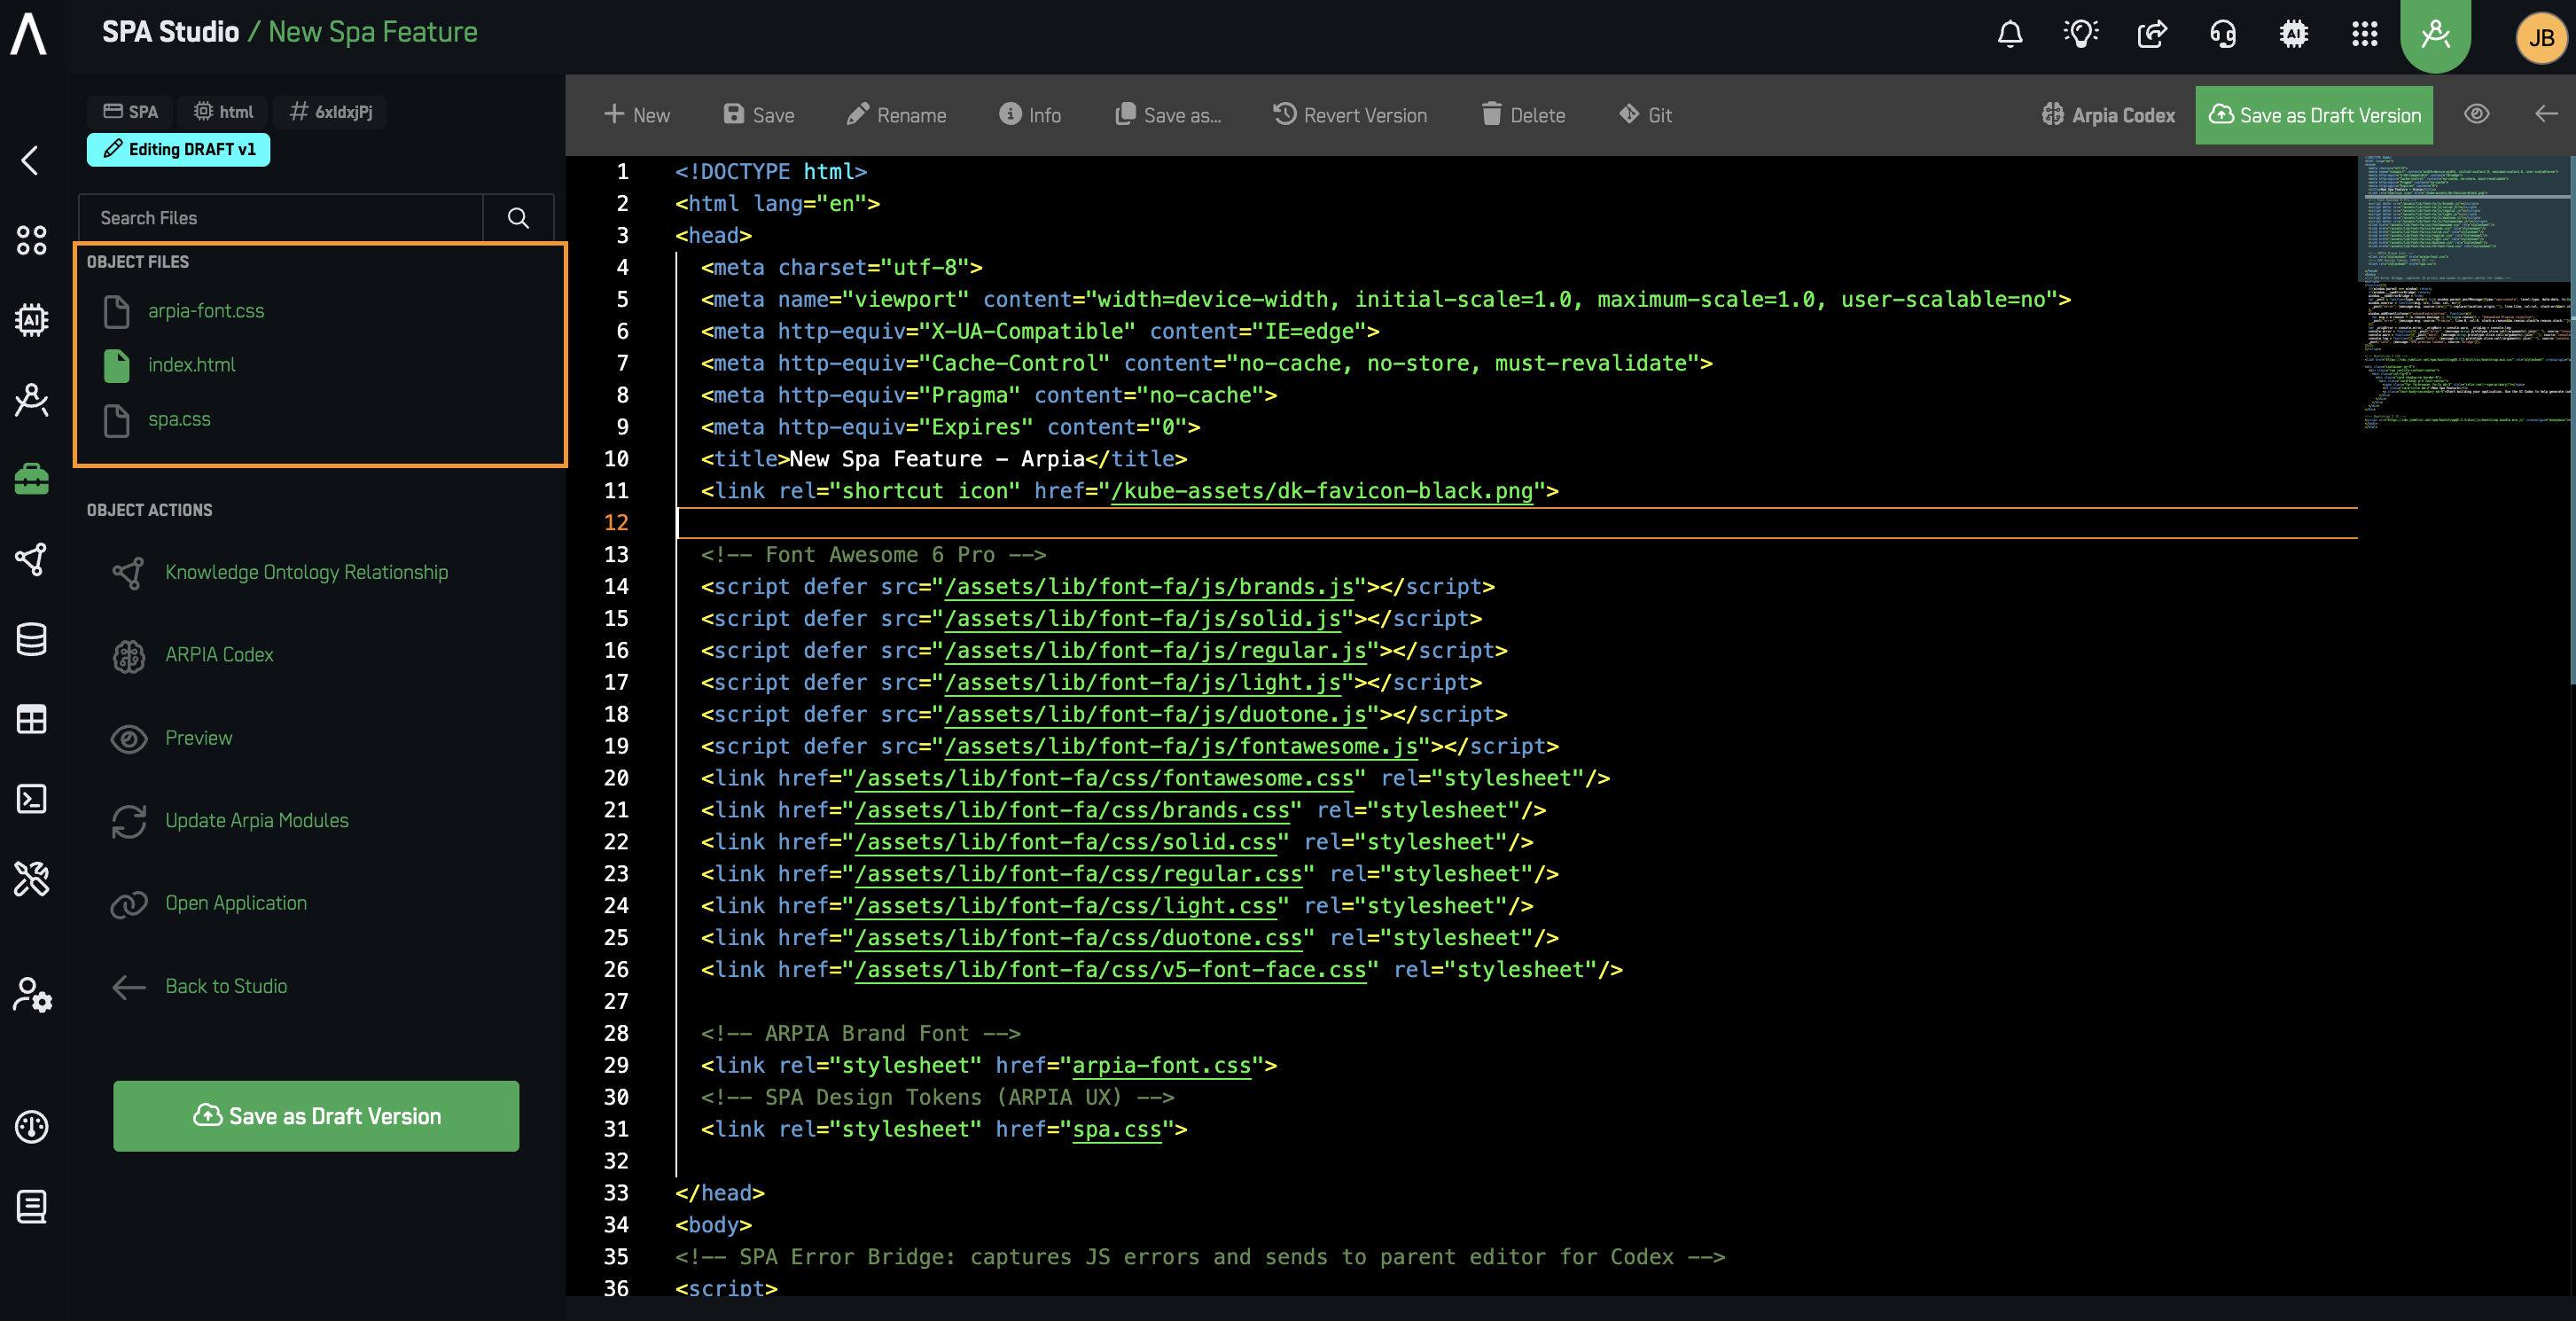
A2. Work With Your Files
Create and organize .html, .css, and .js files, edit them side by side, and keep index.html at the root.
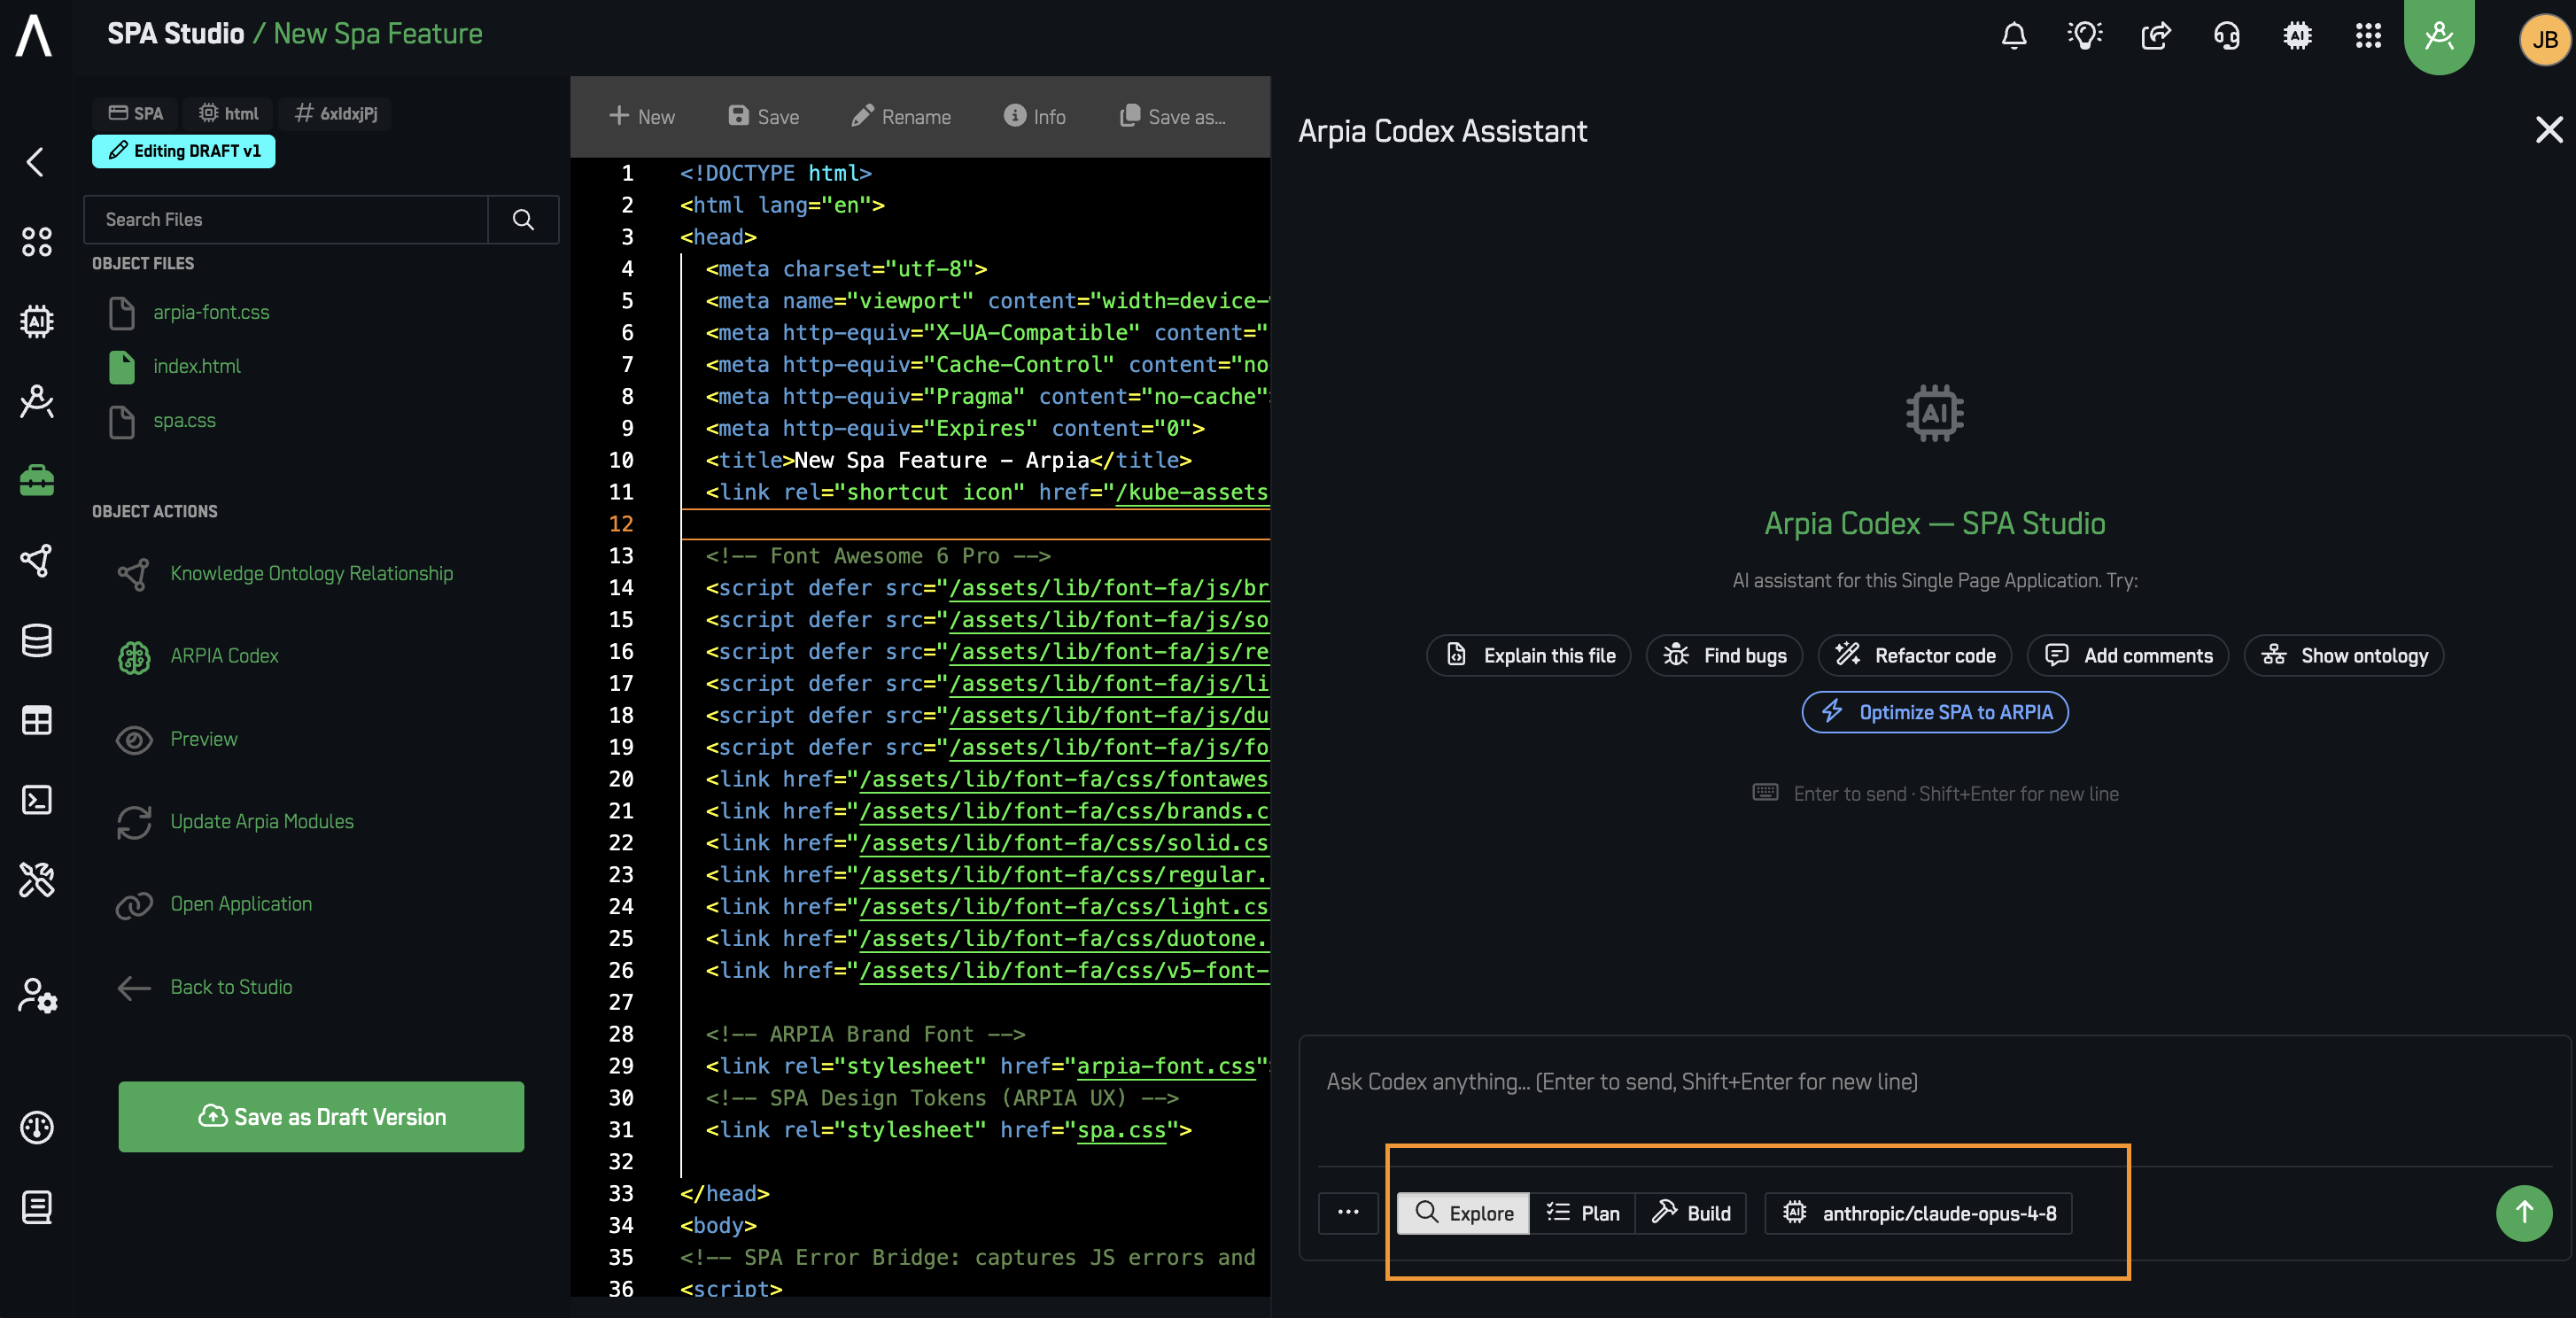
A3. Build With ARPIA Codex
- Open the Codex panel
- Select the model to use
- Pick a mode:
- Explore — reads and explains your code, changes nothing
- Planning — drafts a plan and waits for your OK
- Build — applies changes to your files
- Review, refine your prompt, re-run
Codex reference: for the standalone hub entry on the SPA Studio assistant, see Arpia Codex in SPA Studio.
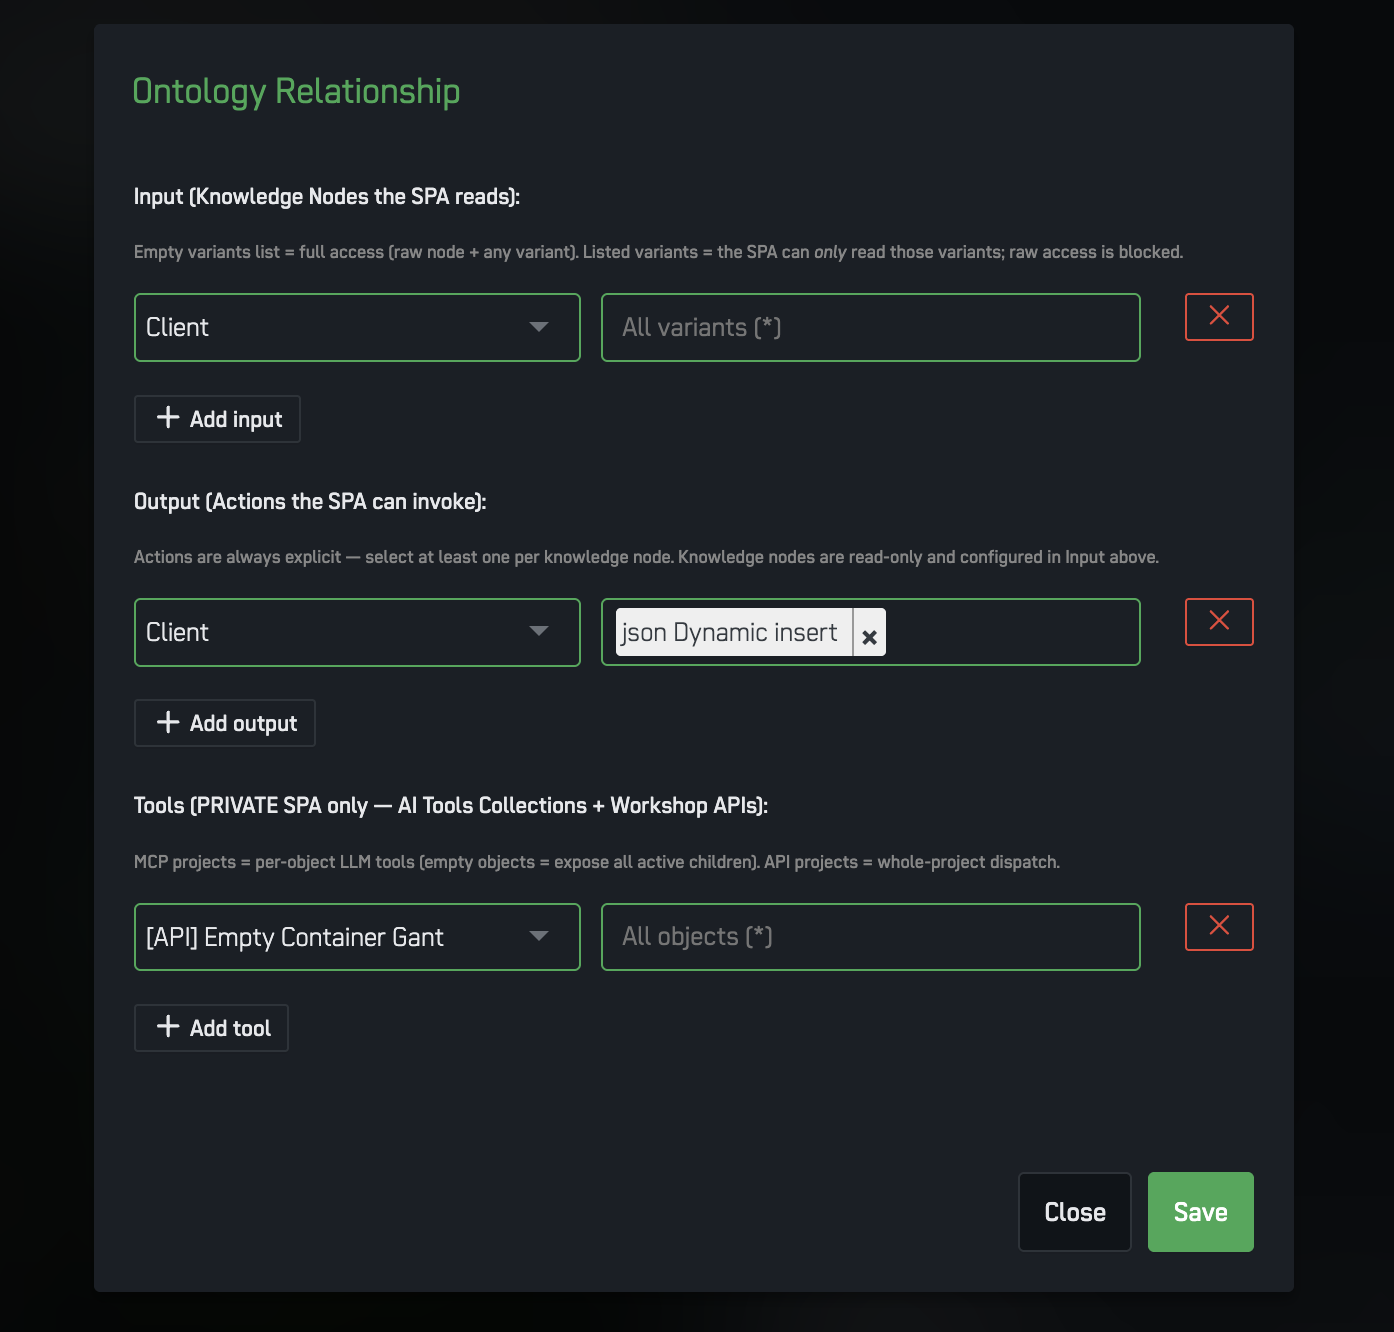
A4. Connect Your Data — Knowledge Ontology Relationship
Advanced — skip this on your first app. Only needed when your SPA reads or writes ARPIA data.
This is where you let your app (and Codex) use your data.
- Open the Knowledge Ontology Relationship button
- Choose which nodes the SPA can read
- Attach the Actions the SPA is allowed to run
- For private SPAs, you can also attach:
- MCP Collections — groups of endpoints with context for AI models
- Workshop API — a POST endpoint that runs a workflow of code + native ARPIA objects
Once set, Codex automatically knows your node structures and API schemas.
A5. Preview and Debug
- Preview — see and use your app live
- Console — read logs and debug JavaScript, in-platform
A6. Keep ARPIA Modules Up to Date
Advanced. When a new SDK ships, click Update ARPIA Modules to regenerate
spa.css,arpia-sdk.js, and (public apps only)ARPIA_ONTOLOGY.MD.
A7. Save a Version
Click Save a Version. Publishing and rollback work as in Step 3 and Step 4.
Path B — External Development & ZIP Upload
Advanced / optional. Use this only if you prefer your own IDE. Most people should use Path A.
B1: Configure MCP in Your IDE (Cursor example)
- Cursor settings → Tools & MCP → New MCP Server
- In
mcp.json, add:
{
  "mcpServers": {
    "MCP Arpia": {
      "url": "https://cloud.arpia.ai/mcp/?token=INSERT_TOKEN_HERE"
    }
  }
}
- Replace
INSERT_TOKEN_HEREwith your ARPIA MCP token, then save.
B2: Download the ARPIA UX SDK
On your SPA page, open the dropdown next to "UPLOAD VERSION" → "Download UX SDK".
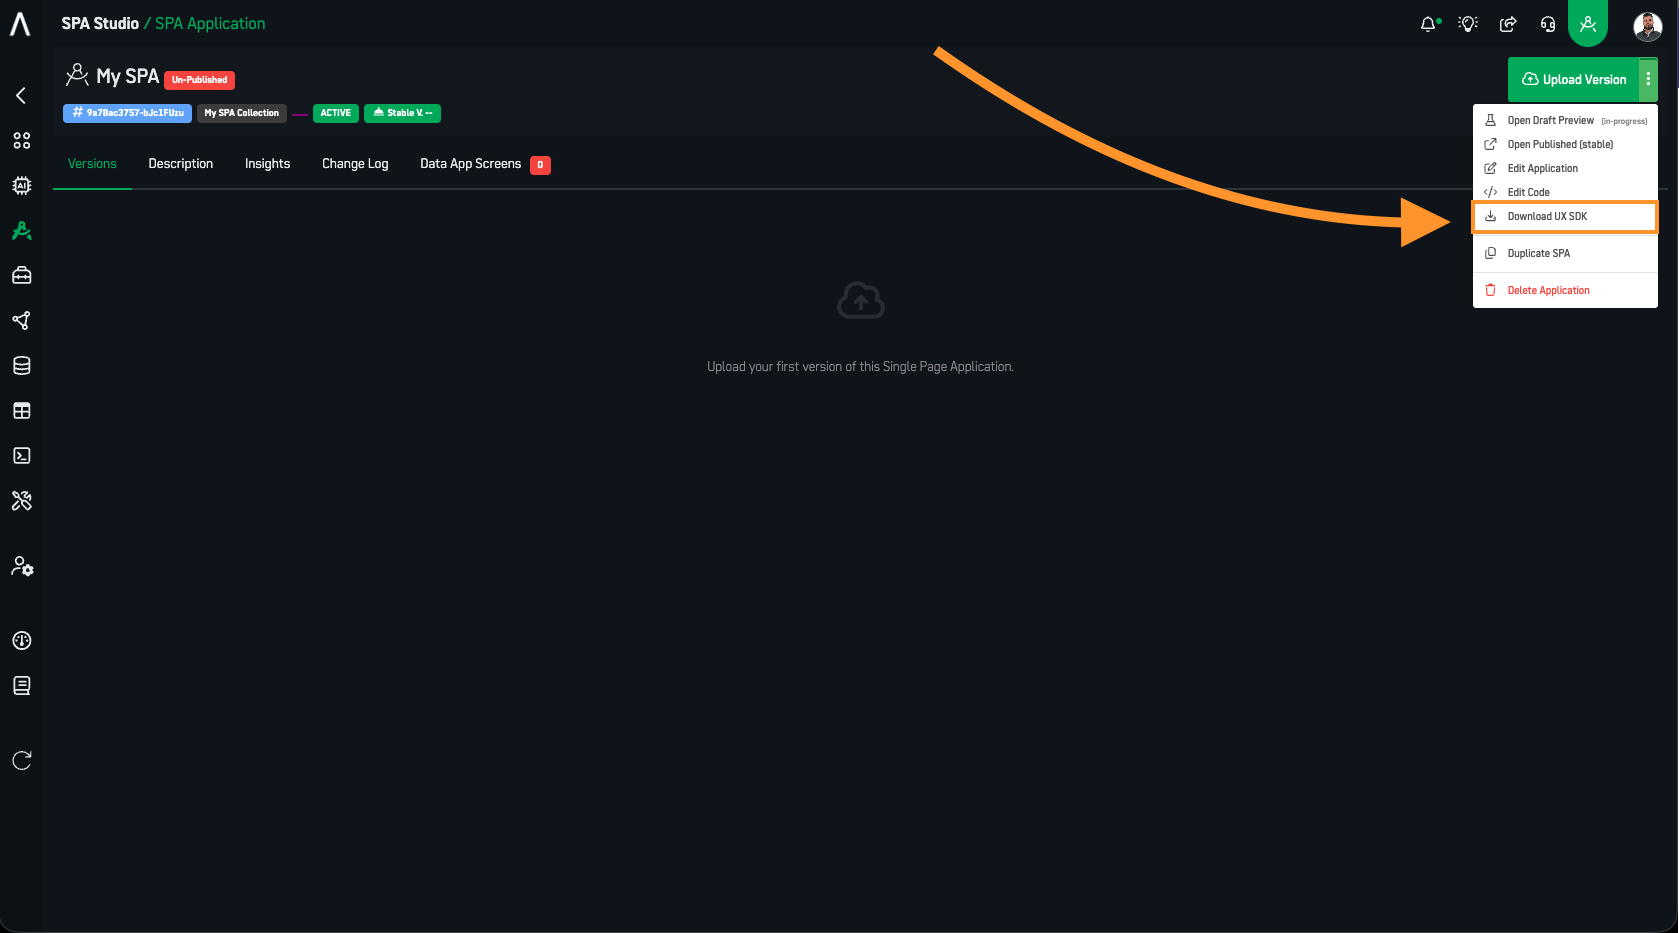
The SDK ZIP contains template.html, instructions.md, README.md, an assets/ folder, and a css/ framework.
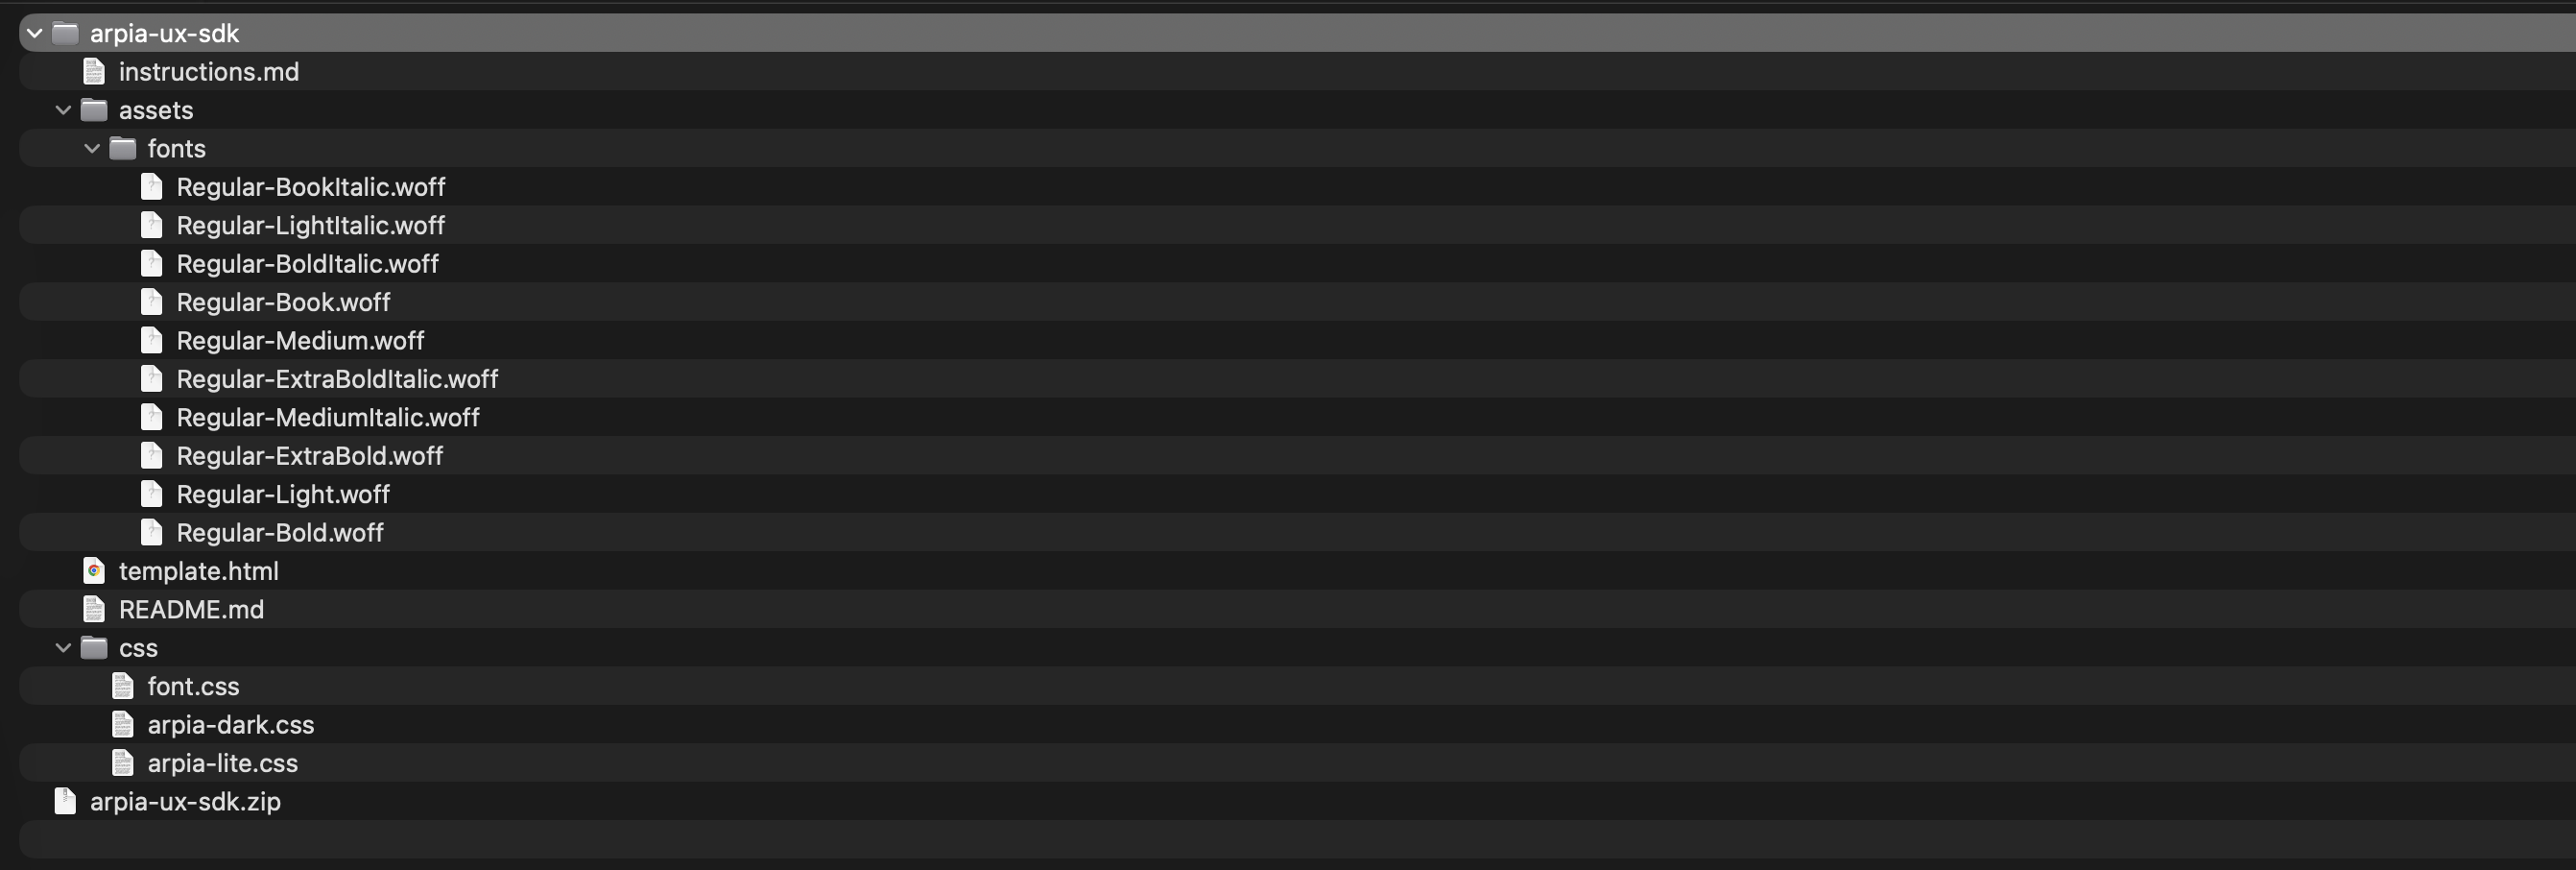
B3: Set Up Your Project
- Create a project folder and open it in your IDE
- Extract the SDK ZIP into it:
my-spa-project/
├── arpia-ux-sdk/
│   ├── assets/
│   ├── css/
│   ├── instructions.md
│   ├── README.md
│   └── template.html
├── (your app files go here)
Use the SDK's
template.htmlas the basis for yourindex.htmlat the project root, and link the SDK's CSS/JS with relative paths.index.htmlmust sit at the root of the ZIP (see B5), not insidearpia-ux-sdk/.
Before coding, read instructions.md (design rules) and README.md (implementation) and check template.html (required DOM).
B4: Develop Your App
If you use an AI IDE, this prompt keeps it on the rails:
# SPA Development Prompt – ARPIA / Cursor
## Objective
Act as a Frontend Developer using the Arpia UX SDK to develop a **Single Page Application (SPA)** using the **Cursor platform**. Reference `@instructions.md` for class rules and `@template.html` for the DOM structure.
Static assets only (HTML, CSS, JS, images). The server-side request will be managed by the ARPIA platform, so there's no need to create server-side functions or files.
## Context & Resources
- The project includes an **ARPIA-provided UX SDK**.
- Inside the project folder you will find:
  - An **HTML template** that must be used as the base of the application.
  - An `instructions.md` file containing **design guidelines, UX patterns, and conventions**.
⚠️ **You must read and follow both `instructions.md` and `README.md` before making any architectural or implementation decisions.**
## Application Domain
- The application is built on **MCP Arpia**.
- Core entities:
  - **[List your entities, e.g., Leads, Opportunities, Customers]**
- The application must:
  - Display and manage information related to [your entities]
  - Provide tools to **create, update, and manage** [your entities] using MCP Arpia capabilities.
## Development Guidelines
- Follow the **file structure, UX patterns, and conventions** defined by the ARPIA UX SDK.
- Reuse existing templates and components whenever possible.
- Do not introduce new architectural patterns unless clearly justified.
- Keep the codebase **modular, readable, and maintainable**.
- Follow SPA best practices appropriate for the Cursor platform.
- **For the REST API calls, use static Endpoint calls based on these endpoints. Put the `collection_id` in the URL path, and use your ARPIA Personal Token as the Bearer token:**
"resources": "https://cloud.arpia.ai/mcp/api/v1/collections/{collection_id}/resources",
"tools": "https://cloud.arpia.ai/mcp/api/v1/collections/{collection_id}/tools"
## Assumptions & Clarifications
- **The index.html should be in the root of the folder.**
- **The css file should use relative paths.**
- **Do not assume missing requirements or behaviors.**
- If any part of the scope, data model, APIs, or UX flows is unclear, **ask for clarification before proceeding**.
Best practices: keep it lightweight, use relative paths, handle errors, and test in Chrome/Firefox/Safari/Edge.
B5: Package It
ZIP all your files with index.html at the root.
- ✅
index.htmlat root level - ✅ Static assets only (no server-side code)
- ✅ Under 25 MB compressed
- ✅
.zipformat only
B6: Upload It
- On your SPA page, click "UPLOAD VERSION"
- Drop the ZIP, add a Version Name and Changelog
- Click "PROCESS VERSION" and wait for extraction
Step 3: Publish & Deploy (both paths)
For any version, use Actions:
- Publish Version — make it the live version
- Open — preview in browser
- Download — get a ZIP backup
- Delete — remove it (can't delete the live version)
To go live: find your version → Actions → Publish Version → confirm.
Step 4: Access Your App
- Direct link:
https://cloud.arpia.ai/spax/[your-app-id]/[app_version](on the app details page) - Workarea Apps menu: appears in your applications list
- Share / bookmark the link with authorized users
Managing Your Apps
Update a Version
Path A: Edit Code → make changes → Preview → (if needed) Update ARPIA Modules → Save a Version → Publish.
Path B: update local files → new ZIP → UPLOAD VERSION → name + changelog → PROCESS VERSION → publish when ready.
Roll Back
Version history → pick the version → Actions → Publish Version → confirm. It goes live immediately.
Delete a Version
Version management → select → Actions → Delete → confirm. (Can't delete the live version.)
Change Access
App settings → choose Public (any ARPIA user) or Private (Workarea members) → save.
Note: MCP Collections and Workshop API attach to private SPAs only.
ARPIA_ONTOLOGY.MDis generated for public apps only.
Monitor Usage
See total opens, access timeline, active-version usage, and engagement patterns.
Integration with ARPIA
Advanced. Read this when you're ready to connect your app to live data.
The Knowledge Model
Your data lives in nodes (tables). You change it through Actions (save/update/delete tools). The Knowledge Ontology Relationship controls which nodes your app can read and which Actions it can run. Private SPAs can also expose MCP Collections and a Workshop API.
Ways to Access Data
- ARPIA JavaScript SDK (
arpia-sdk.js) — regenerated via Update ARPIA Modules - MCP API calls — authenticated requests to MCP endpoints
- Knowledge Node queries
- Actions / Workshop API
MCP API Example
Put the collection_id in the URL path and pass your ARPIA Personal Token as the Bearer token:
const ARPIA_API = {
  resources: "https://cloud.arpia.ai/mcp/api/v1/collections/{collection_id}/resources",
  tools: "https://cloud.arpia.ai/mcp/api/v1/collections/{collection_id}/tools"
};

async function fetchResources(collectionId, bearerToken) {
  try {
    const response = await fetch(
      ARPIA_API.resources.replace('{collection_id}', collectionId),
      {
        headers: {
          'Authorization': `Bearer ${bearerToken}`,
          'Content-Type': 'application/json'
        }
      }
    );
    return await response.json();
  } catch (error) {
    console.error('Error fetching resources:', error);
    throw error;
  }
}
Generate a Personal Token under "My Profile" in the ARPIA Platform. Same-domain calls inherit your ARPIA session.
Supported & Not Supported
Supported: HTML5, CSS3 (Tailwind, Bootstrap), JavaScript (vanilla + React/Vue/Angular), client-side libraries, static assets, JSON files.
Note: Framework apps (React/Vue/Angular) must be compiled to static files before upload — ARPIA serves static assets only and runs no build step.
Not supported: server-side code (Python, PHP, Node.js, Ruby), backend APIs/databases, server-side rendering or auth, file-system operations, non-.zip archives.
Limits
- ZIP ≤ 25 MB compressed
index.htmlmust be at the root- No server-side languages
- MCP Collections / Workshop API → private SPAs only
ARPIA_ONTOLOGY.MD→ public apps only
Troubleshooting
Upload fails — ZIP under 25 MB, index.html at root, .zip only, no server-side files.
App won't load — check the Console, use relative paths, include all dependencies, test in Preview first.
API calls fail — verify the collection_id (URL path) and Personal Token (Bearer), check endpoints, confirm nodes/Actions are attached in the Knowledge Ontology Relationship.
Codex can't see your data/tools — confirm the ontology defines the nodes/Actions; for MCP Collections/Workshop API the SPA must be private; re-run Update ARPIA Modules; use Build mode to apply changes.
Styling looks off — check relative CSS paths, confirm spa.css and arpia-font.css are linked, run Update ARPIA Modules, test other browsers.
Updated about 1 month ago