
How to use "Extract" Objects?
Overview
Extract objects allow you to bring data into your repository from external sources registered as data sources in ARPIA. This guide covers step-by-step instructions for each Extract & Load tool.
Note: Before using Extract objects, ensure you have a registered data source and repository access configured. See Managing Data Sources for setup instructions.
AP DataPipe Engine - MySQL
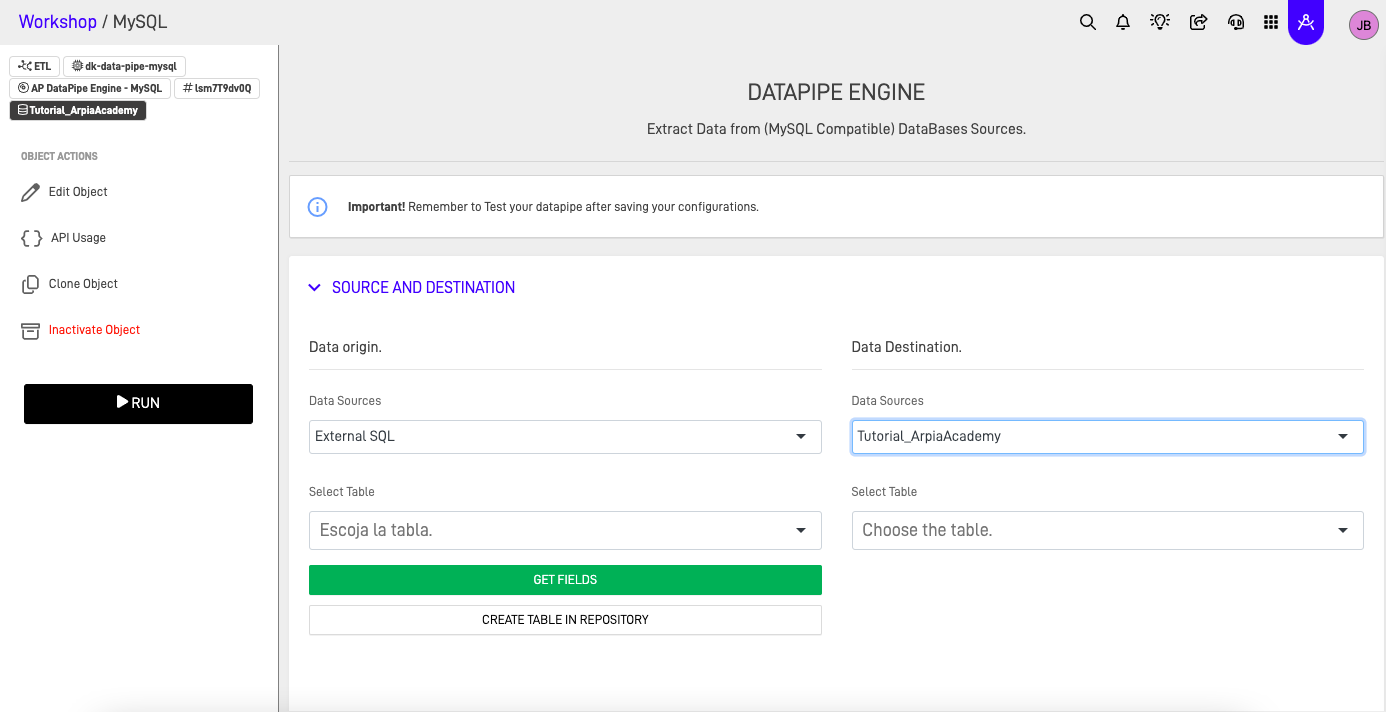
The AP DataPipe Engine - MySQL provides a GUI-based interface for extracting data from MySQL-compatible databases (including MariaDB, Amazon Aurora MySQL, and other compatible systems).
Step 1: Select Source and Destination Tables
- Open your Reasoning Flows project.
- Create a new object and select AP DataPipe Engine - MySQL.
- In the Source section, select the registered data source and the table you want to extract from.
- In the Destination section, select the repository table where data will be loaded.
Step 2: Create Destination Table (If Needed)
If no destination table exists, you can create one directly:
- Click the Create Table in Repository button.
- Review the SQL statement that will create the table in your destination repository.
- Important: You must define a primary key to create the table.
- Modify column names, types, or constraints as needed.
- Click Create Table.
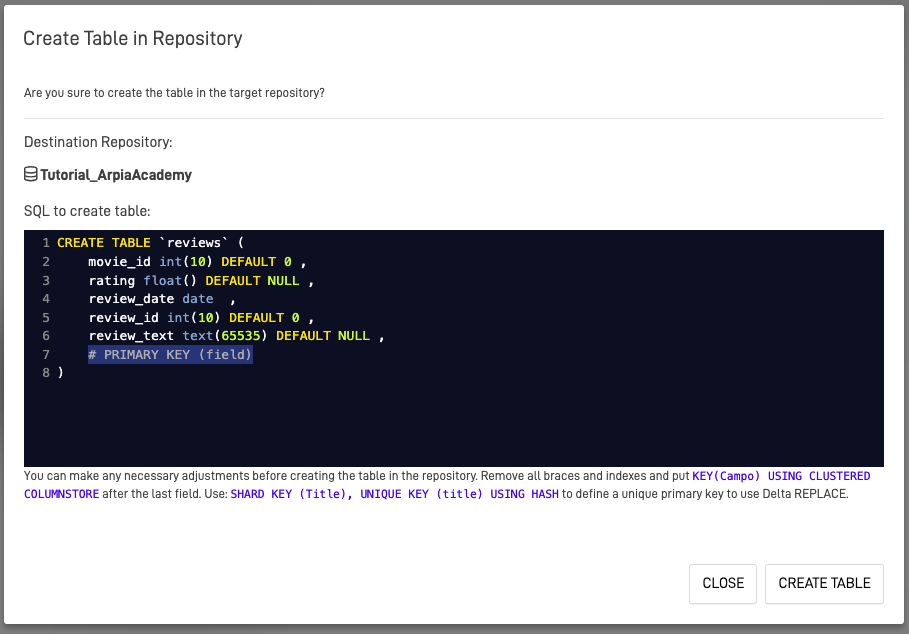
The new table will appear in your destination repository options.
Step 3: Configure Field Mapping
Once source and destination tables are selected:
- Click Get Fields to automatically map source fields to destination fields.
- Review the mapping and adjust as needed:
- Remove fields you don't want to extract
- Rename destination fields if required
- Verify data type compatibility

Step 4: Configure DataPipe Settings
The DataPipe Settings control how the extraction behaves:
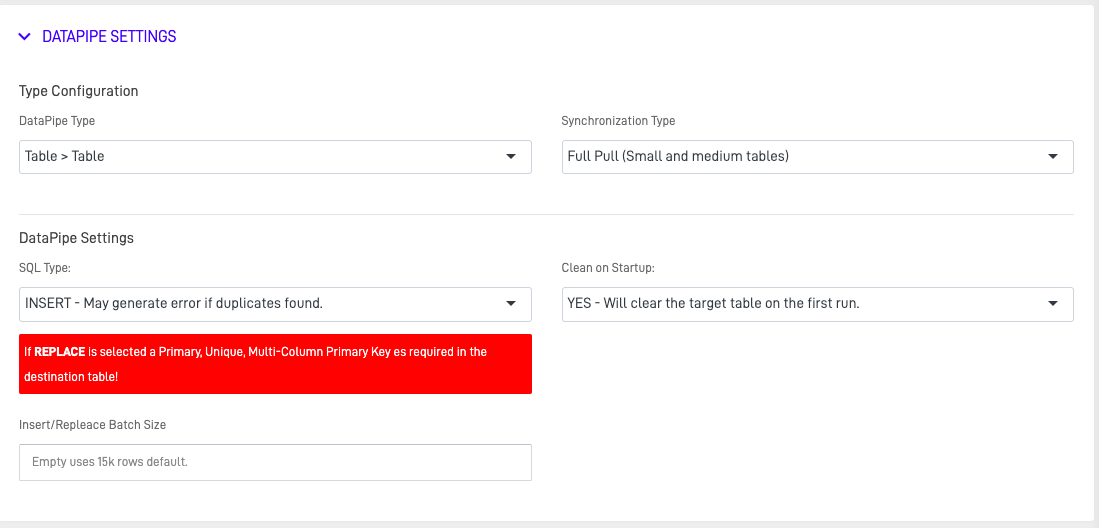
| Setting | Description |
|---|---|
| Load Mode | Choose between TRUNCATE & INSERT (replace all data) or UPSERT (update existing, insert new) |
| Batch Size | Number of records processed per batch (affects performance) |
| Filter Condition | Optional WHERE clause to extract a subset of data |
| Pre-Execution SQL | SQL commands to run before extraction begins |
| Post-Execution SQL | SQL commands to run after extraction completes |
Step 5: Save and Execute
- Click Save to store your configuration.
- To run manually, click Execute or Run.
- To schedule automated runs, configure the schedule in the project settings.
- Monitor execution status in the Execution Log.
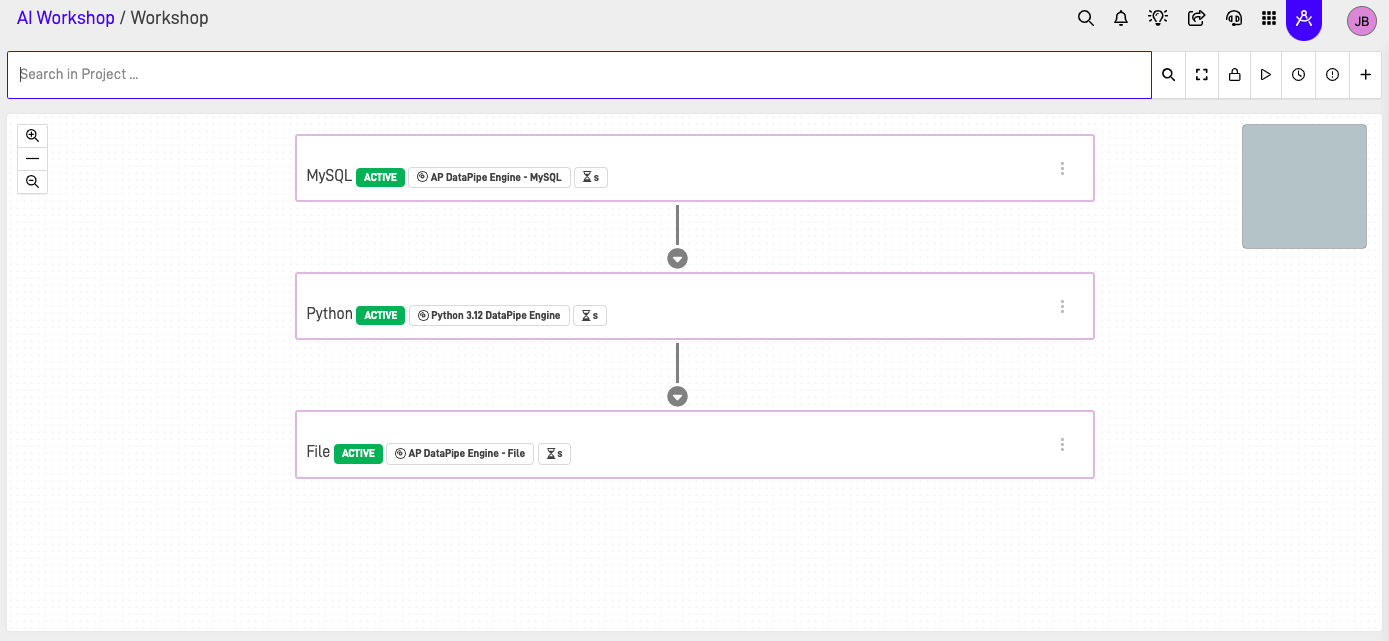
AP DataPipe Engine - File
The AP DataPipe Engine - File provides a GUI-based interface for extracting data from file sources such as CSV, JSON, and other structured formats.
Step 1: Select Source File and Destination Table
- Open your Reasoning Flows project.
- Create a new object and select AP DataPipe Engine - File.
- In the Source section, select or upload the file to extract.
- Configure file parsing options (delimiter, encoding, header row, etc.).
- In the Destination section, select or create the destination repository table.
Step 2: Configure Field Mapping
- Click Get Fields to detect columns from the source file.
- Map source columns to destination table fields.
- Configure data type conversions if needed.
Step 3: Configure DataPipe Settings
Configure load mode, batch size, and any pre/post-execution SQL as needed (similar to MySQL configuration above).
Step 4: Save and Execute
- Click Save to store your configuration.
- Click Execute to run the extraction.
- Monitor status in the Execution Log.
Python 3.12 DataPipe Engine
The Python 3.12 DataPipe Engine combines the structure of the AP DataPipe with the flexibility of custom Python code, allowing you to add transformation logic during the extract and load process.
Step 1: Create the DataPipe Object
- Open your Reasoning Flows project.
- Create a new object and select Python 3.12 DataPipe Engine.
- Configure source and destination connections in the settings panel.
Step 2: Write Extraction Logic
Use the code editor to write your extraction and transformation logic:
# Example: Extract, transform, and load with custom logic
import pandas as pd
from arpia import datasource, repository

# Connect to source
source_conn = datasource.connect('my_mysql_source')
df = source_conn.query("SELECT * FROM customers WHERE active = 1")

# Transform data
df['full_name'] = df['first_name'] + ' ' + df['last_name']
df['created_date'] = pd.to_datetime(df['created_date'])

# Load to repository
repository.write('clean_customers', df, mode='upsert', key='customer_id')
Step 3: Configure Settings and Dependencies
- Add any required Python packages in the Dependencies section.
- Configure execution parameters (timeout, memory allocation).
- Set up any required environment variables or credentials.
Step 4: Test and Execute
- Use the Test function to validate your code with a sample dataset.
- Review output and logs for errors.
- Click Execute for full extraction.
- Schedule as needed for recurring runs.
Scheduling Extractions
All Extract & Load objects can be scheduled for automated execution:
- Open the object's Settings or Schedule tab.
- Configure the schedule using:
- Frequency: Daily, weekly, monthly, or custom cron expression
- Time: Specific execution time
- Timezone: Ensure correct timing for your region
- Enable the schedule and save.
Scheduled jobs appear in the project's execution calendar and can be monitored from the dashboard.
Troubleshooting
Common Issues
| Issue | Possible Cause | Solution |
|---|---|---|
| Connection failed | Invalid credentials or network issue | Verify data source configuration and credentials |
| Table creation failed | Missing primary key | Ensure at least one column is designated as primary key |
| Field mapping errors | Data type mismatch | Check source and destination data types; add type conversions if needed |
| Extraction timeout | Large dataset or slow source | Increase timeout setting; add filters to reduce data volume; optimize source query |
| Duplicate key errors | UPSERT mode with incorrect key | Verify the primary key column is correctly configured |
| Character encoding issues | Source file uses non-UTF8 encoding | Specify correct encoding in file parsing options |
Viewing Execution Logs
- Navigate to the object's Execution Log or History tab.
- Select the specific execution to view details.
- Review timestamps, record counts, and any error messages.
- For Python DataPipe, check the console output for debugging information.
Next Steps
- Return to Extract & Load Overview for tool comparison and decision guidance.
- Continue to Transform & Prepare to clean and enrich your loaded data.