
How to create an AutoApi
Step-by-Step Guide
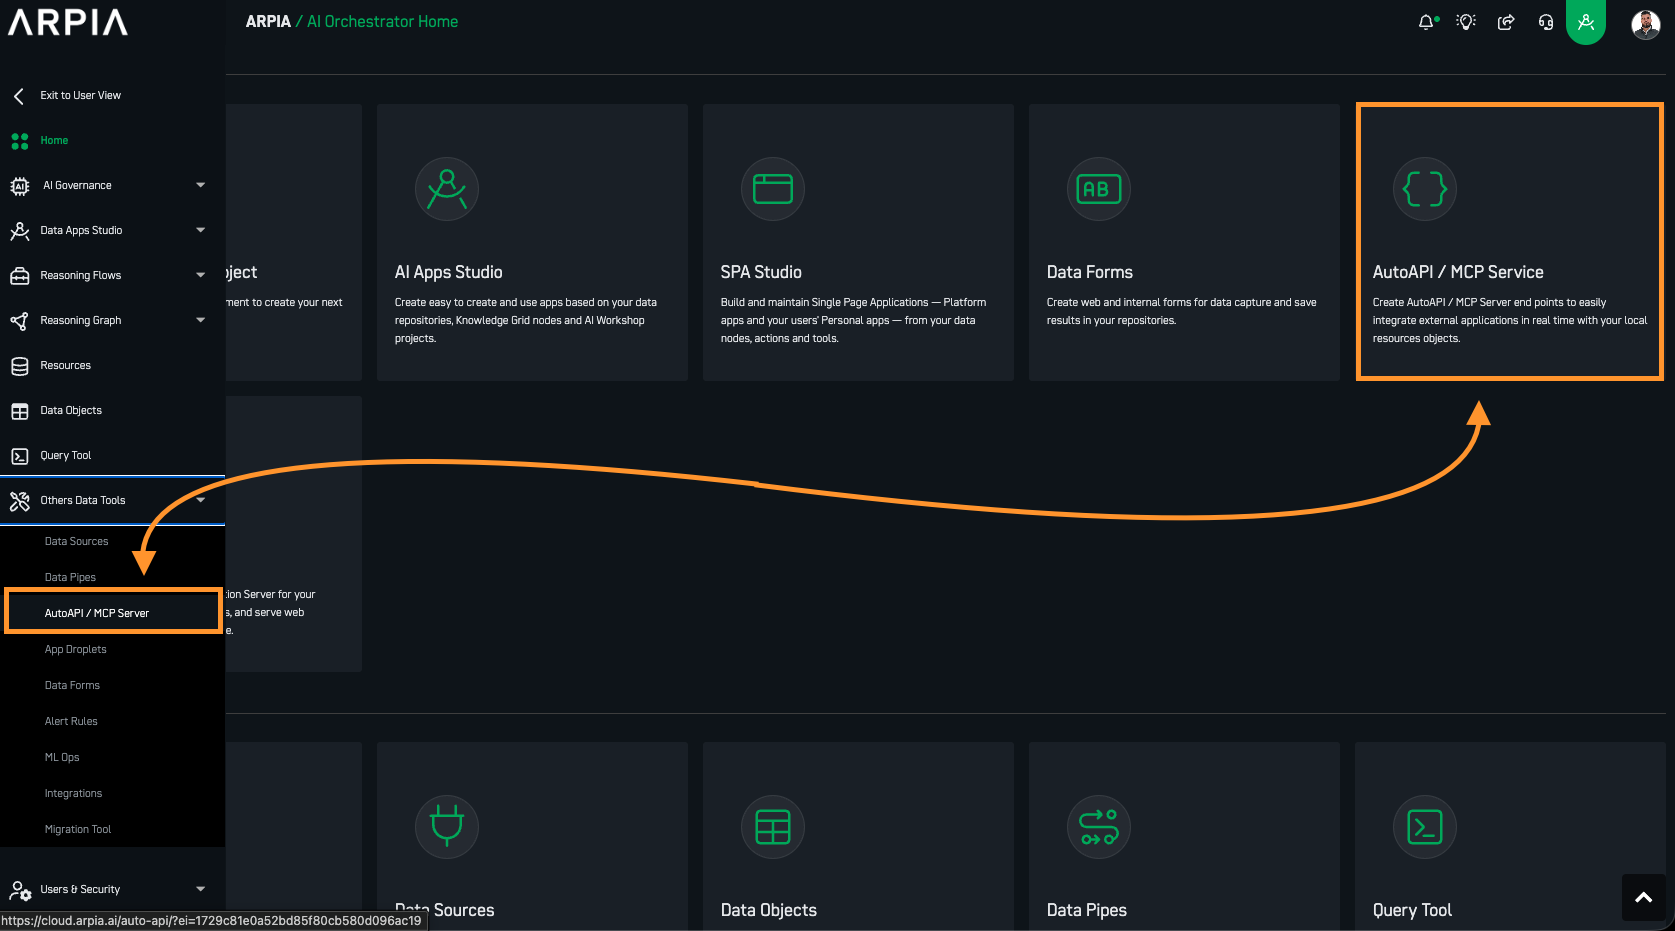
Step 1: Go to the screen to create the AutoAPI.
Navigate to the AutoAPI section in your Orchestrator toolbar.
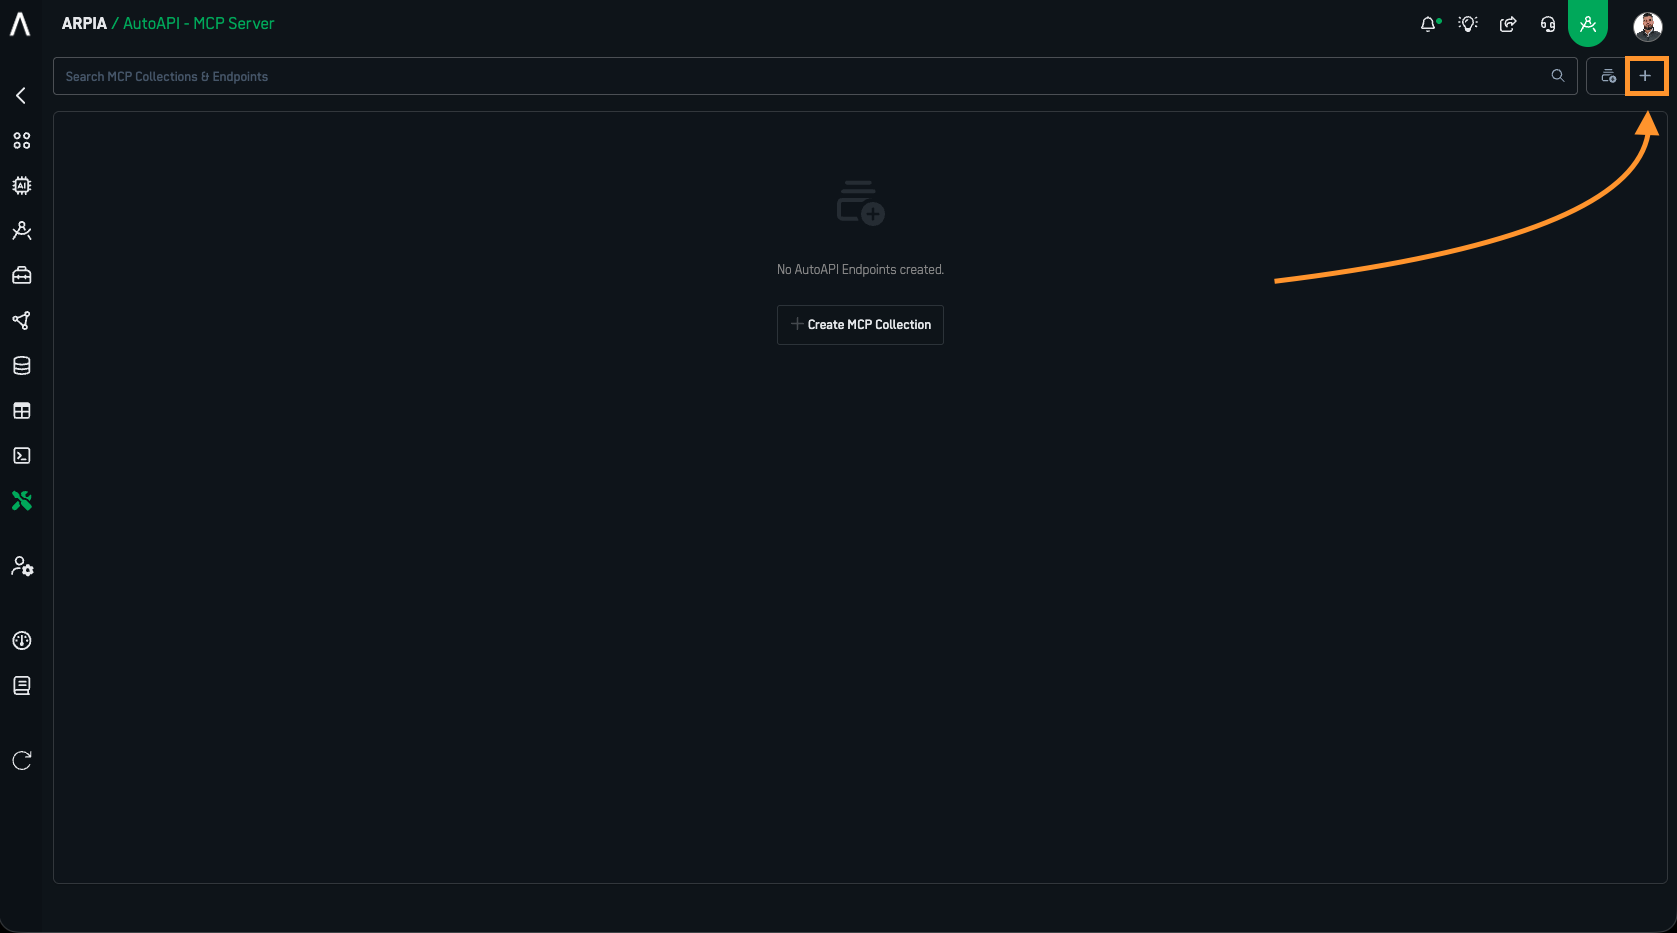
Step 2: Create the AutoAPI.
You will be directed to a new window displaying all the AutoAPI you have created. To create a new AutoAPI, click the + button.
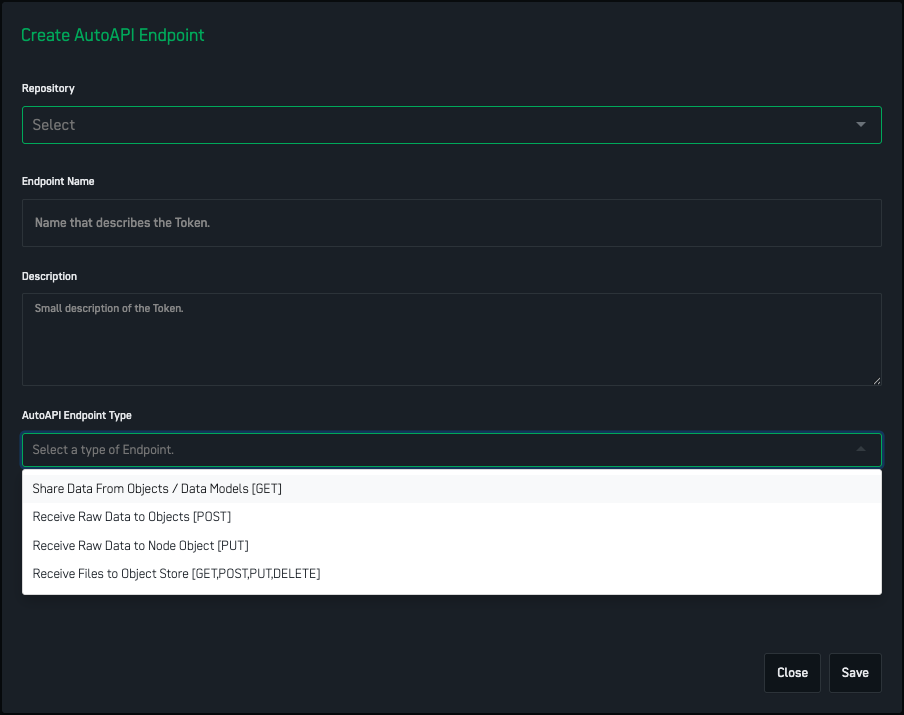
Step 3: Fill the Create AutoAPI Endpoint Form
Add the necessary information for your AutoAPI and select a method (Endpoint).
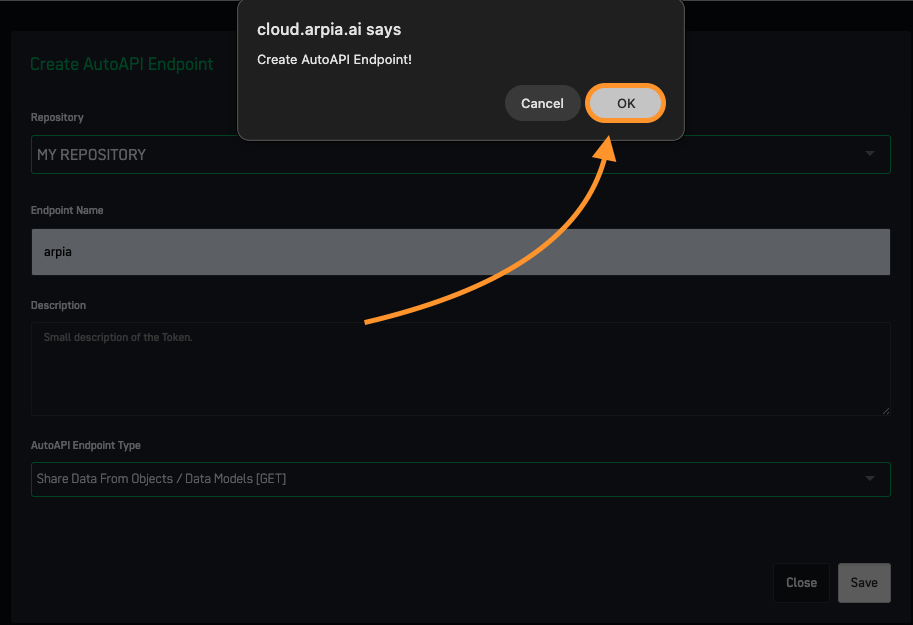
Step 3.1: From the pop screen press OK.
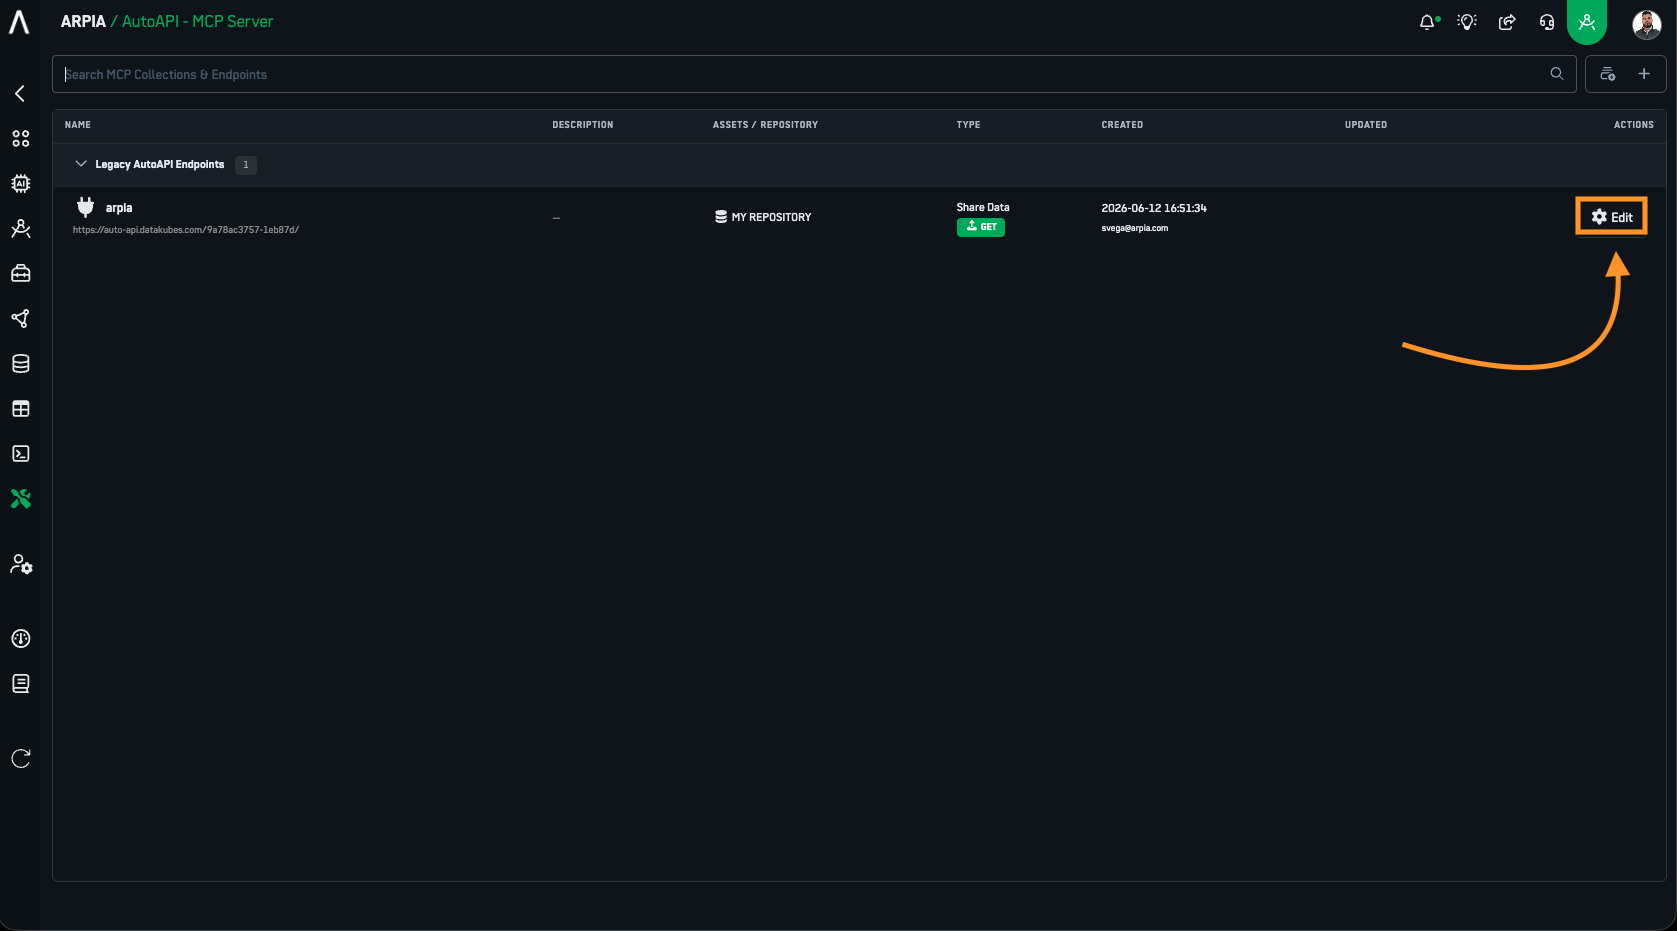
Step 4: Edit the AutoAPI settings
Select EDIT on your AutoAPI to access the settings.
Step 5: GET AutoAPI
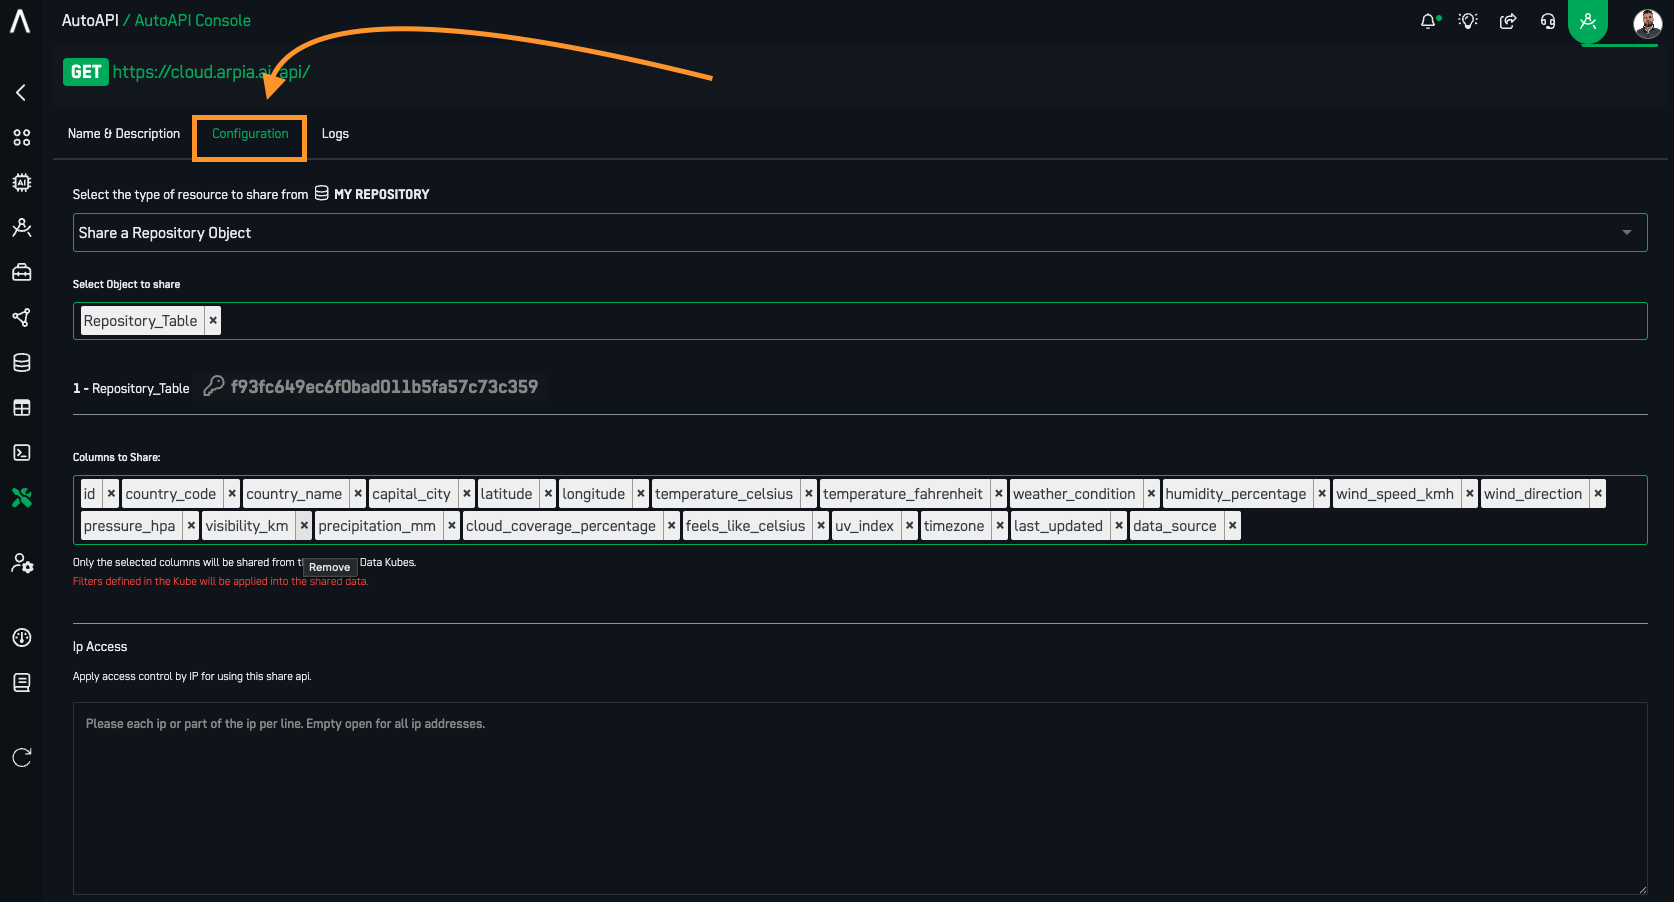
Navigate to the "Configuration" Tab to set up your GET AutoAPI.
Sub-step 5.1: Select Data Source
Choose the object you would like to retrieve data from. You have two options:
- Share Repository Object: Select a "Data Object" from your repository
- Share Kube Model: Select a "Node" from your Kubes model

This allows you to access either traditional table structures or cube-based data models depending on your needs.
Sub-step 5.2: Configure Columns
Once you've selected your data source:
- Review the available columns from your selected table or cube
- Select which specific columns you want to expose through your AutoAPI
- Consider data security and performance when choosing columns to share
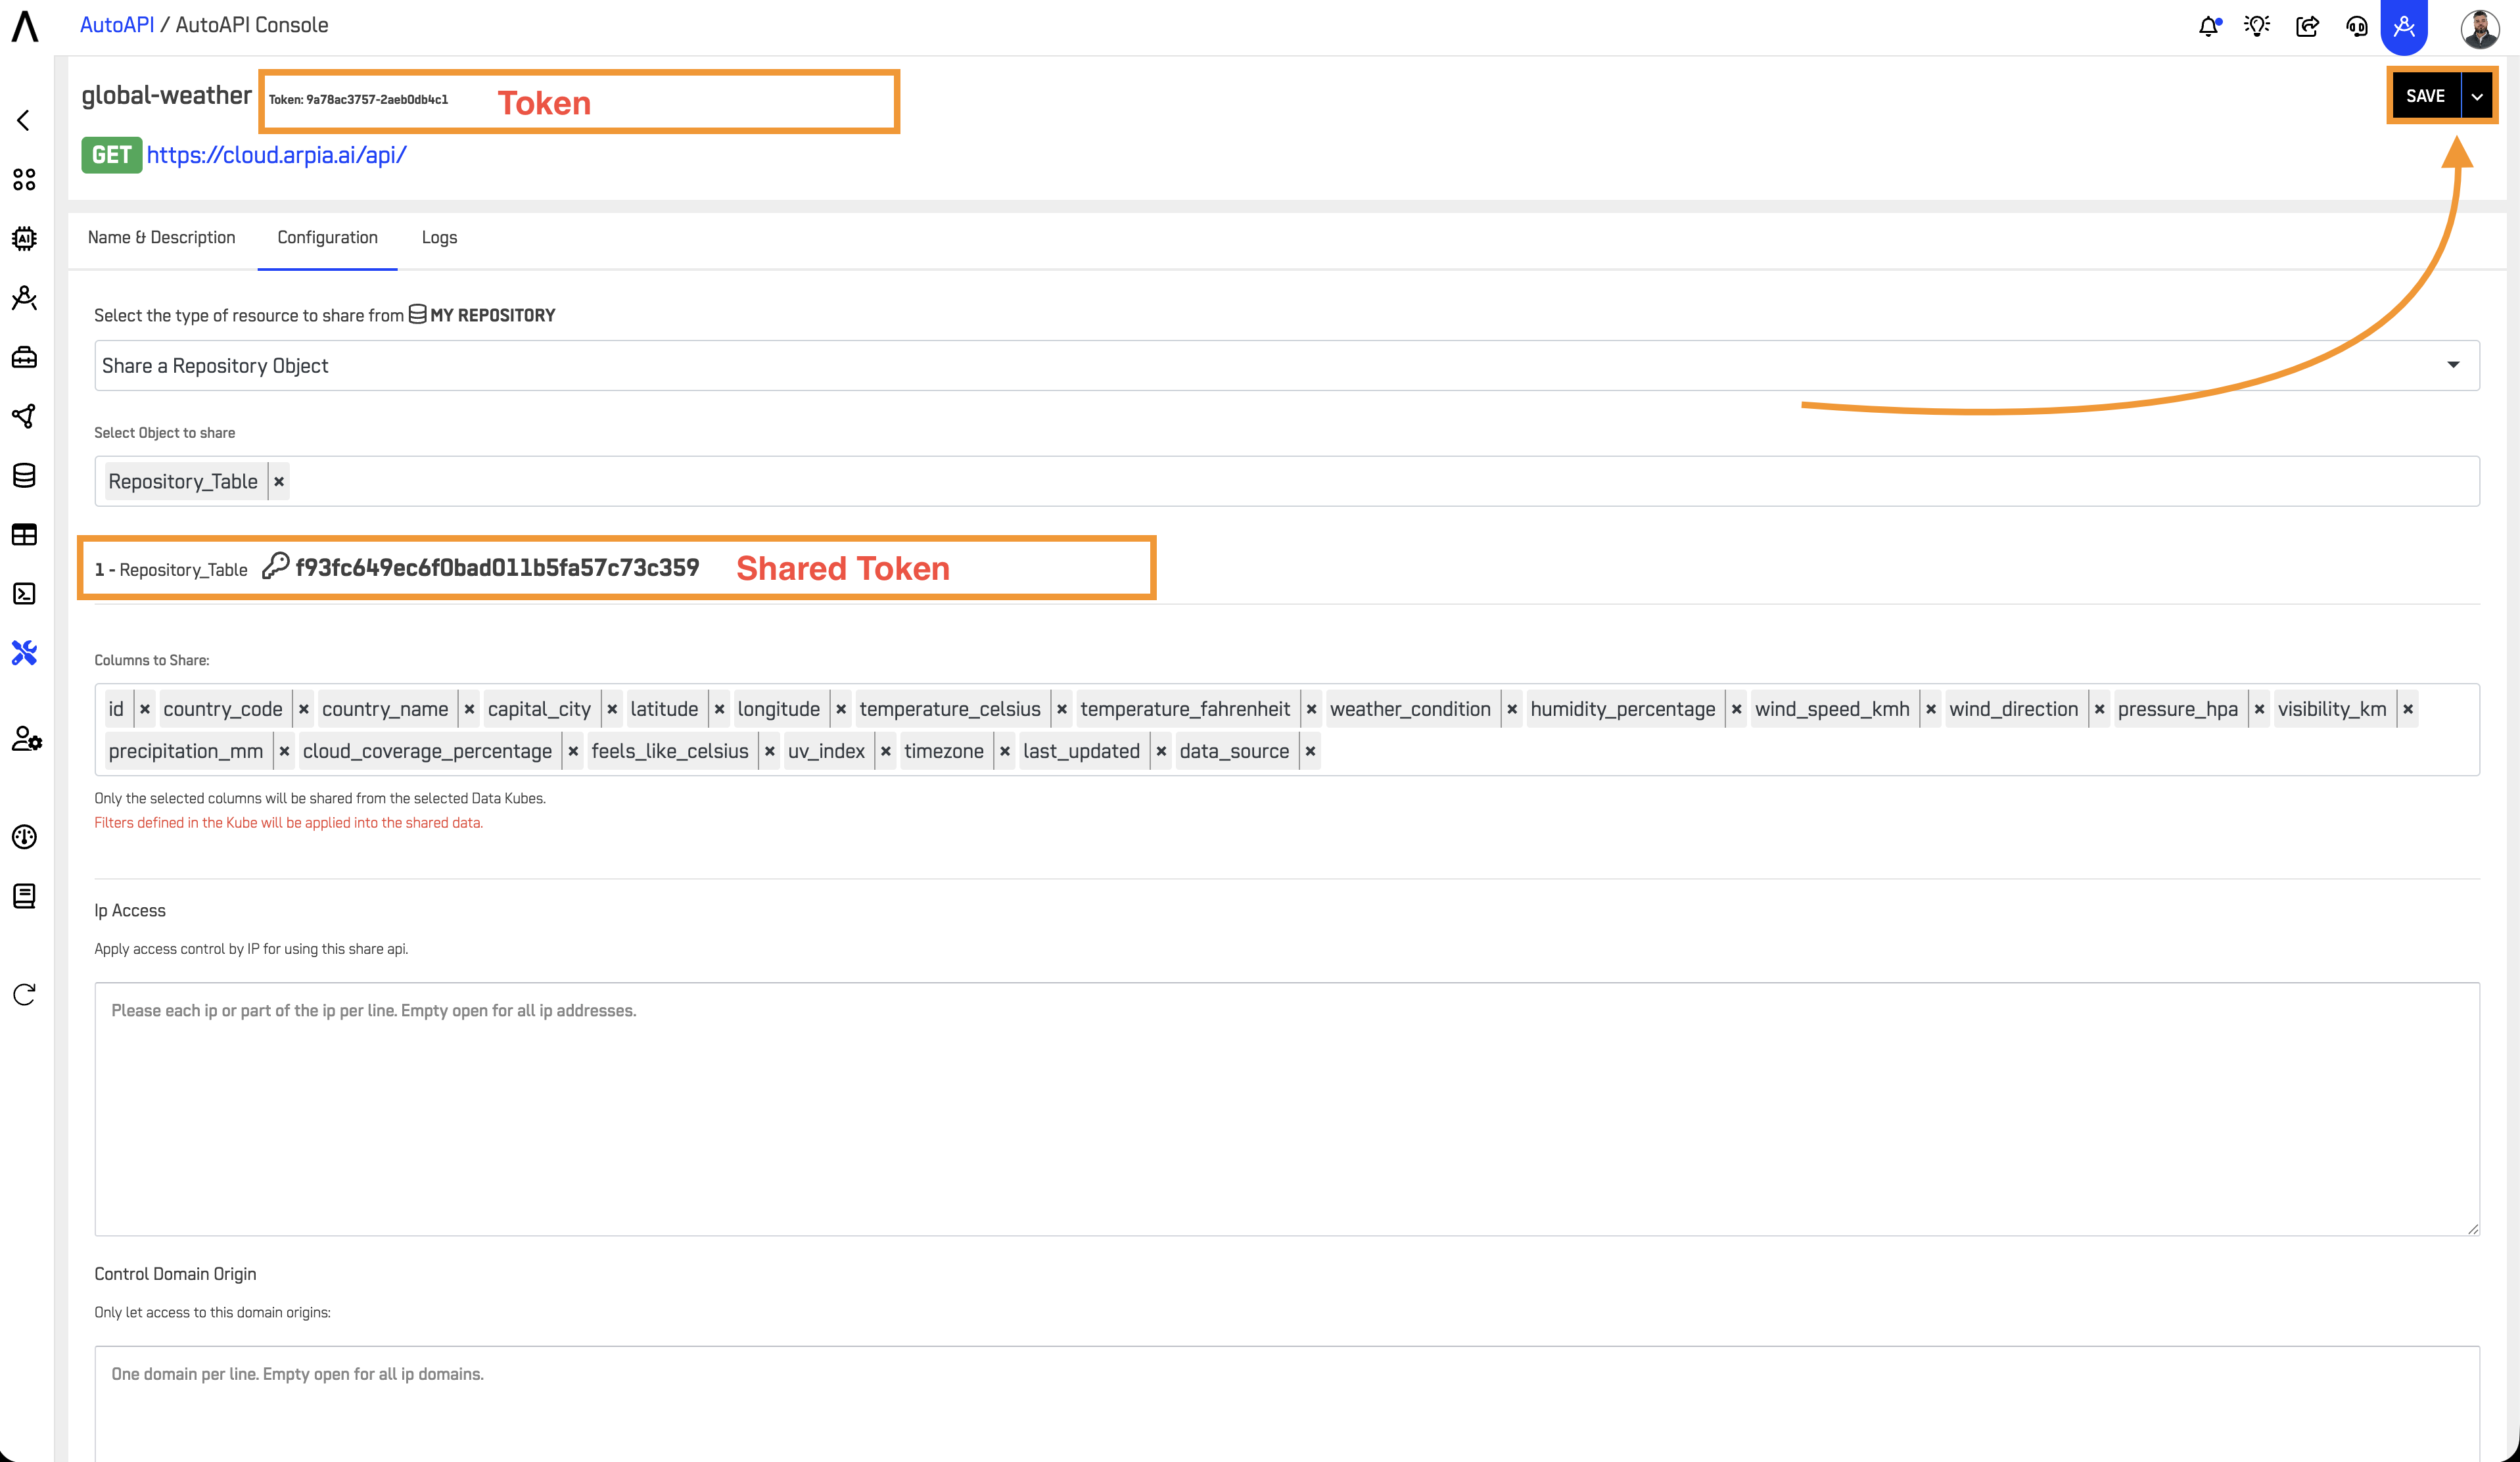
Sub-step 5.3: Save and Activate
After configuring your data source and columns:
- Review your selections to ensure they meet your requirements
- Click the save button to activate your AutoAPI
- Your API endpoint will be ready for use immediately after saving
Sub-step 5.4: Test Your AutoAPI Endpoint
Once your AutoAPI is activated, you can test it using the following URL format:
https://cloud.arpia.ai/api/?token=PLACE_YOUR_TOKEN_HERE&shared_token=PLACE_YOUR_SHARED_TOKEN_HERE
Parameters:
token: ReplacePLACE_YOUR_TOKEN_HEREwith your actual API tokenshared_token: ReplacePLACE_YOUR_SHARED_TOKEN_HEREwith your actual shared token
Example:
If your tokens are:
- API Token:
abc123xyz - Shared Token:
def456uvw
Your complete URL would be:
https://cloud.arpia.ai/api/?token=abc123xyz&shared_token=def456uvw
Testing Method 1: Browser (For GET Requests)
- Copy your complete URL with your actual tokens
- Open a new browser tab
- Paste the URL in the address bar and press Enter
- View the response:
- If successful, you'll see JSON data returned
- If there's an error, check your tokens and endpoint configuration
Tip: Install a browser JSON viewer extension for better readability of the response.
Testing Method 2: Postman
-
Open Postman (or download from postman.com)
-
Create a new request:
- Click "New" → "HTTP Request"
- Select the appropriate method (GET, POST, PUT, etc.)
-
Configure the request:
- Enter the base URL:
https://cloud.arpia.ai/api/ - Go to the "Params" tab
- Add the following query parameters:
- Key:
token| Value:[your_api_token] - Key:
shared_token| Value:[your_shared_token]
- Key:
- Enter the base URL:
-
For POST/PUT requests (if applicable):
- Go to the "Body" tab
- Select "raw" and "JSON"
- Enter your request payload
-
Send the request:
- Click "Send"
- Review the response in the bottom panel
- Check the status code (200 = success)
-
Save for future use:
- Click "Save" to create a collection
- Name your request for easy access later
Testing Method 3: cURL (Command Line)
For developers comfortable with command line:
# GET request
curl "https://cloud.arpia.ai/api/?token=abc123xyz&shared_token=def456uvw"

# POST request with JSON payload
curl -X POST "https://cloud.arpia.ai/api/?token=abc123xyz&shared_token=def456uvw" \
  -H "Content-Type: application/json" \
  -d '{"key":"value"}'
Common Testing Issues and Solutions
| Issue | Solution |
|---|---|
| 401 Unauthorized | Check that both tokens are correct and properly formatted |
| 403 Forbidden | Verify your IP address or domain is allowed in security settings |
| 404 Not Found | Verify the endpoint path and that the AutoAPI is activated |
| Empty response | Ensure data source is configured and has accessible data |
| Connection timeout | Check network connectivity and firewall settings |
Security Configuration
Your AutoAPI includes built-in security controls that can be configured in the Edit settings:
1. IP Access Control
- Restrict API access to specific IP addresses or IP ranges
- Add one IP or IP range per line in the configuration
- Leave empty to allow access from all IP addresses
- Example entries:
  192.168.1.100
  10.0.0.0/24
  203.0.113.45
2. Control Domain Origin
- Restrict API access to specific domain origins (CORS control)
- Add one domain per line in the configuration
- Leave empty to allow access from all domains
- Example entries:
  https://app.example.com
  https://dashboard.company.com
  http://localhost:3000
Security Best Practices:
- Never share your tokens publicly or commit them to version control
- Use environment variables in applications for token management
- Configure IP restrictions for production APIs to known server addresses
- Set domain origin controls to prevent unauthorized cross-origin requests
- Use HTTPS for all API communications
- Monitor API access logs regularly for unusual activity
- Consider using different AutoAPI endpoints for development and production with appropriate security settings for each
Note: Remember that any changes to column selection or data source will require saving again to update your active AutoAPI configuration.
Step 6: Buckets in AutoAPI
Buckets are an integral part of the AutoAPI system, used to store and manage files, resources, or data payloads. You can:
- Integrate Buckets for file storage directly into your AutoAPI workflows.
- Use AutoAPI to retrieve data from or send data to Buckets via API calls.
- Manage Buckets resources using GET, PUT, and POST methods in the AutoAPI interface.
For more details on how Buckets are utilized, refer to the S3 Buckets API Documentation.
Updated about 1 month ago