
MCP Server Guide
Complete guide to connecting AI agents to your enterprise data through ARPIA's Model Context Protocol server
🤖 MCP Server Guide
Overview
The ARPIA MCP Server enables AI agents like Claude, ChatGPT, Cursor, and Windsurf to access your enterprise databases through the Model Context Protocol—a secure, standardized interface for AI-to-data communication.
🎯 What is MCP?
The Model Context Protocol (MCP) is an open standard that provides:
- Discovery: AI agents find available data sources
- Authentication: Secure token-based access
- Interaction: Standardized query interface
- Governance: Complete audit trails
📋 Prerequisites
Before you begin, ensure you have:
- Administrator or Owner role in your ARPIA workspace
- Access to AutoAPI / MCP Server section in the dashboard
- At least one connected data repository (database, data warehouse, or API)
- Arpia Intelligence nodes configured - Your data sources must have Arpia Intelligence enabled before they can be exposed through MCP. See detailed setup guide →
- Understanding of your data classification requirements for security
Important: If you haven't configured Arpia Intelligence on your data sources yet, complete that setup first before proceeding with MCP collection creation.
🏗️ Architecture Overview
Token Hierarchy
ARPIA uses a three-tier token system for granular access control:
| Token Type | Purpose | Example | Length |
|---|---|---|---|
| Collection Token | Workspace access | b3cb7ee2af-8852c0edc731c7c59e9e | 32 characters |
| Resource Token | Endpoint access | b3cb7ee2af-2c6f4ef6b5 | 20 characters |
| Variant Token | Security rules | toMBmPXFmf | 10 characters |
Token Terminology Guide:
- Collection Token (also called "Auth Token" in the UI) - Controls access to an entire MCP collection
- Resource Token (also called "Shared Token" for individual endpoints) - Controls access to specific data endpoints
- Variant Token - Applies additional security rules and access restrictions
Data Flow
AI Agent (Claude/ChatGPT)
    ↓ Natural language query
MCP Protocol Layer
    ↓ Translates to HTTP
AutoAPI Endpoints
    ↓ Queries Arpia Intelligence nodes
Your Data Sources
📋 Step 1: Create MCP Collection
Via ARPIA Dashboard
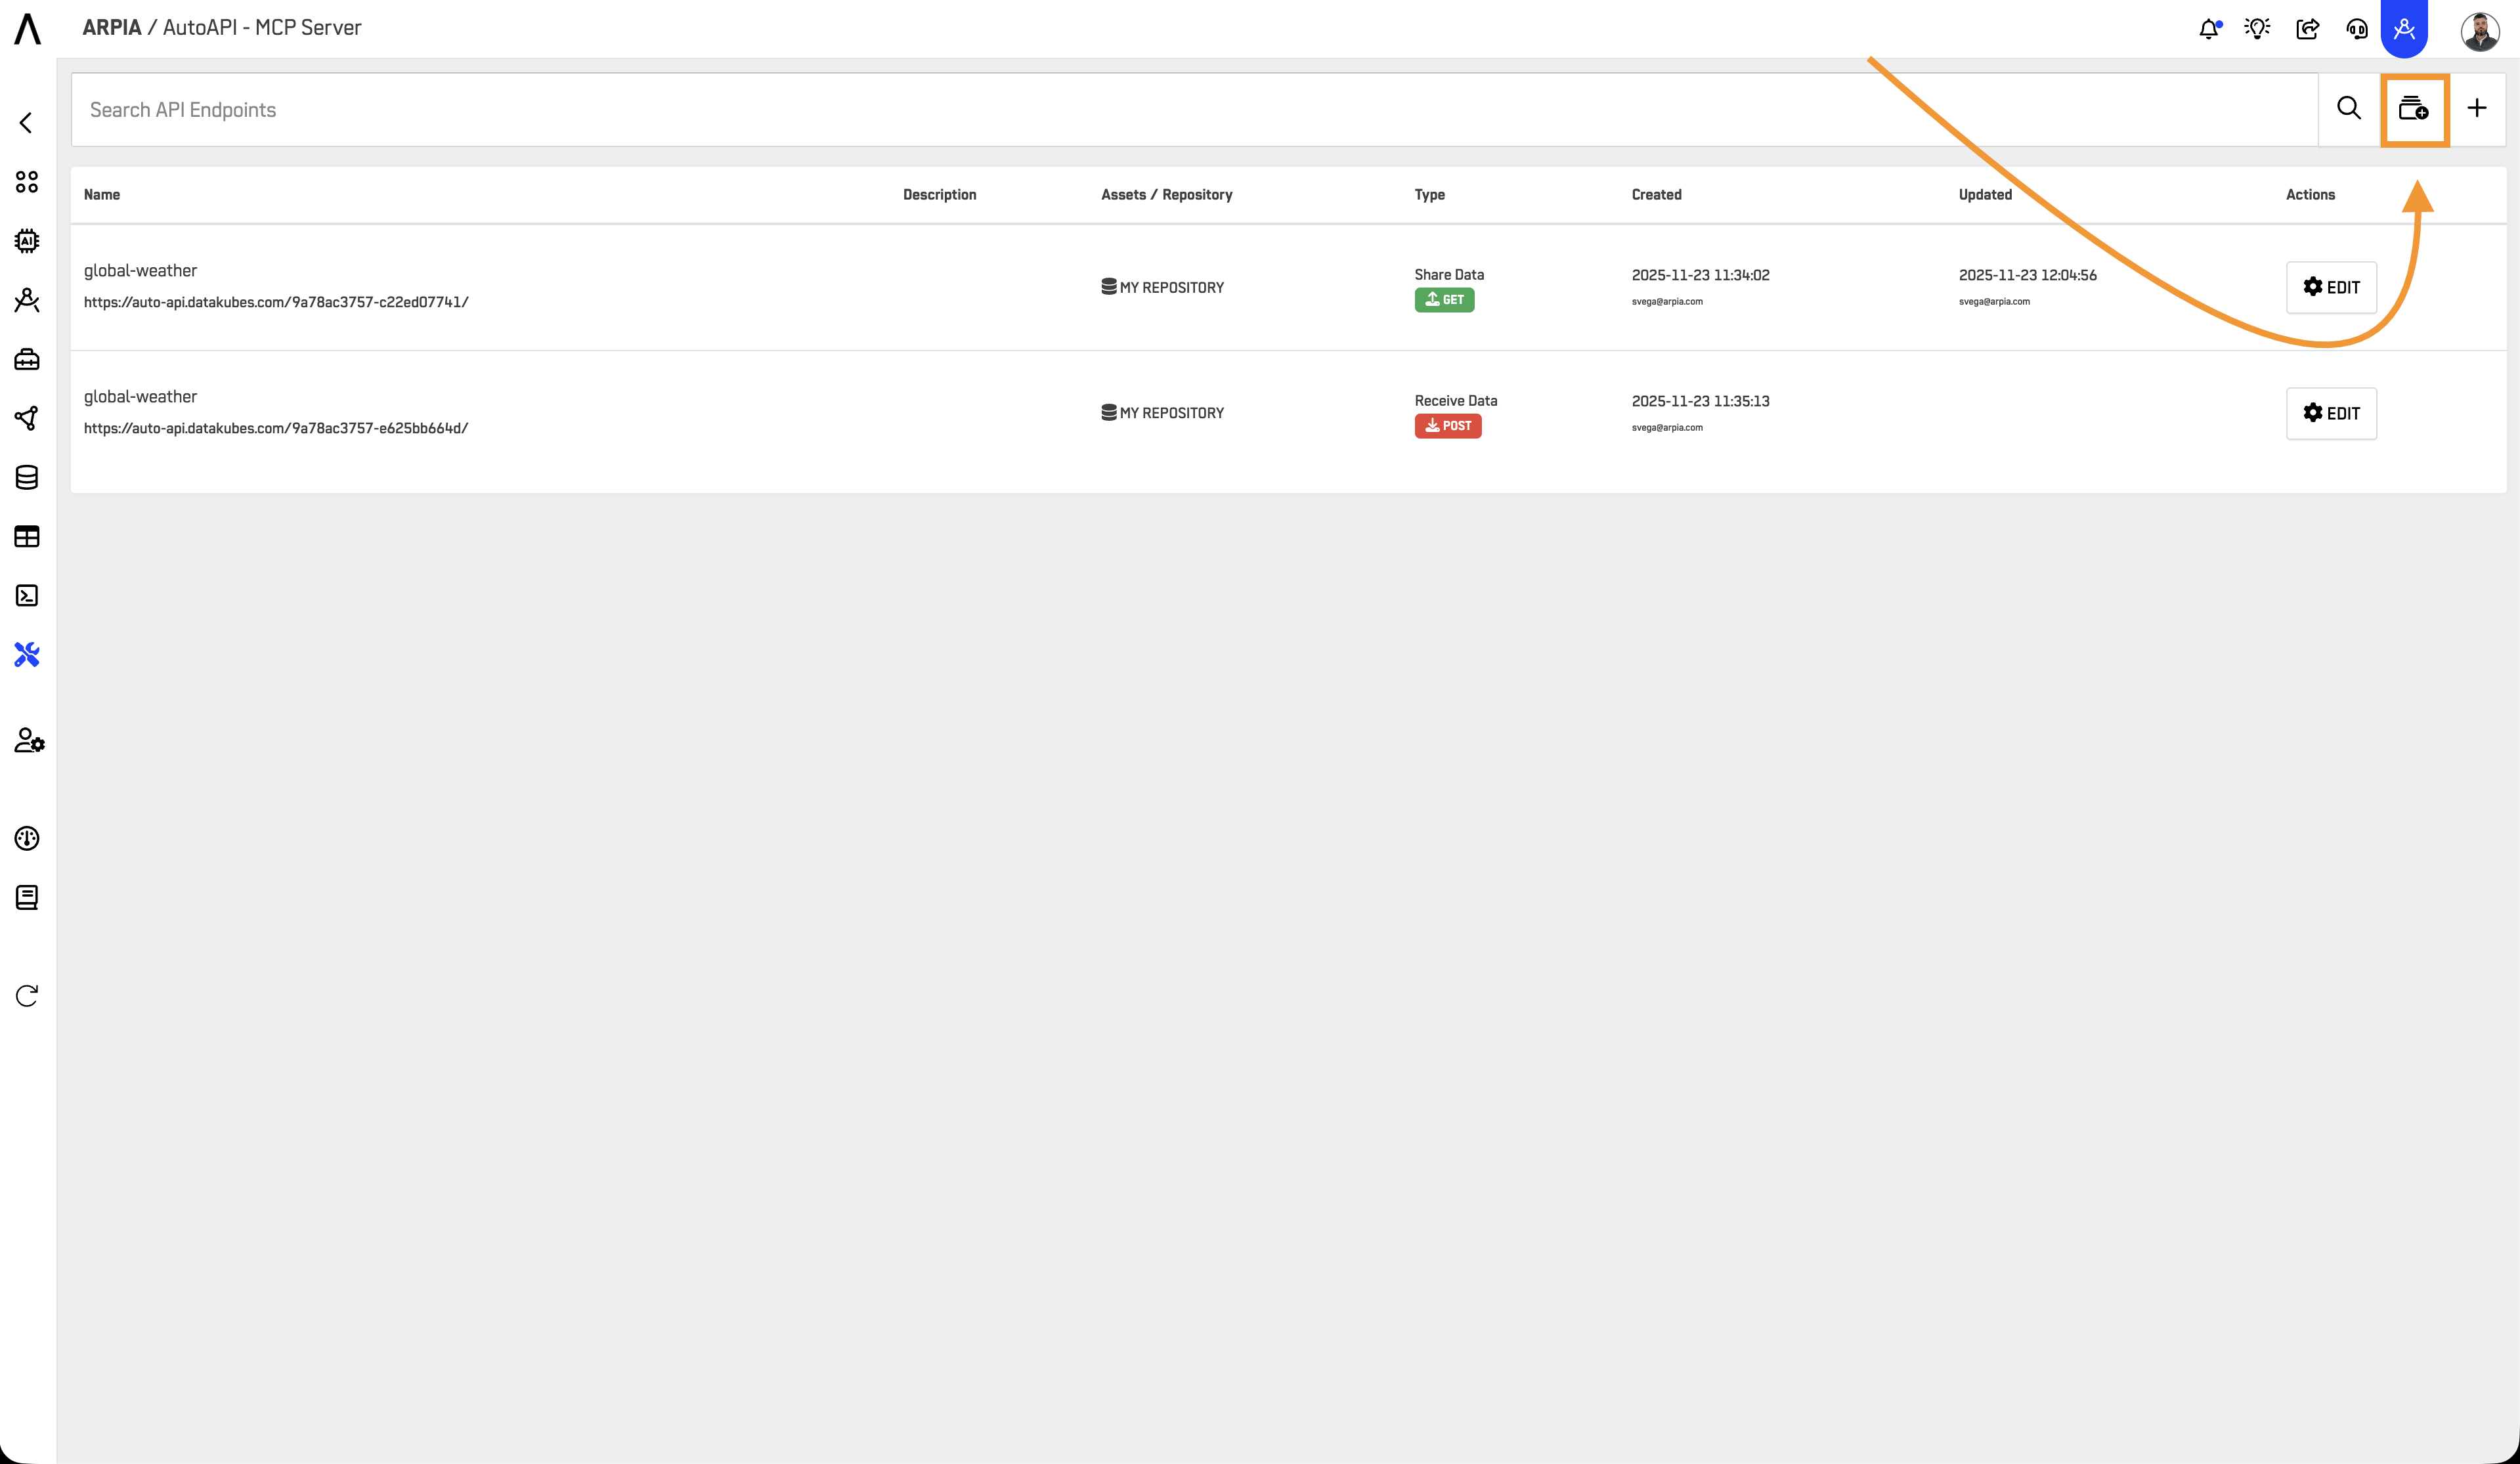
- Navigate to AutoAPI / MCP Server from home
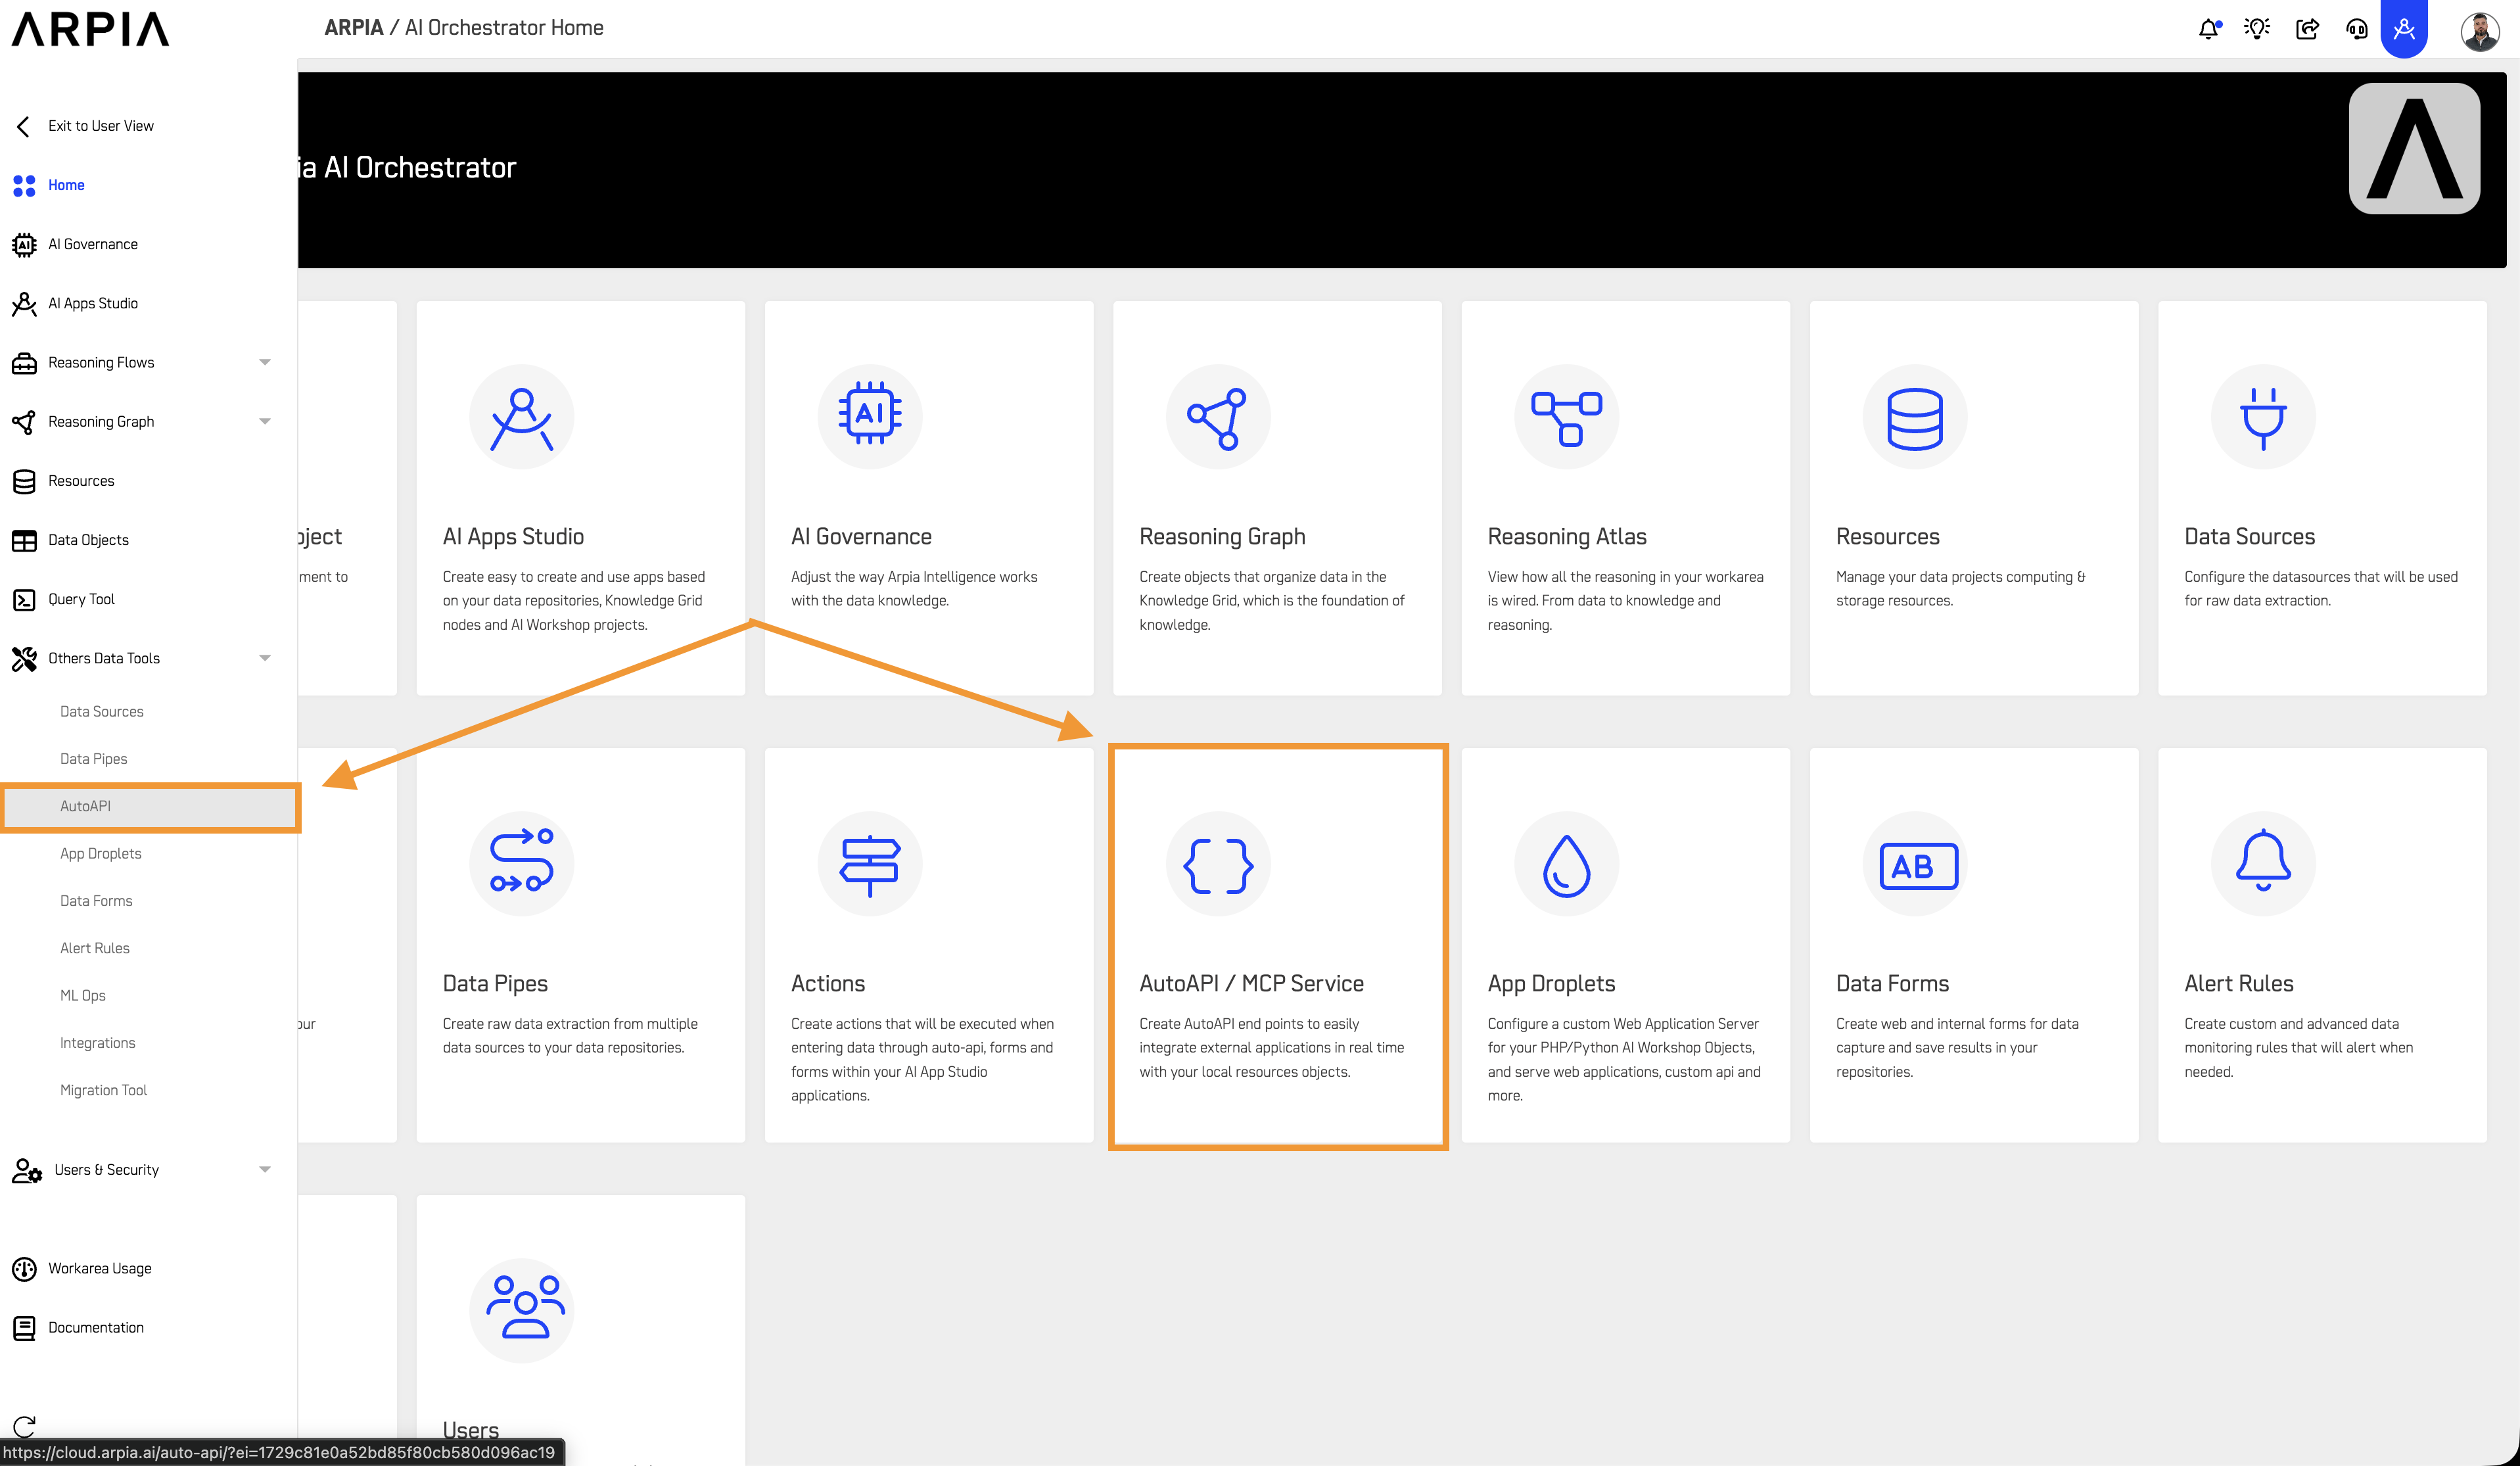
- Click + button to create new collection
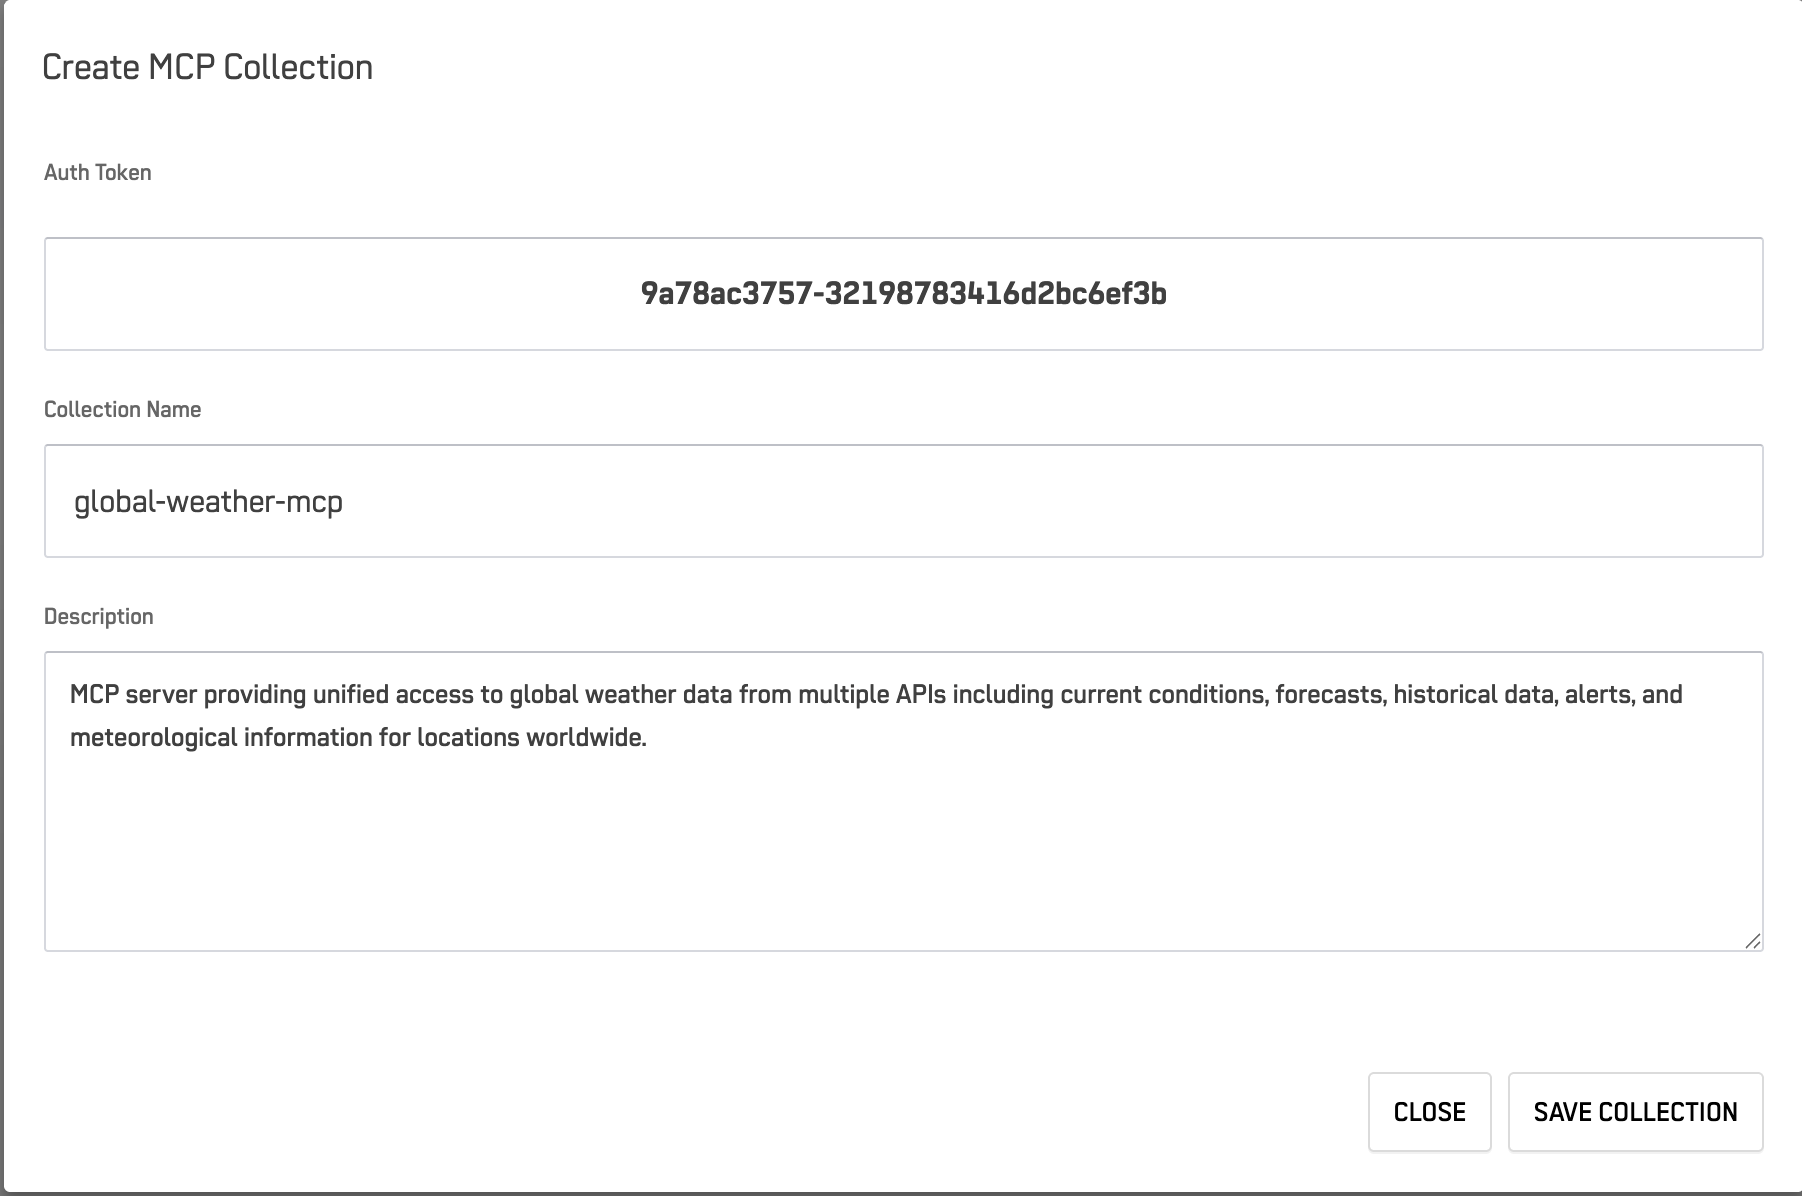
- Configure collection settings:
| Field | Description | Example |
|---|---|---|
| Auth Token | Auto-generated unique ID | b3cb7ee2af-8852c0edc731c7c59e9e |
| Collection Name | Descriptive workspace name | "Production CRM Data" |
| Description | Purpose and contents | "Customer and sales information" |
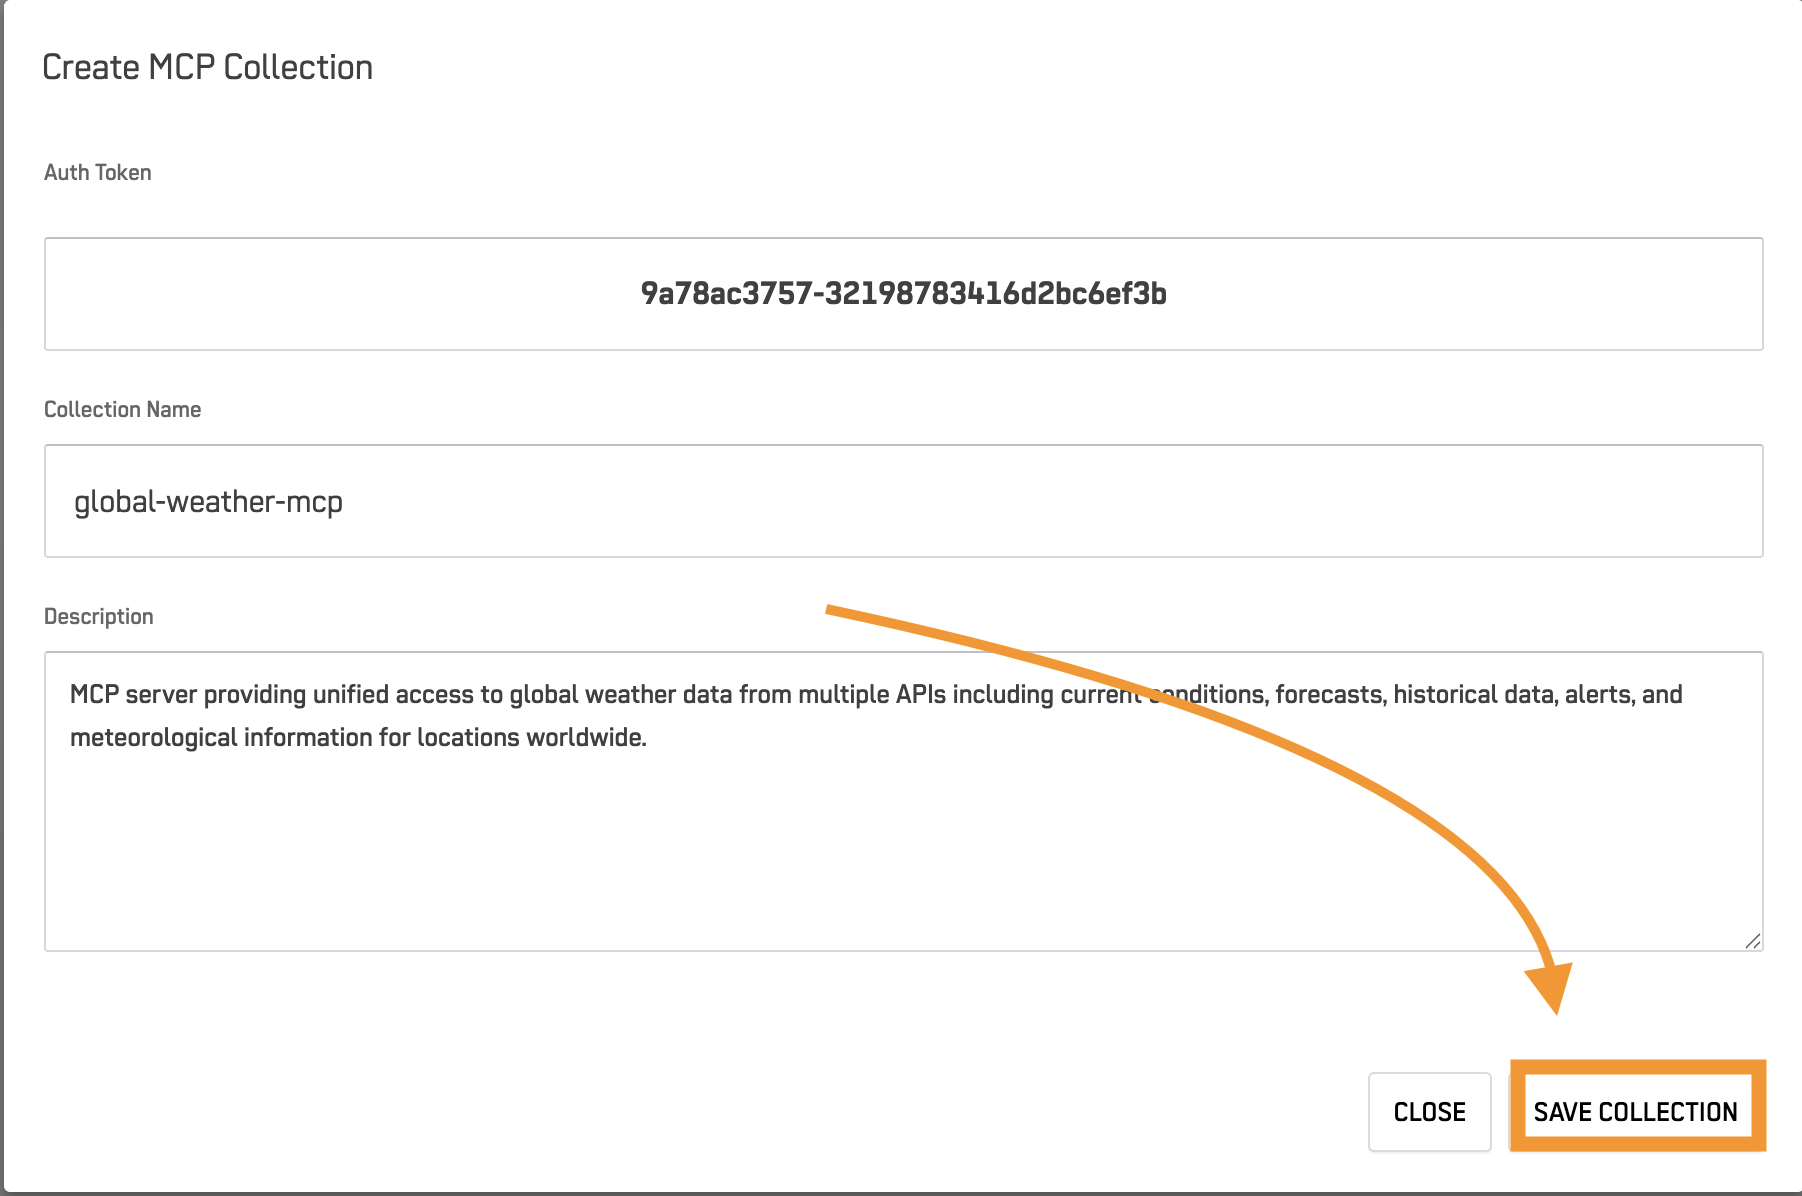
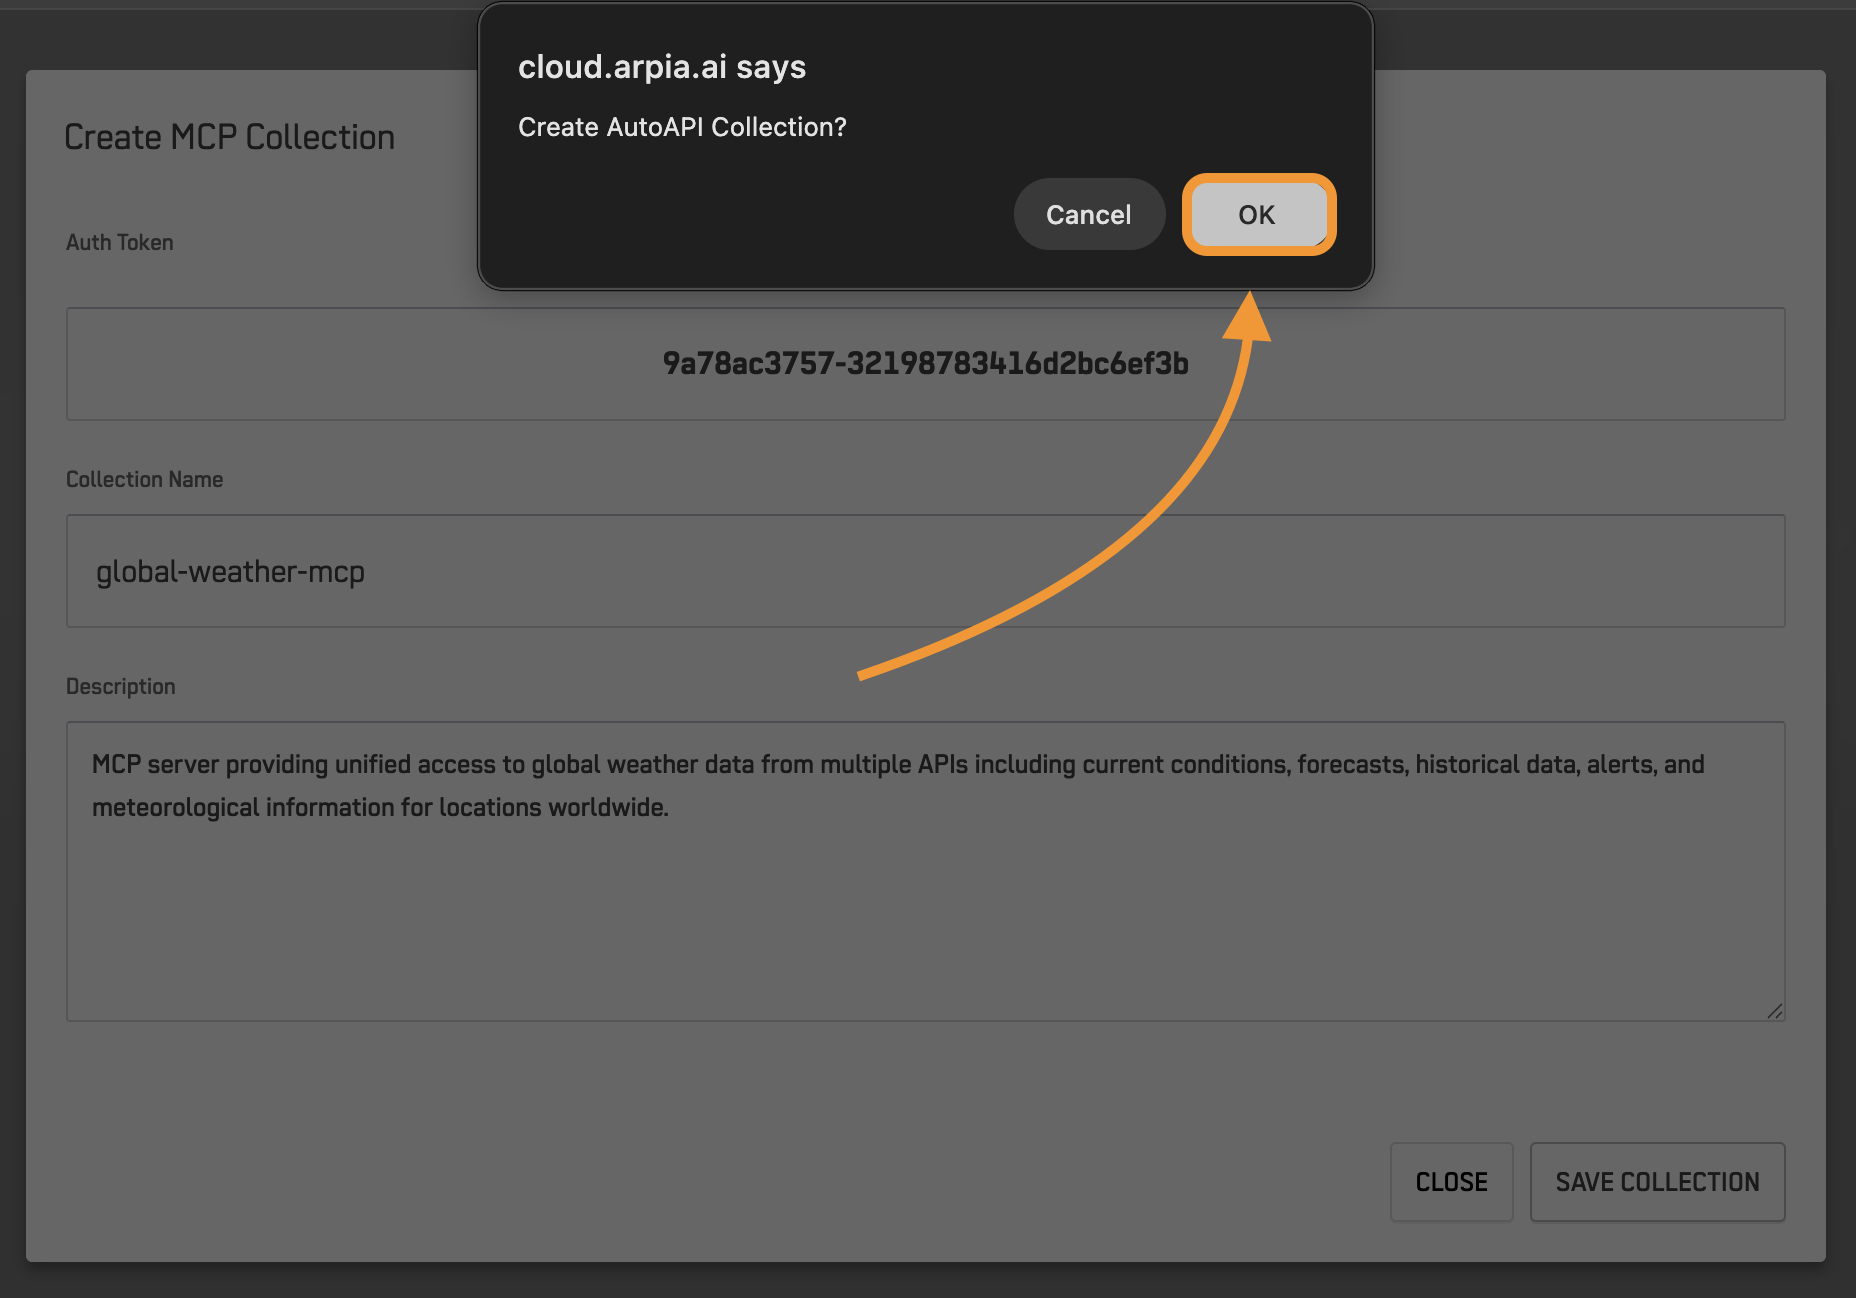
- Click SAVE COLLECTION
Security Note: Store your collection token securely. It provides access to all resources in the collection. You'll find this token at the top of your collection details page after saving.
- Click OK in the popup that says "Create AutoAPI Collection?"
Locating Your Collection Token
After creating your collection:
- The Collection Token appears at the top of the collection details page
- Copy and save this token securely - you'll need it to connect AI agents
- This token grants access to all resources within this collection
🔧 Step 2: Create Resources (AutoAPI Endpoints)
Resources define what data AI agents can access and how.
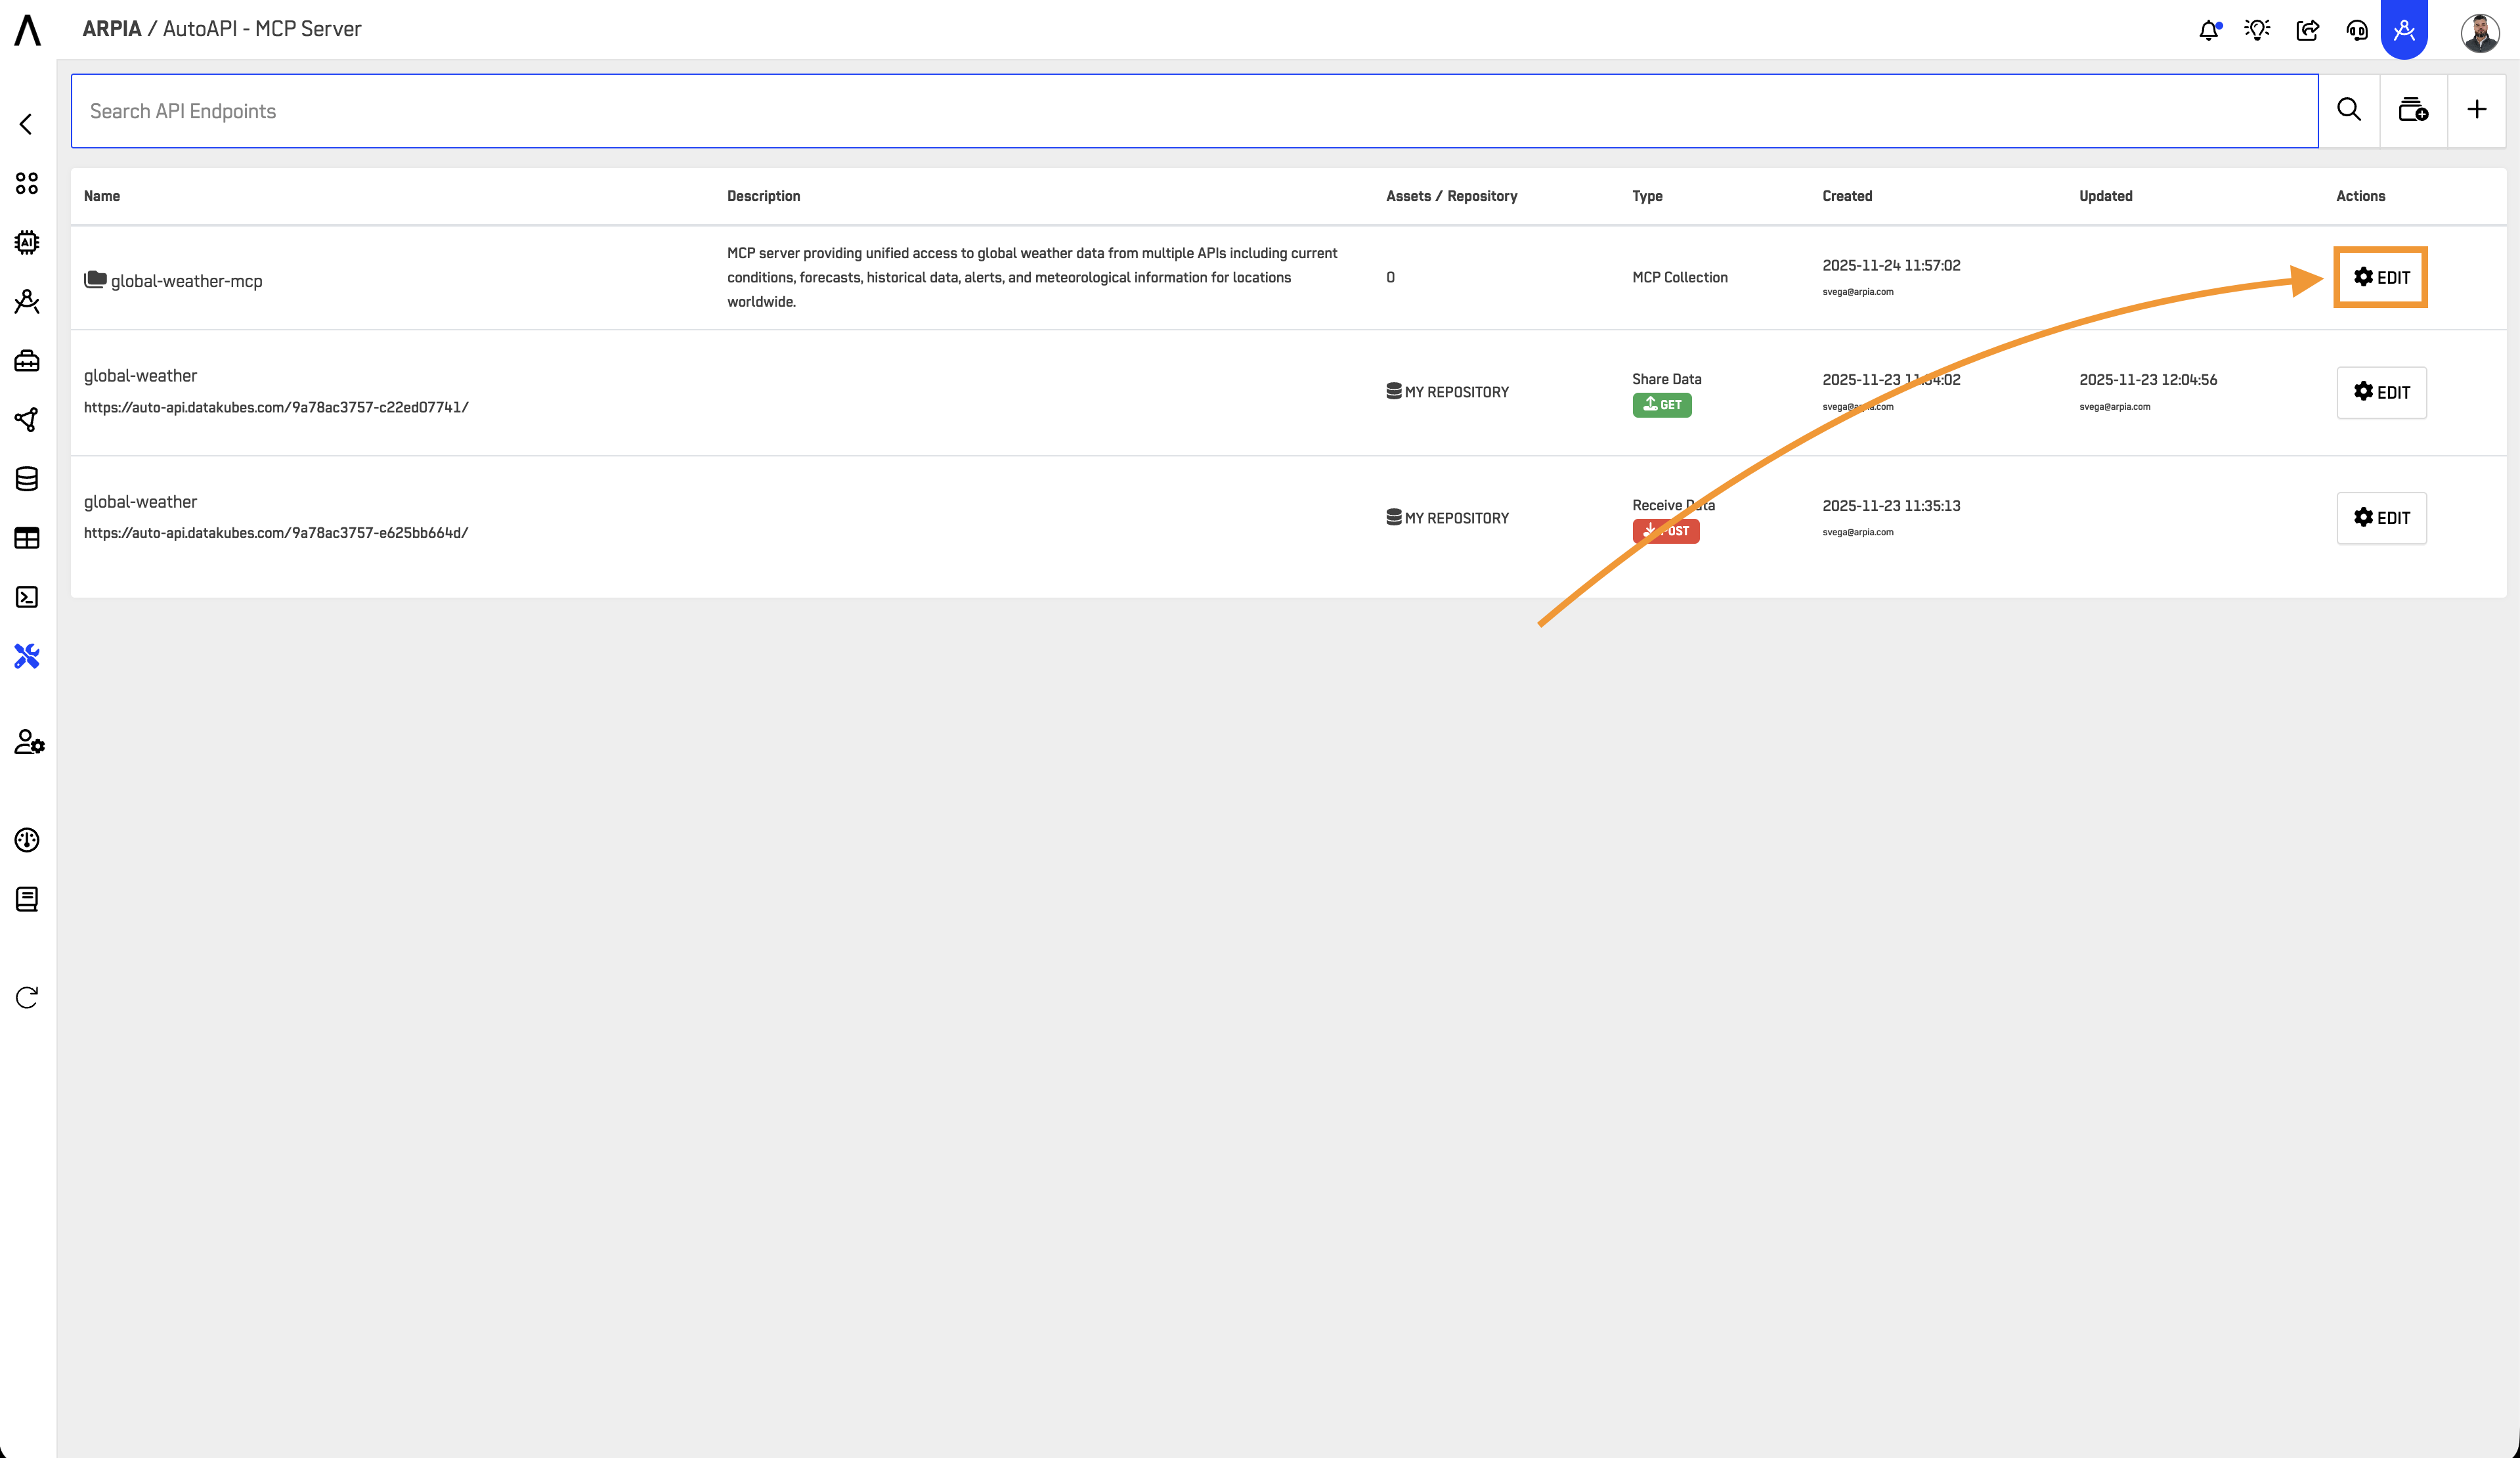
2.1 Navigate to Collection
Open your MCP Collection by pressing "Edit".
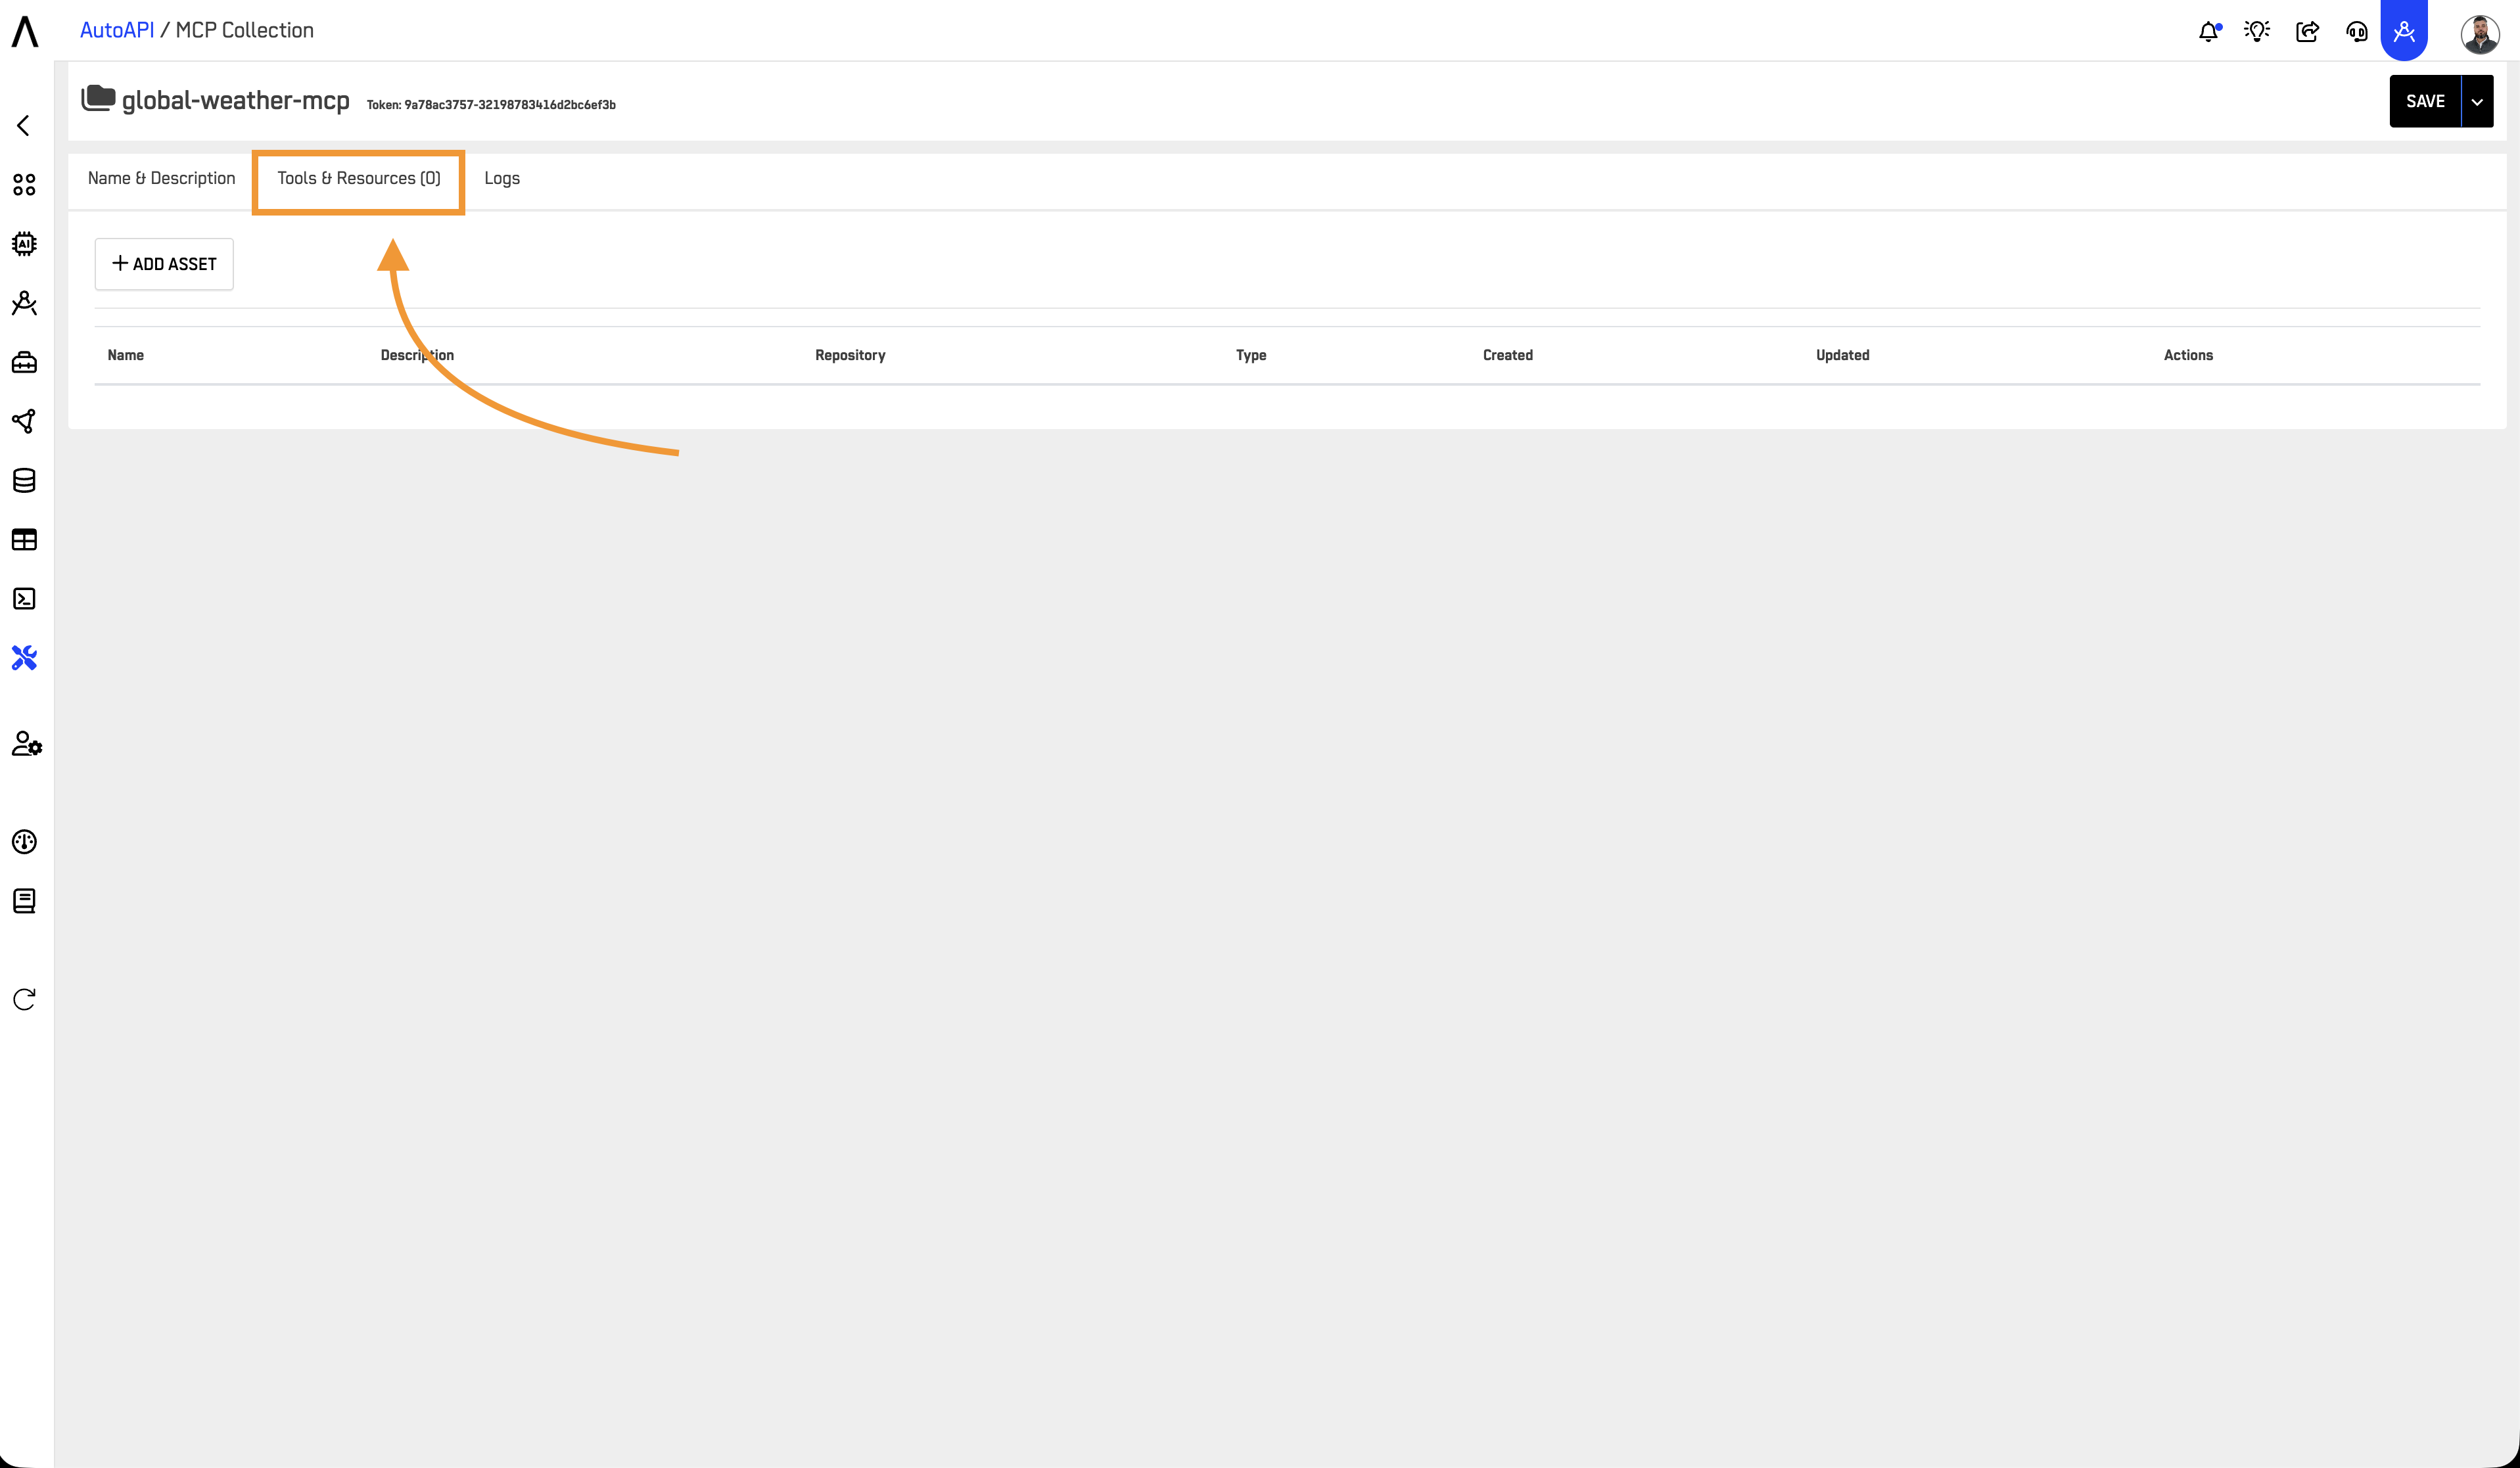
2.2 Access Tools & Resources
Go to Tools & Resources tab
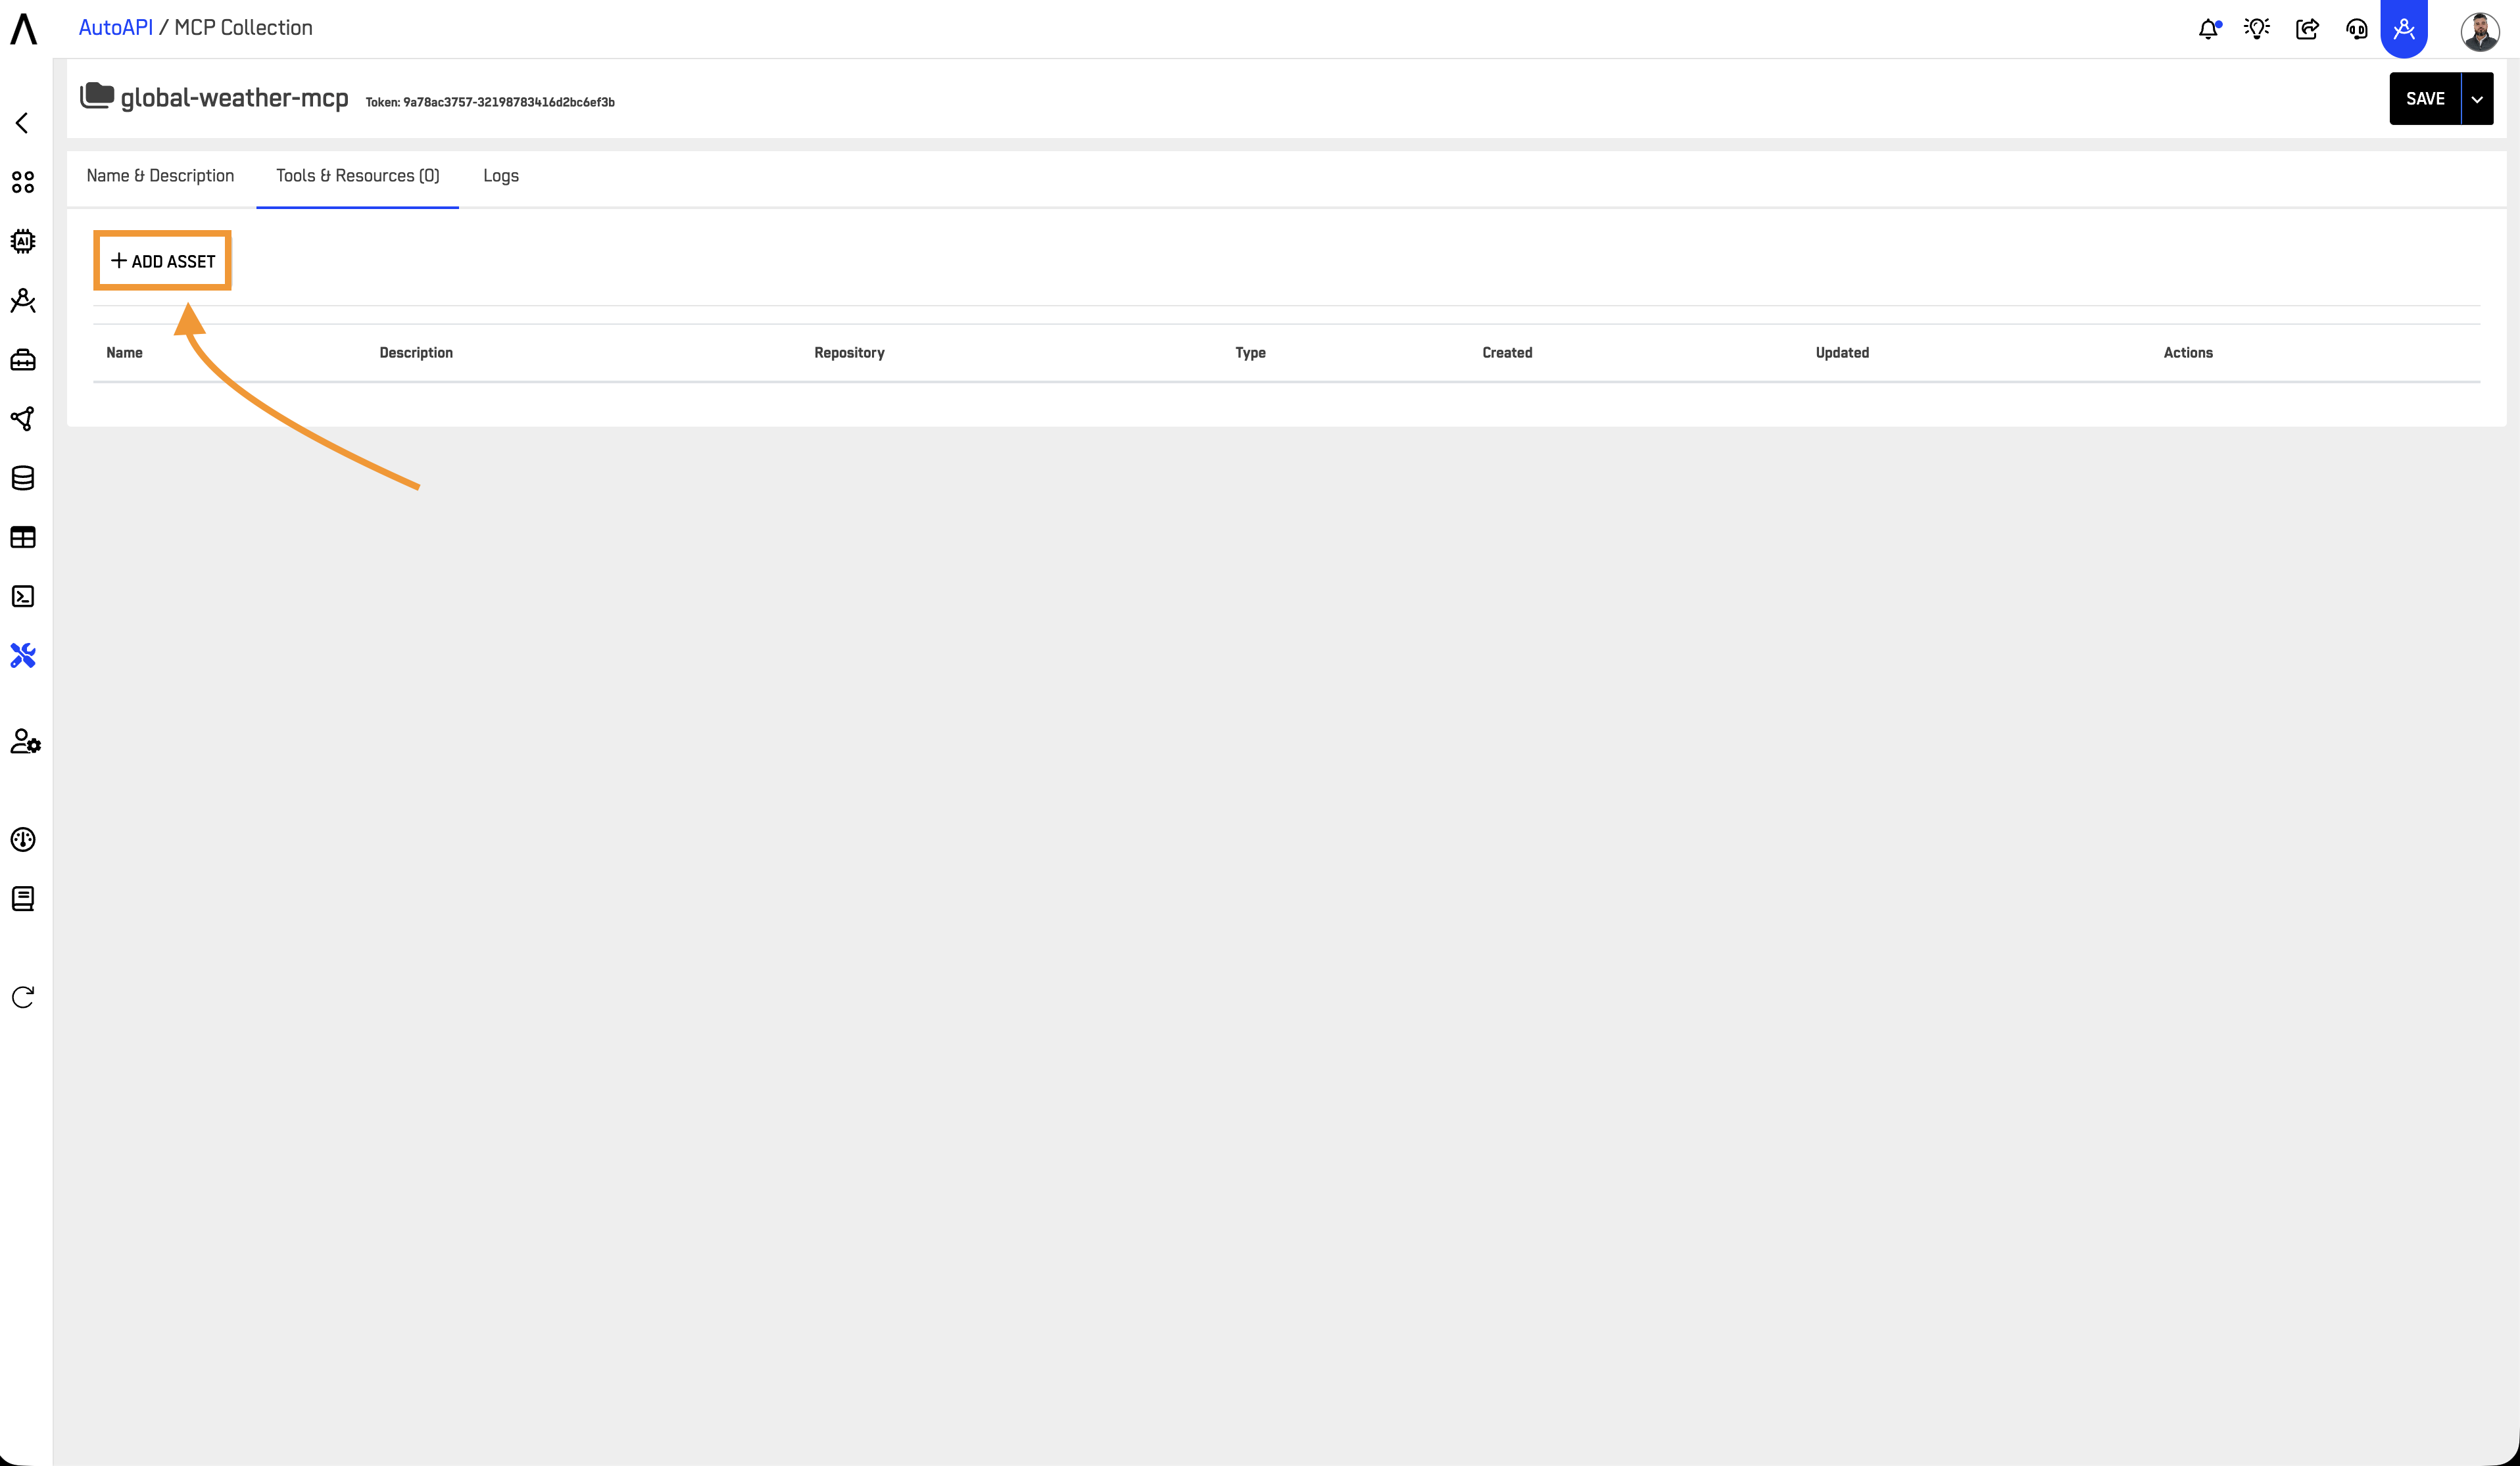
2.3 Add New Asset
Click + ADD ASSET
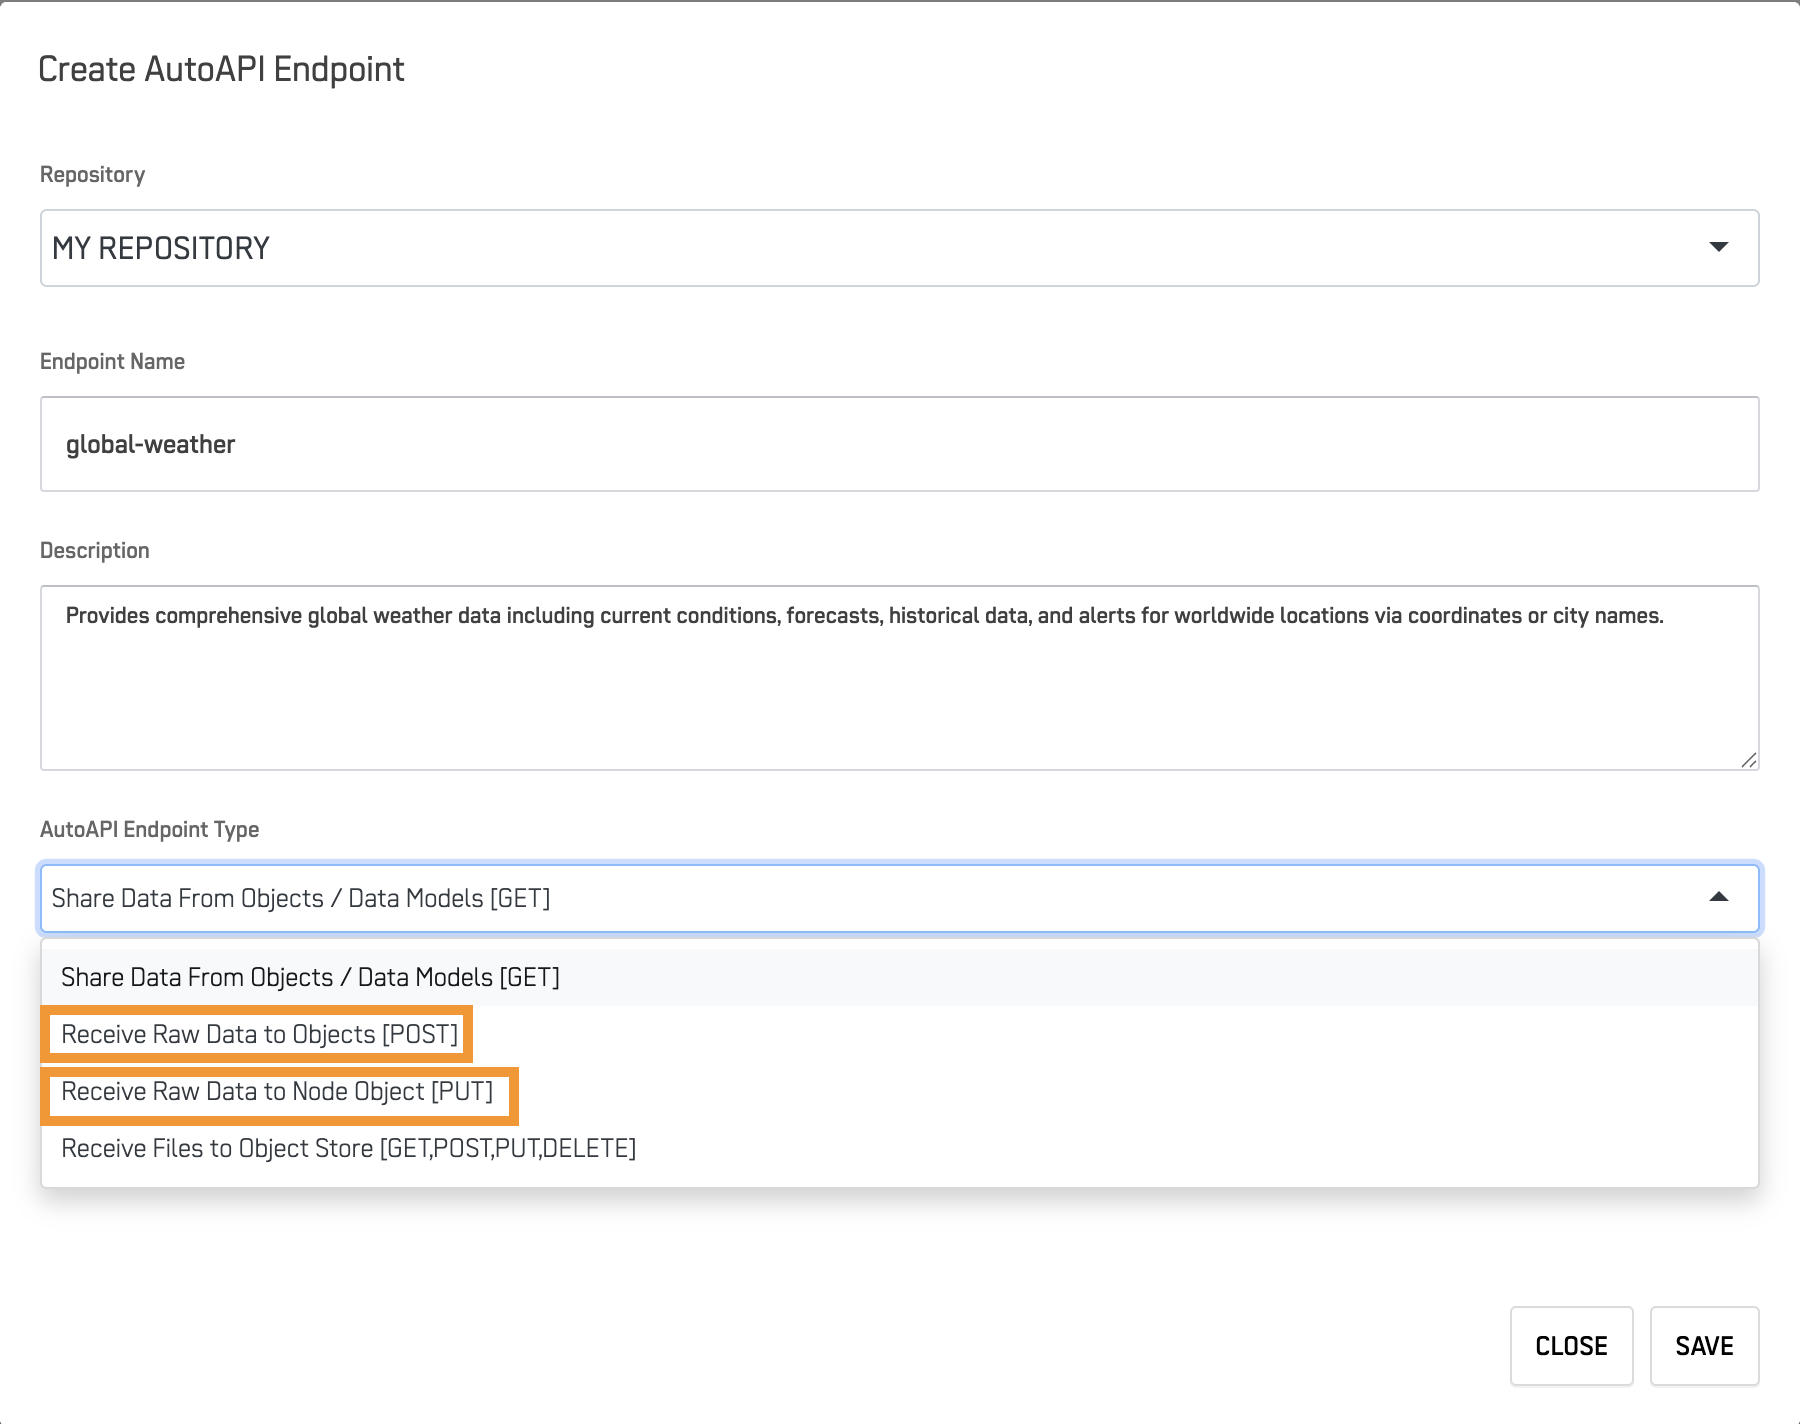
2.4 Configure Endpoint
Add the necessary information for your AutoAPI and select a method (Endpoint).
Basic Settings
- Name: Descriptive identifier (e.g., "CustomerInformation")
- Description: What data this provides (be specific - AI agents use this to understand when to query this resource)
- Repository: Select data source
Endpoint Type
| Type | Use Case | HTTP Method |
|---|---|---|
| Share Data [GET] | Query/retrieve data | GET |
| Receive Data [POST] | Submit new records/data | POST |
Add the necessary information for your AutoAPI and select a method (Endpoint).
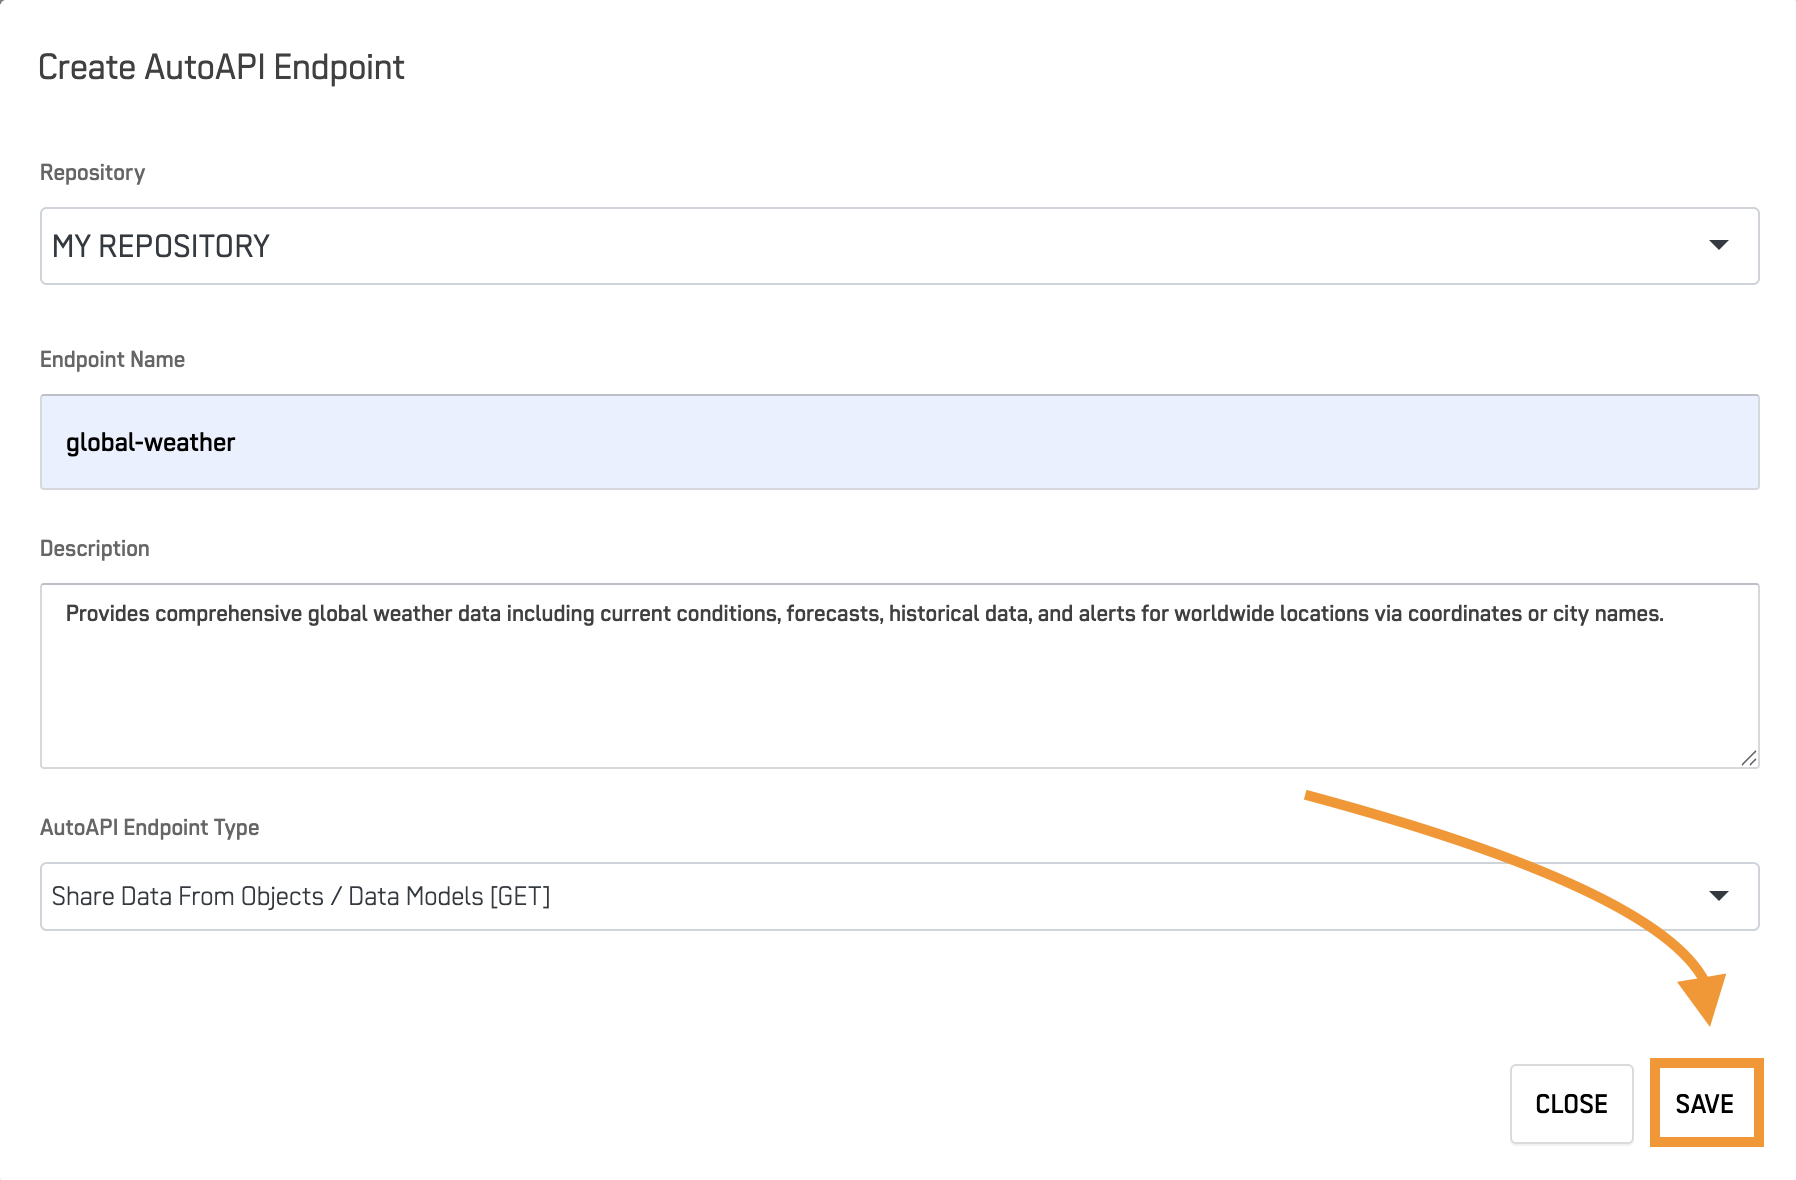
2.5 Save Asset
Press the "Save Button".
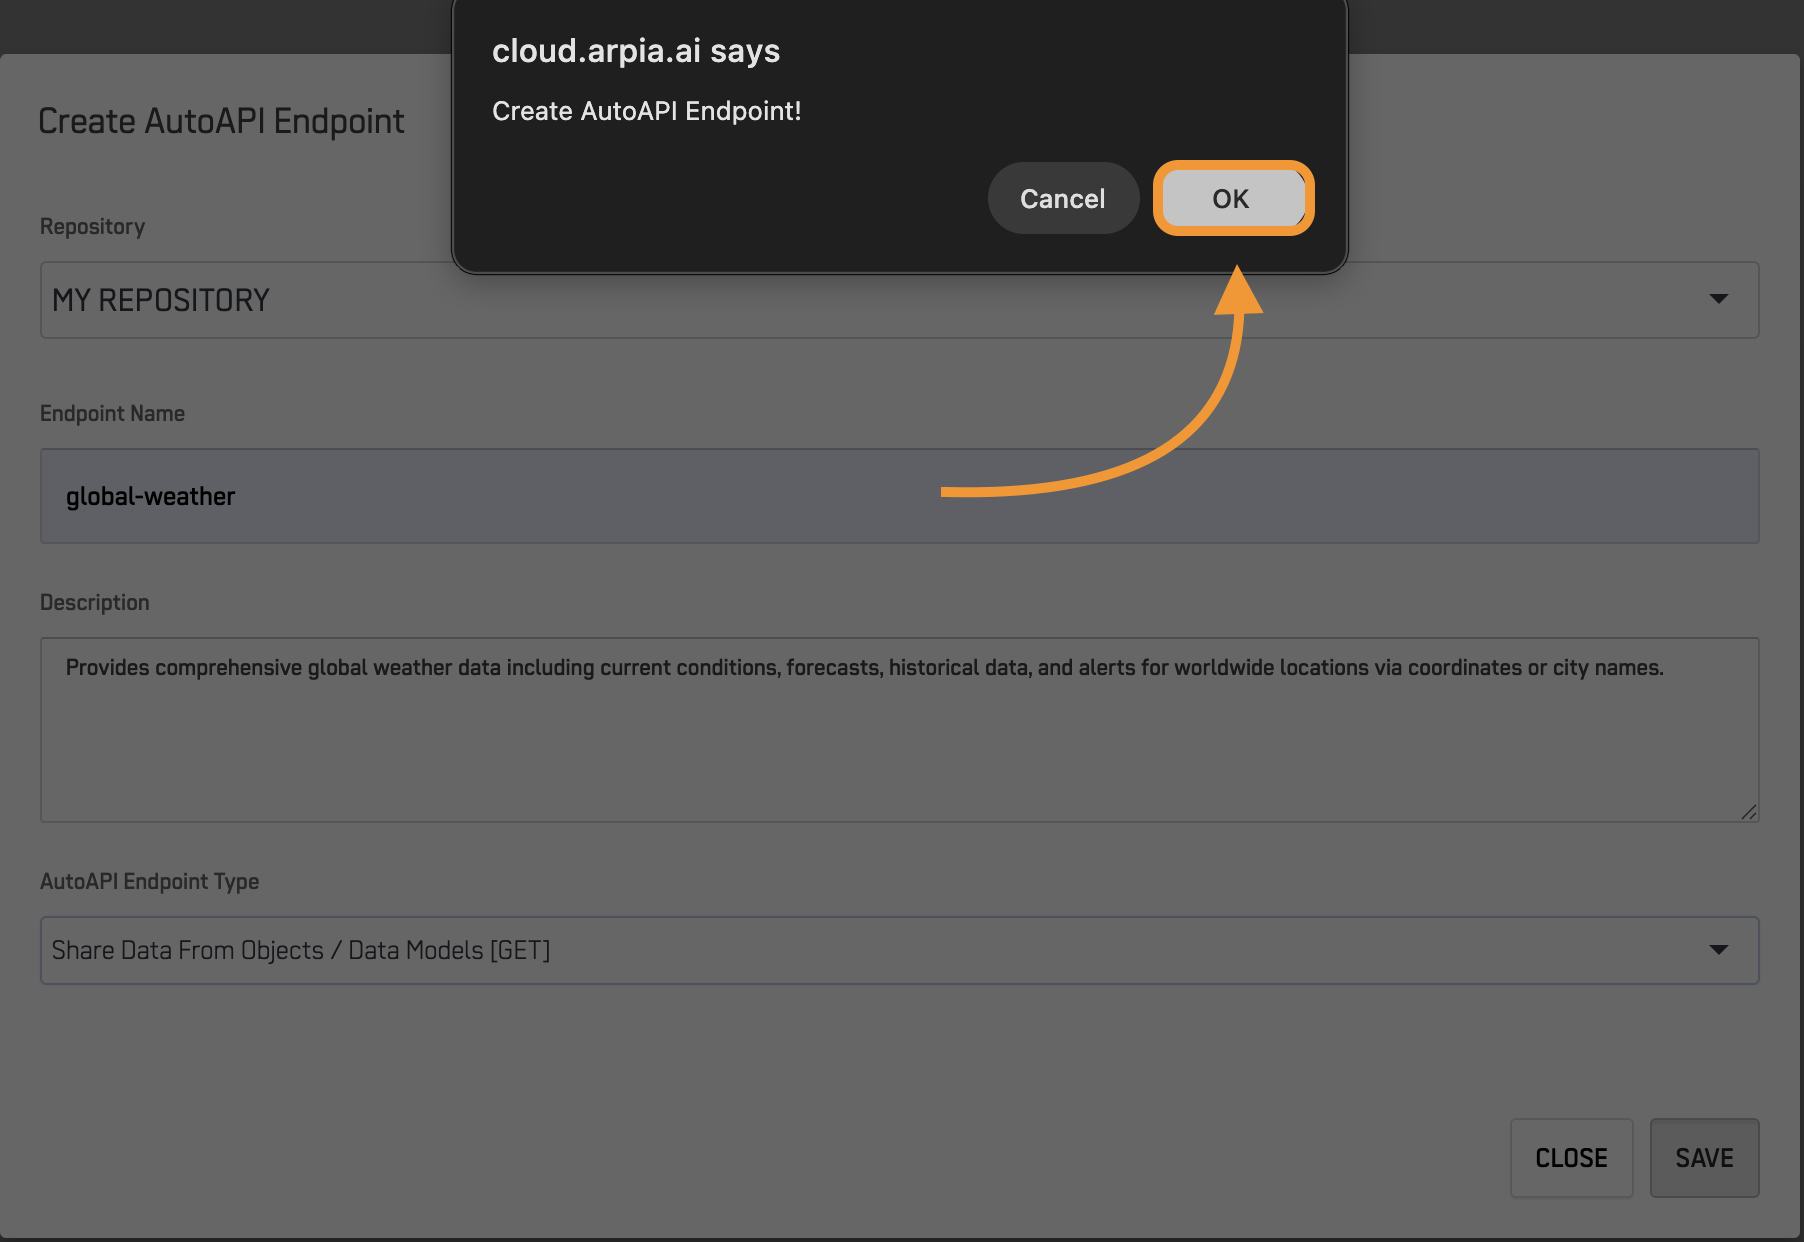
2.6 Confirm Asset Creation
From the popup screen press OK.
2.7 Edit Asset Configuration
From the Asset list press "Edit" on the Asset you created.
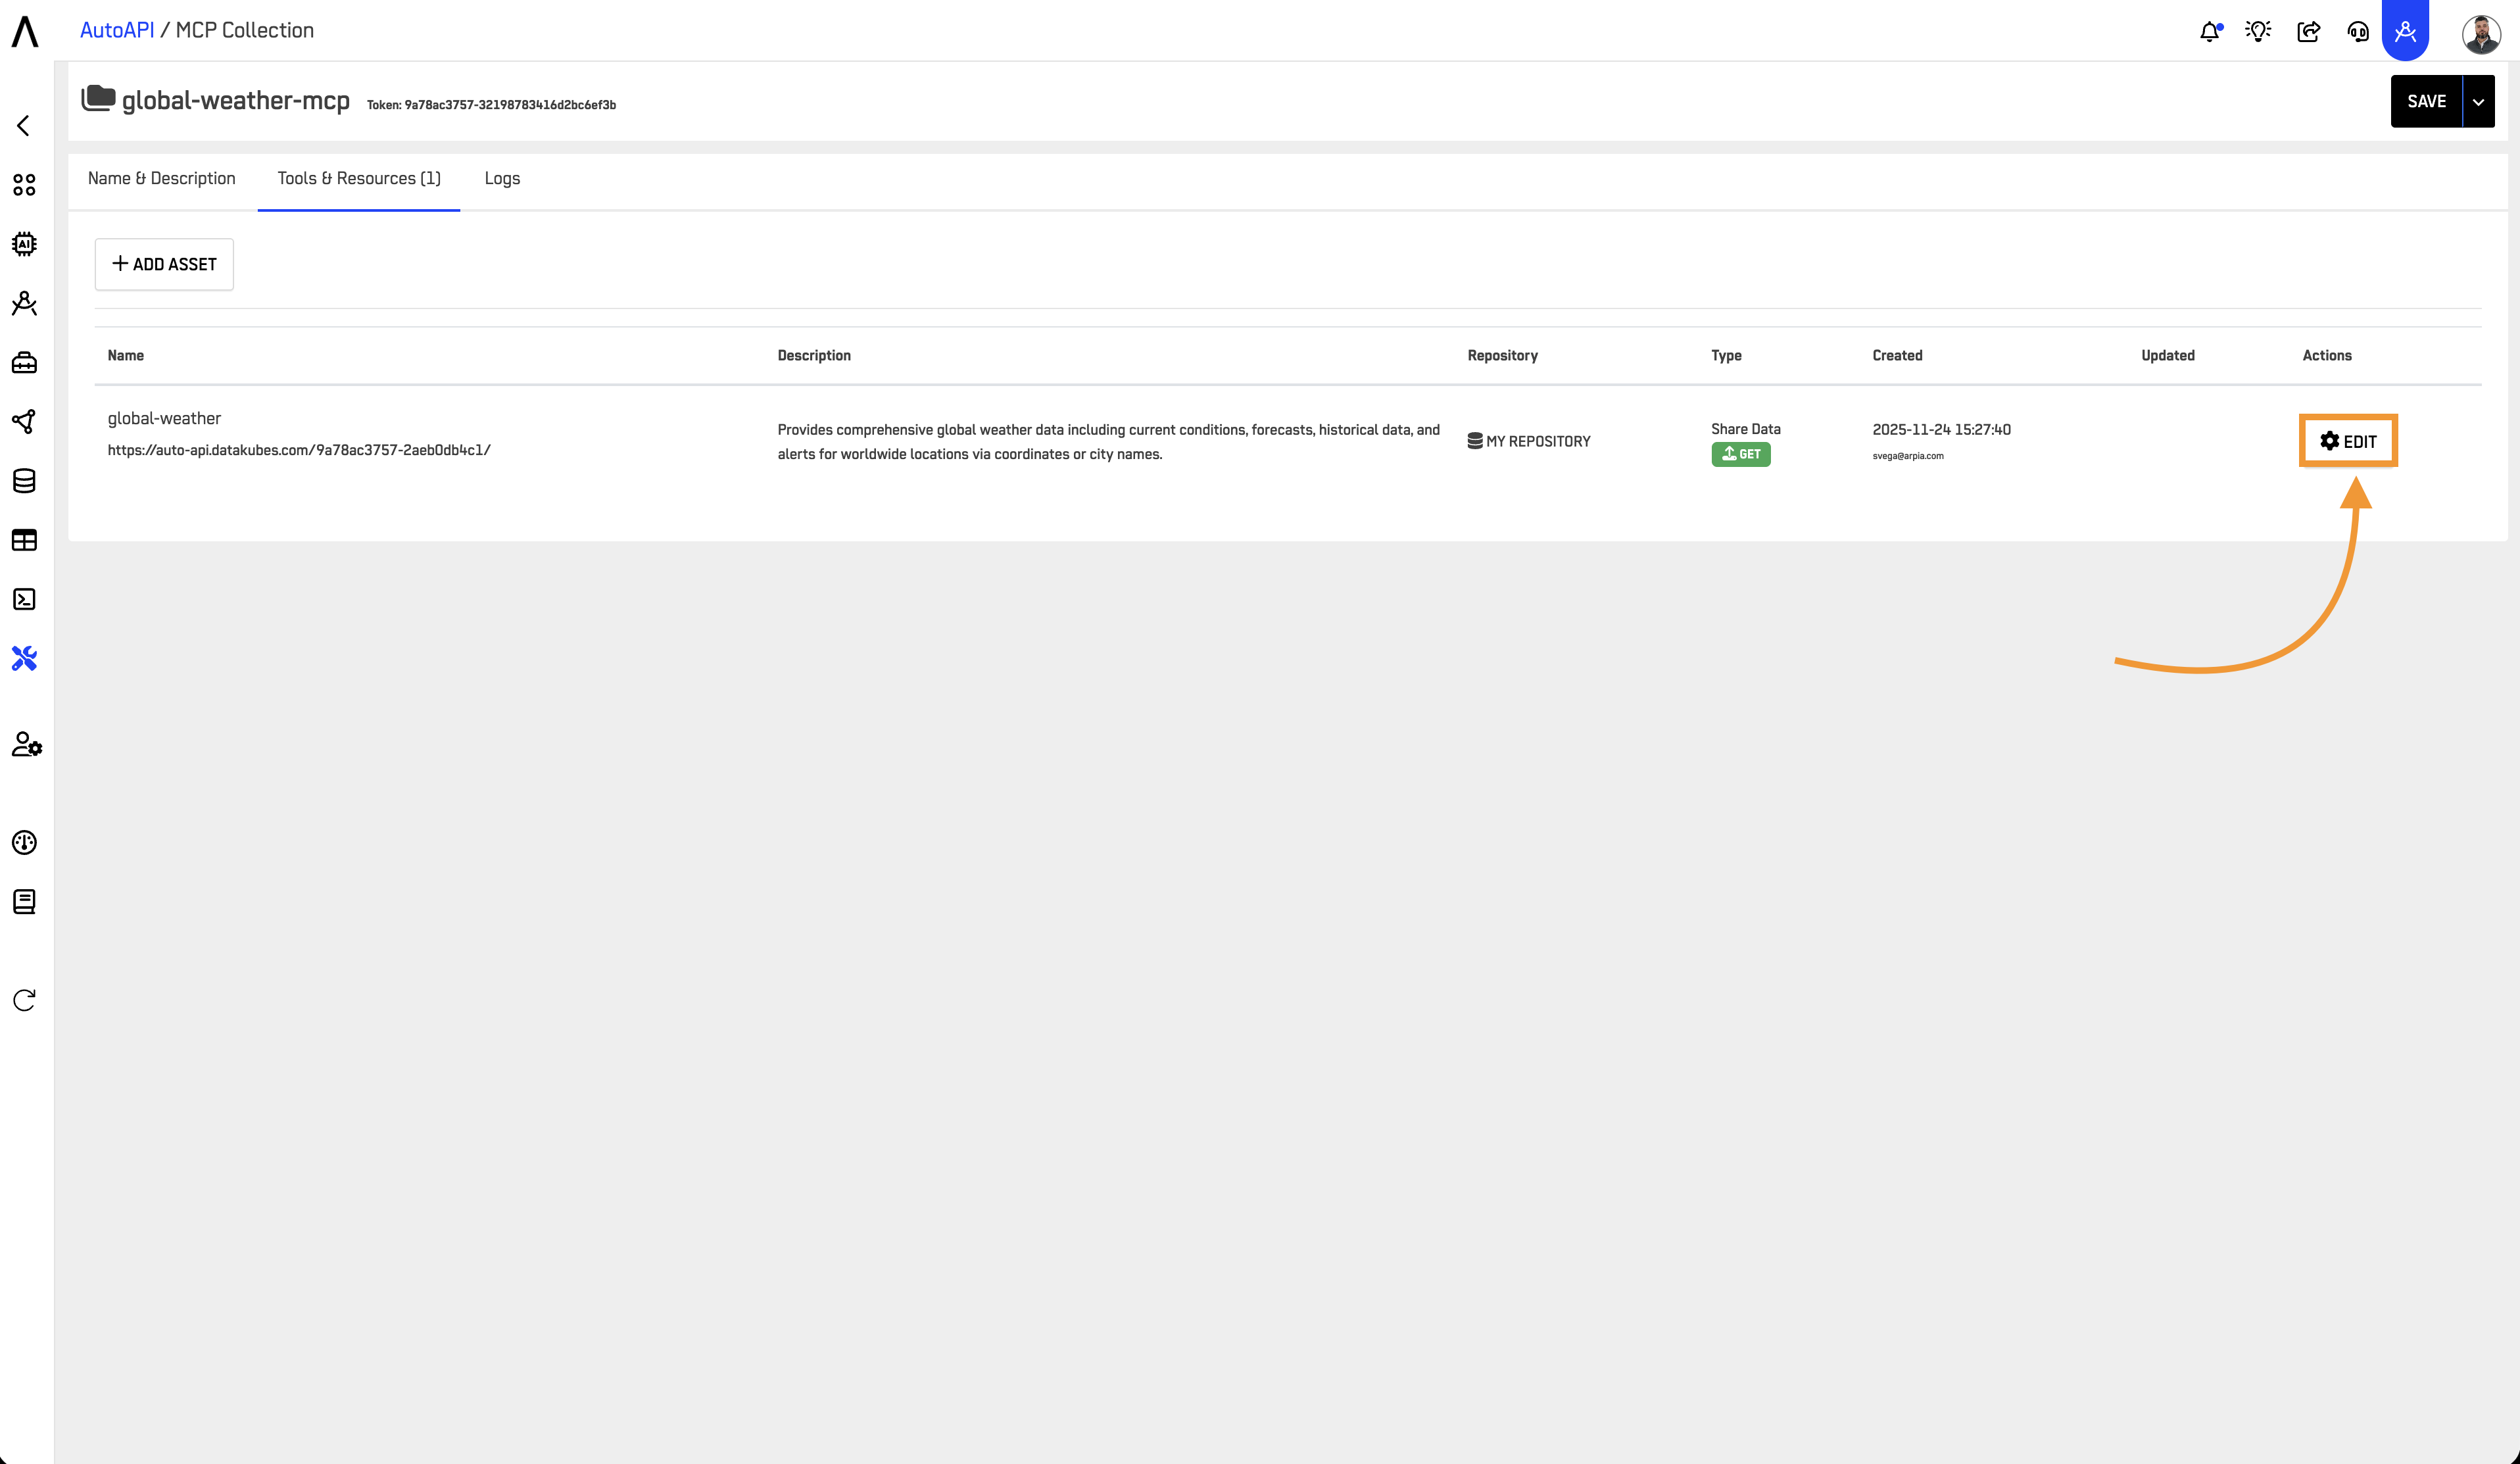
2.8 Open Configuration Tab
Go into the "Configuration" Tab.
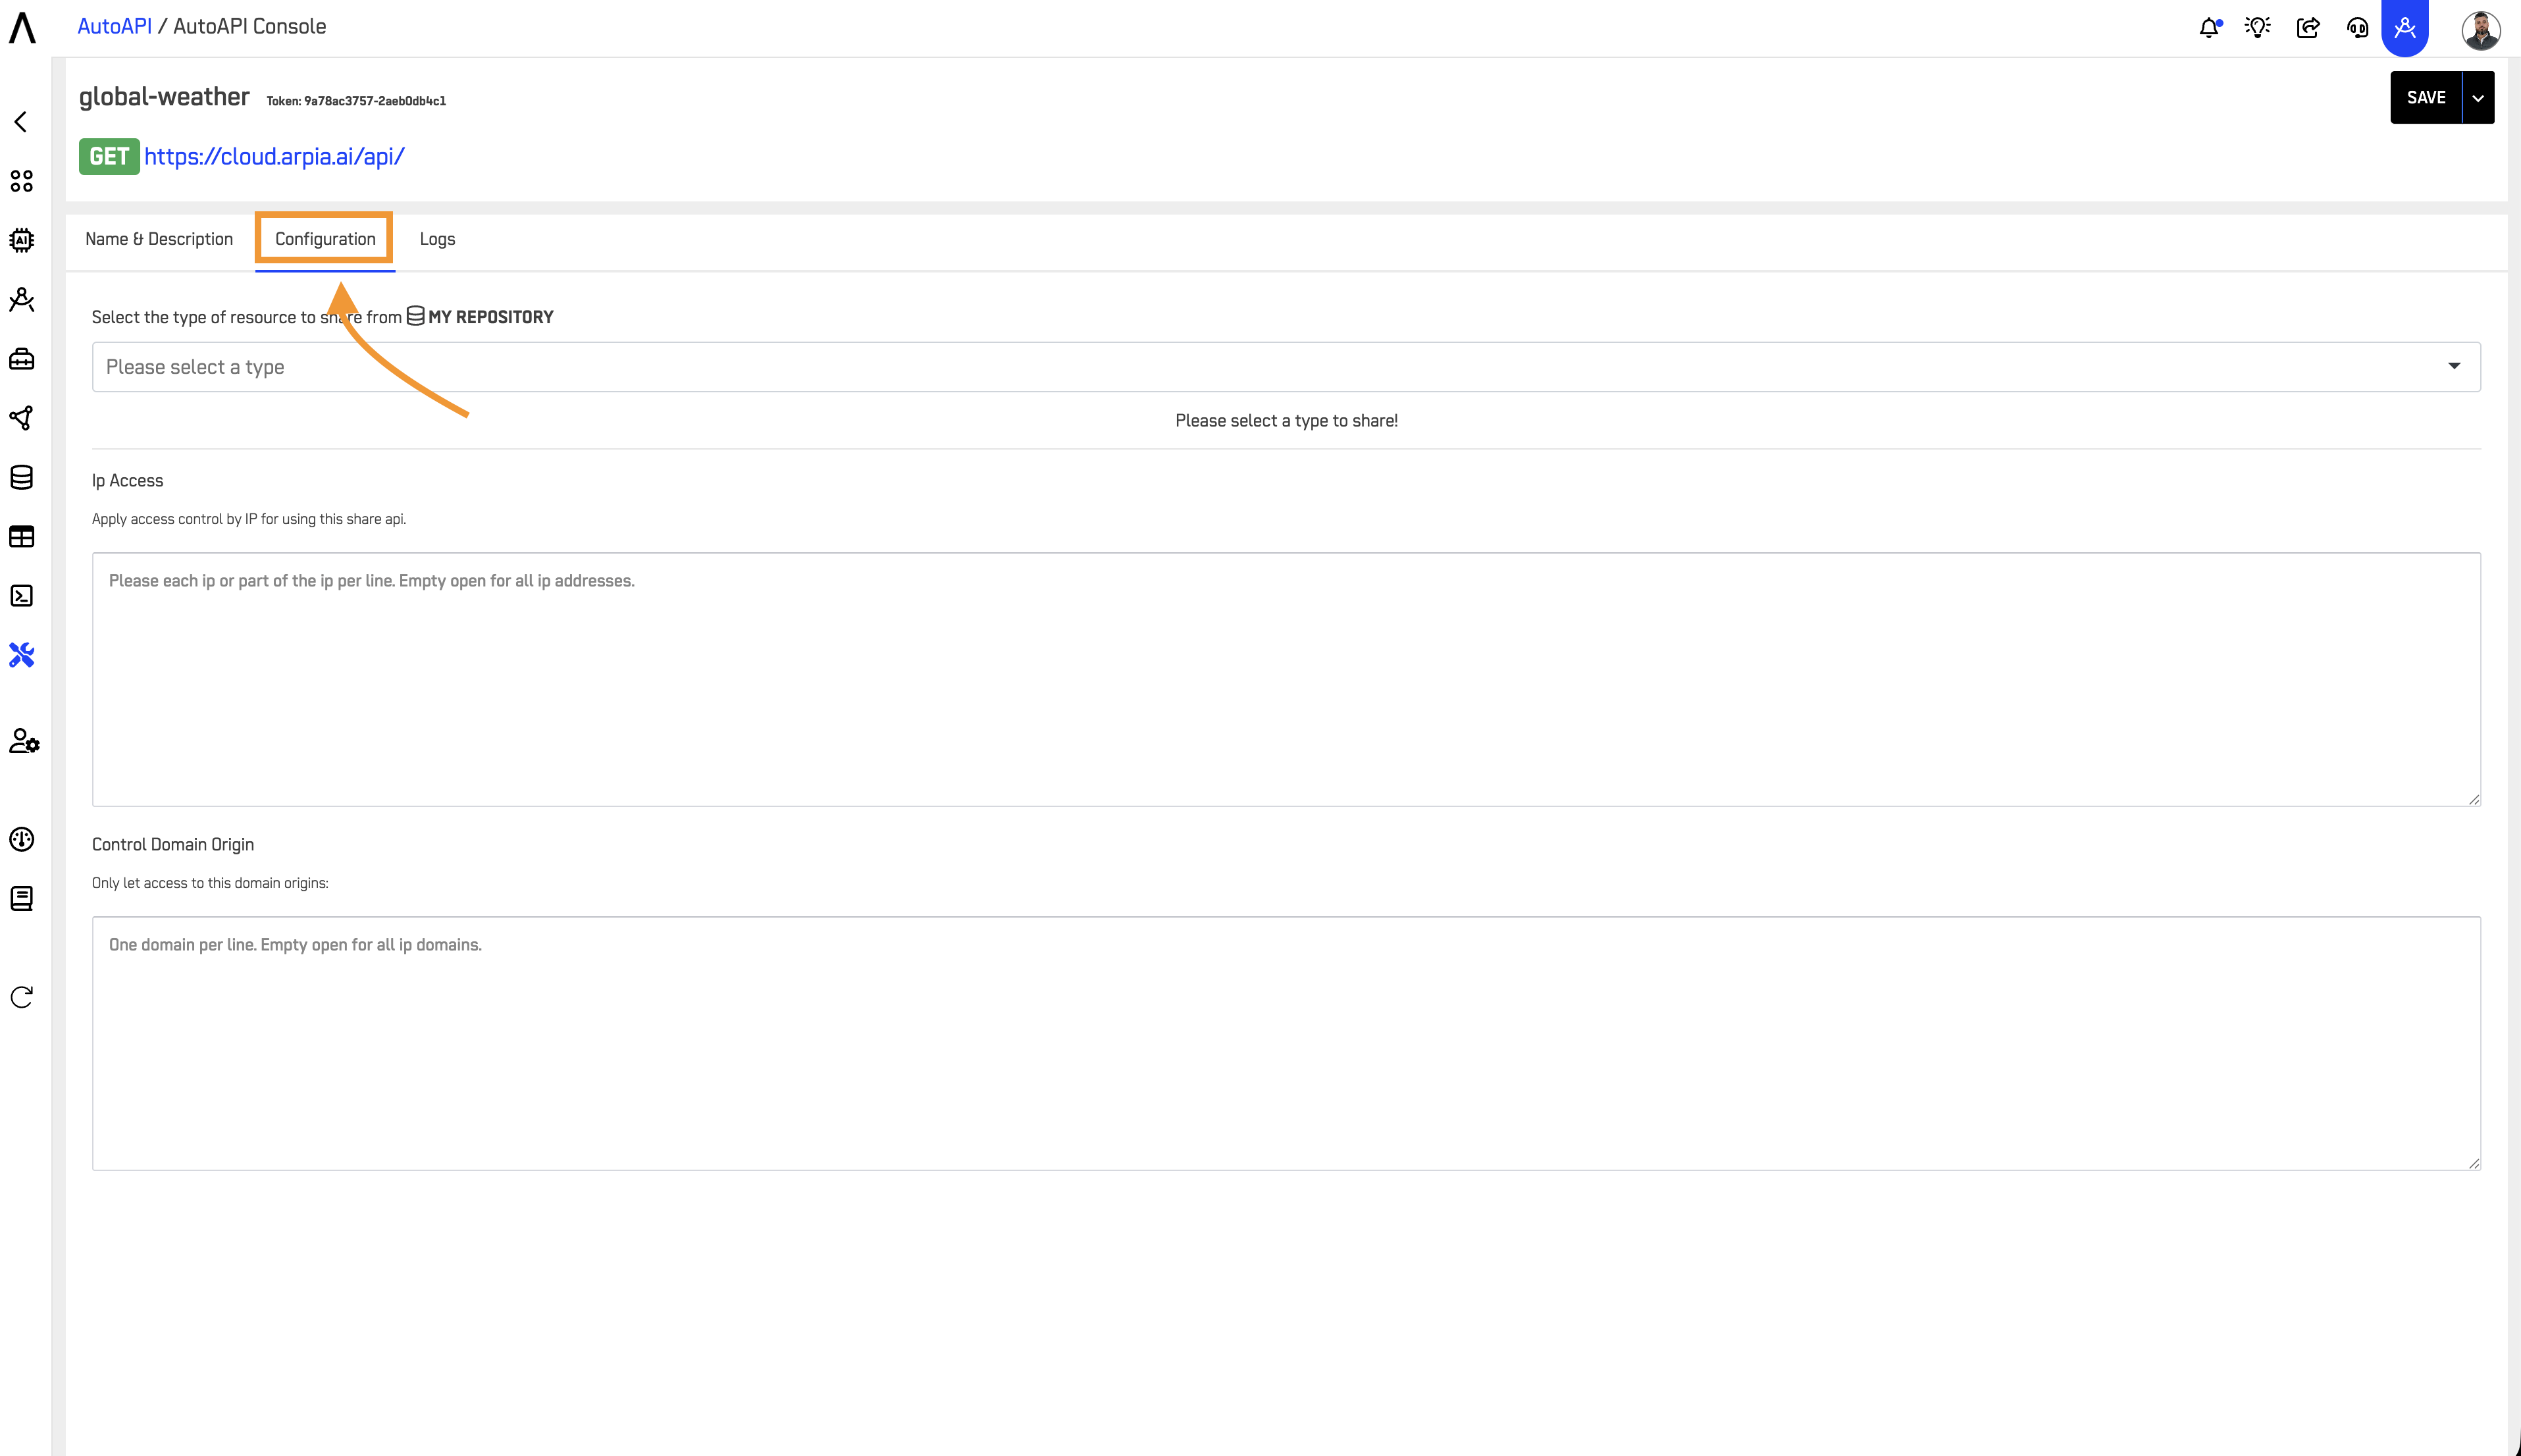
🔍 Step 3: Configure GET AutoAPI (Read Data)
Navigate to the "Configuration" Tab to set up your GET AutoAPI for querying data.
3.1 Select Data Source
Choose the object you would like to retrieve data from. You have two options:
- Share Repository Object: Select a "Data Object" from your repository (traditional table structure)
- Share Kube Model: Select a "Node" from your Kubes model (cube-based data model)

This allows you to access either traditional table structures or cube-based data models depending on your needs.
Note: Only data sources with Arpia Intelligence configured will appear in this list. If you don't see your table/kube, ensure you've completed the Arpia Intelligence setup.
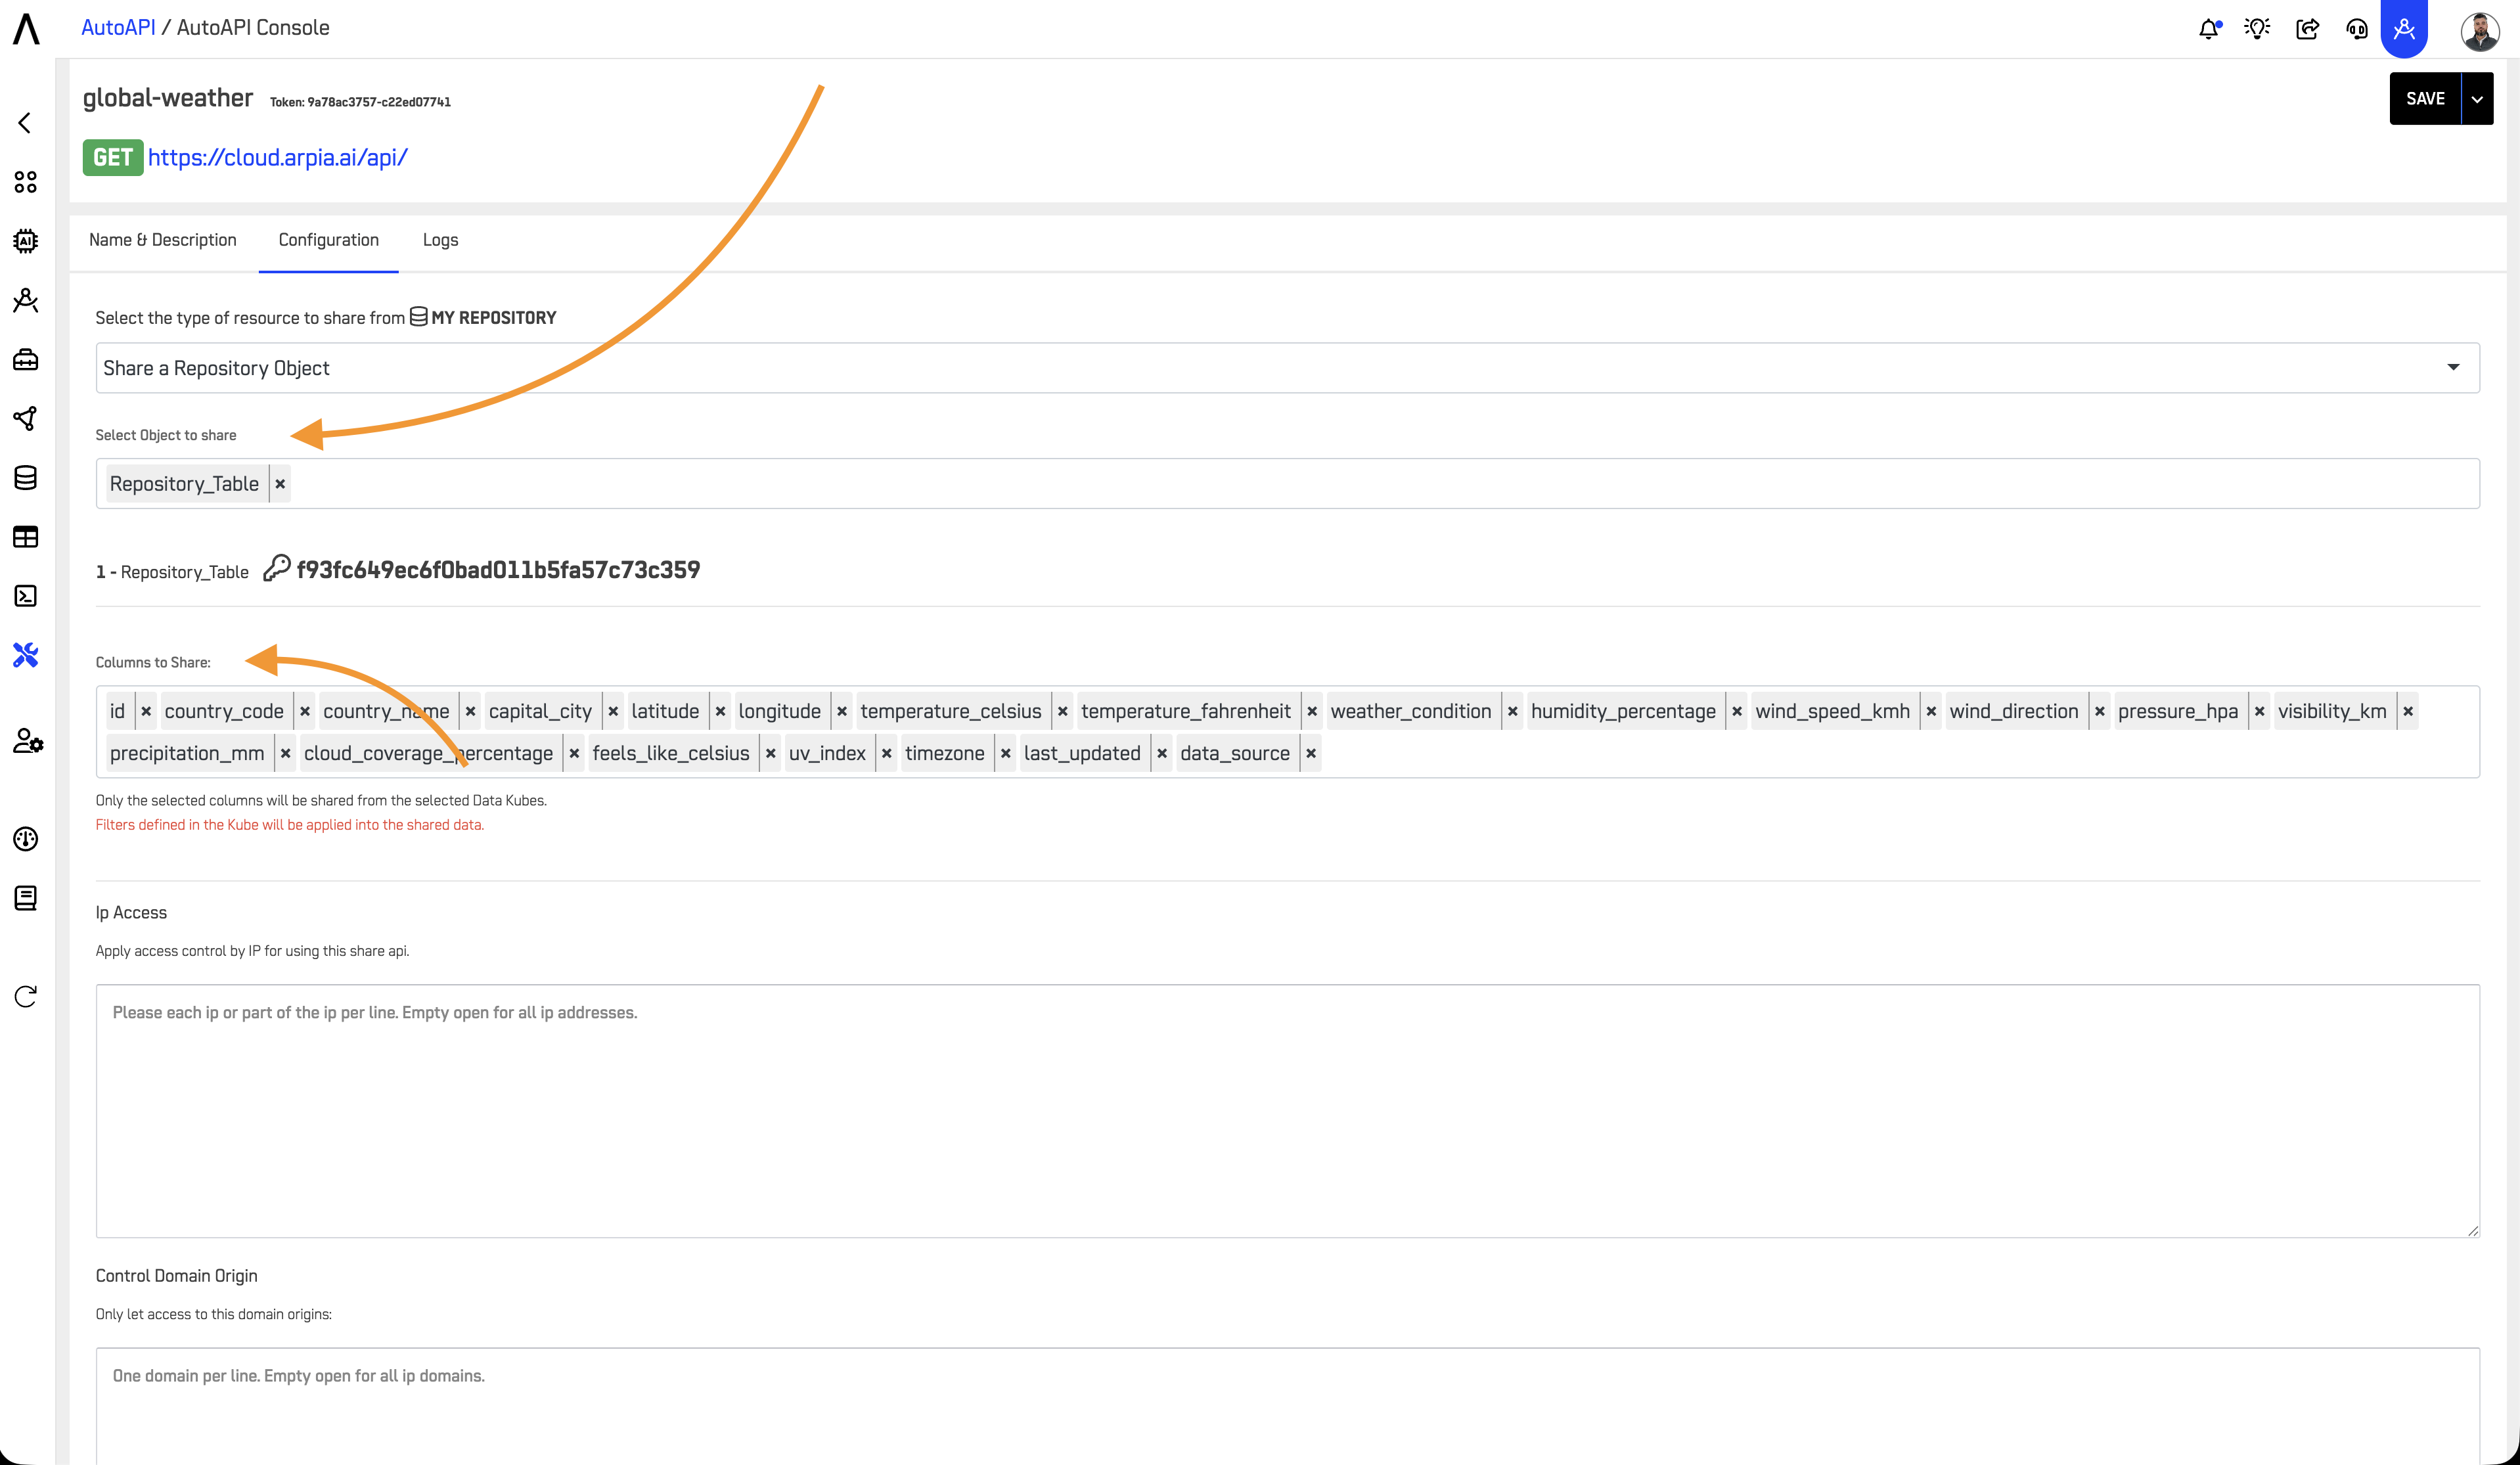
3.2 Configure Columns
Once you've selected your data source:
- Review the available columns from your selected table or cube
- Select which specific columns you want to expose through your AutoAPI
- Data Security Considerations:
- Exclude personally identifiable information (PII) unless absolutely necessary
- Avoid exposing sensitive fields like passwords, tokens, or private keys
- Consider whether aggregated data would be sufficient instead of row-level detail
- Review your organization's data classification policies
3.3 Save and Activate
After configuring your data source and columns:
- Review your selections to ensure they meet your requirements
- Click the save button to activate your AutoAPI
- Your API endpoint will be ready for use immediately after saving
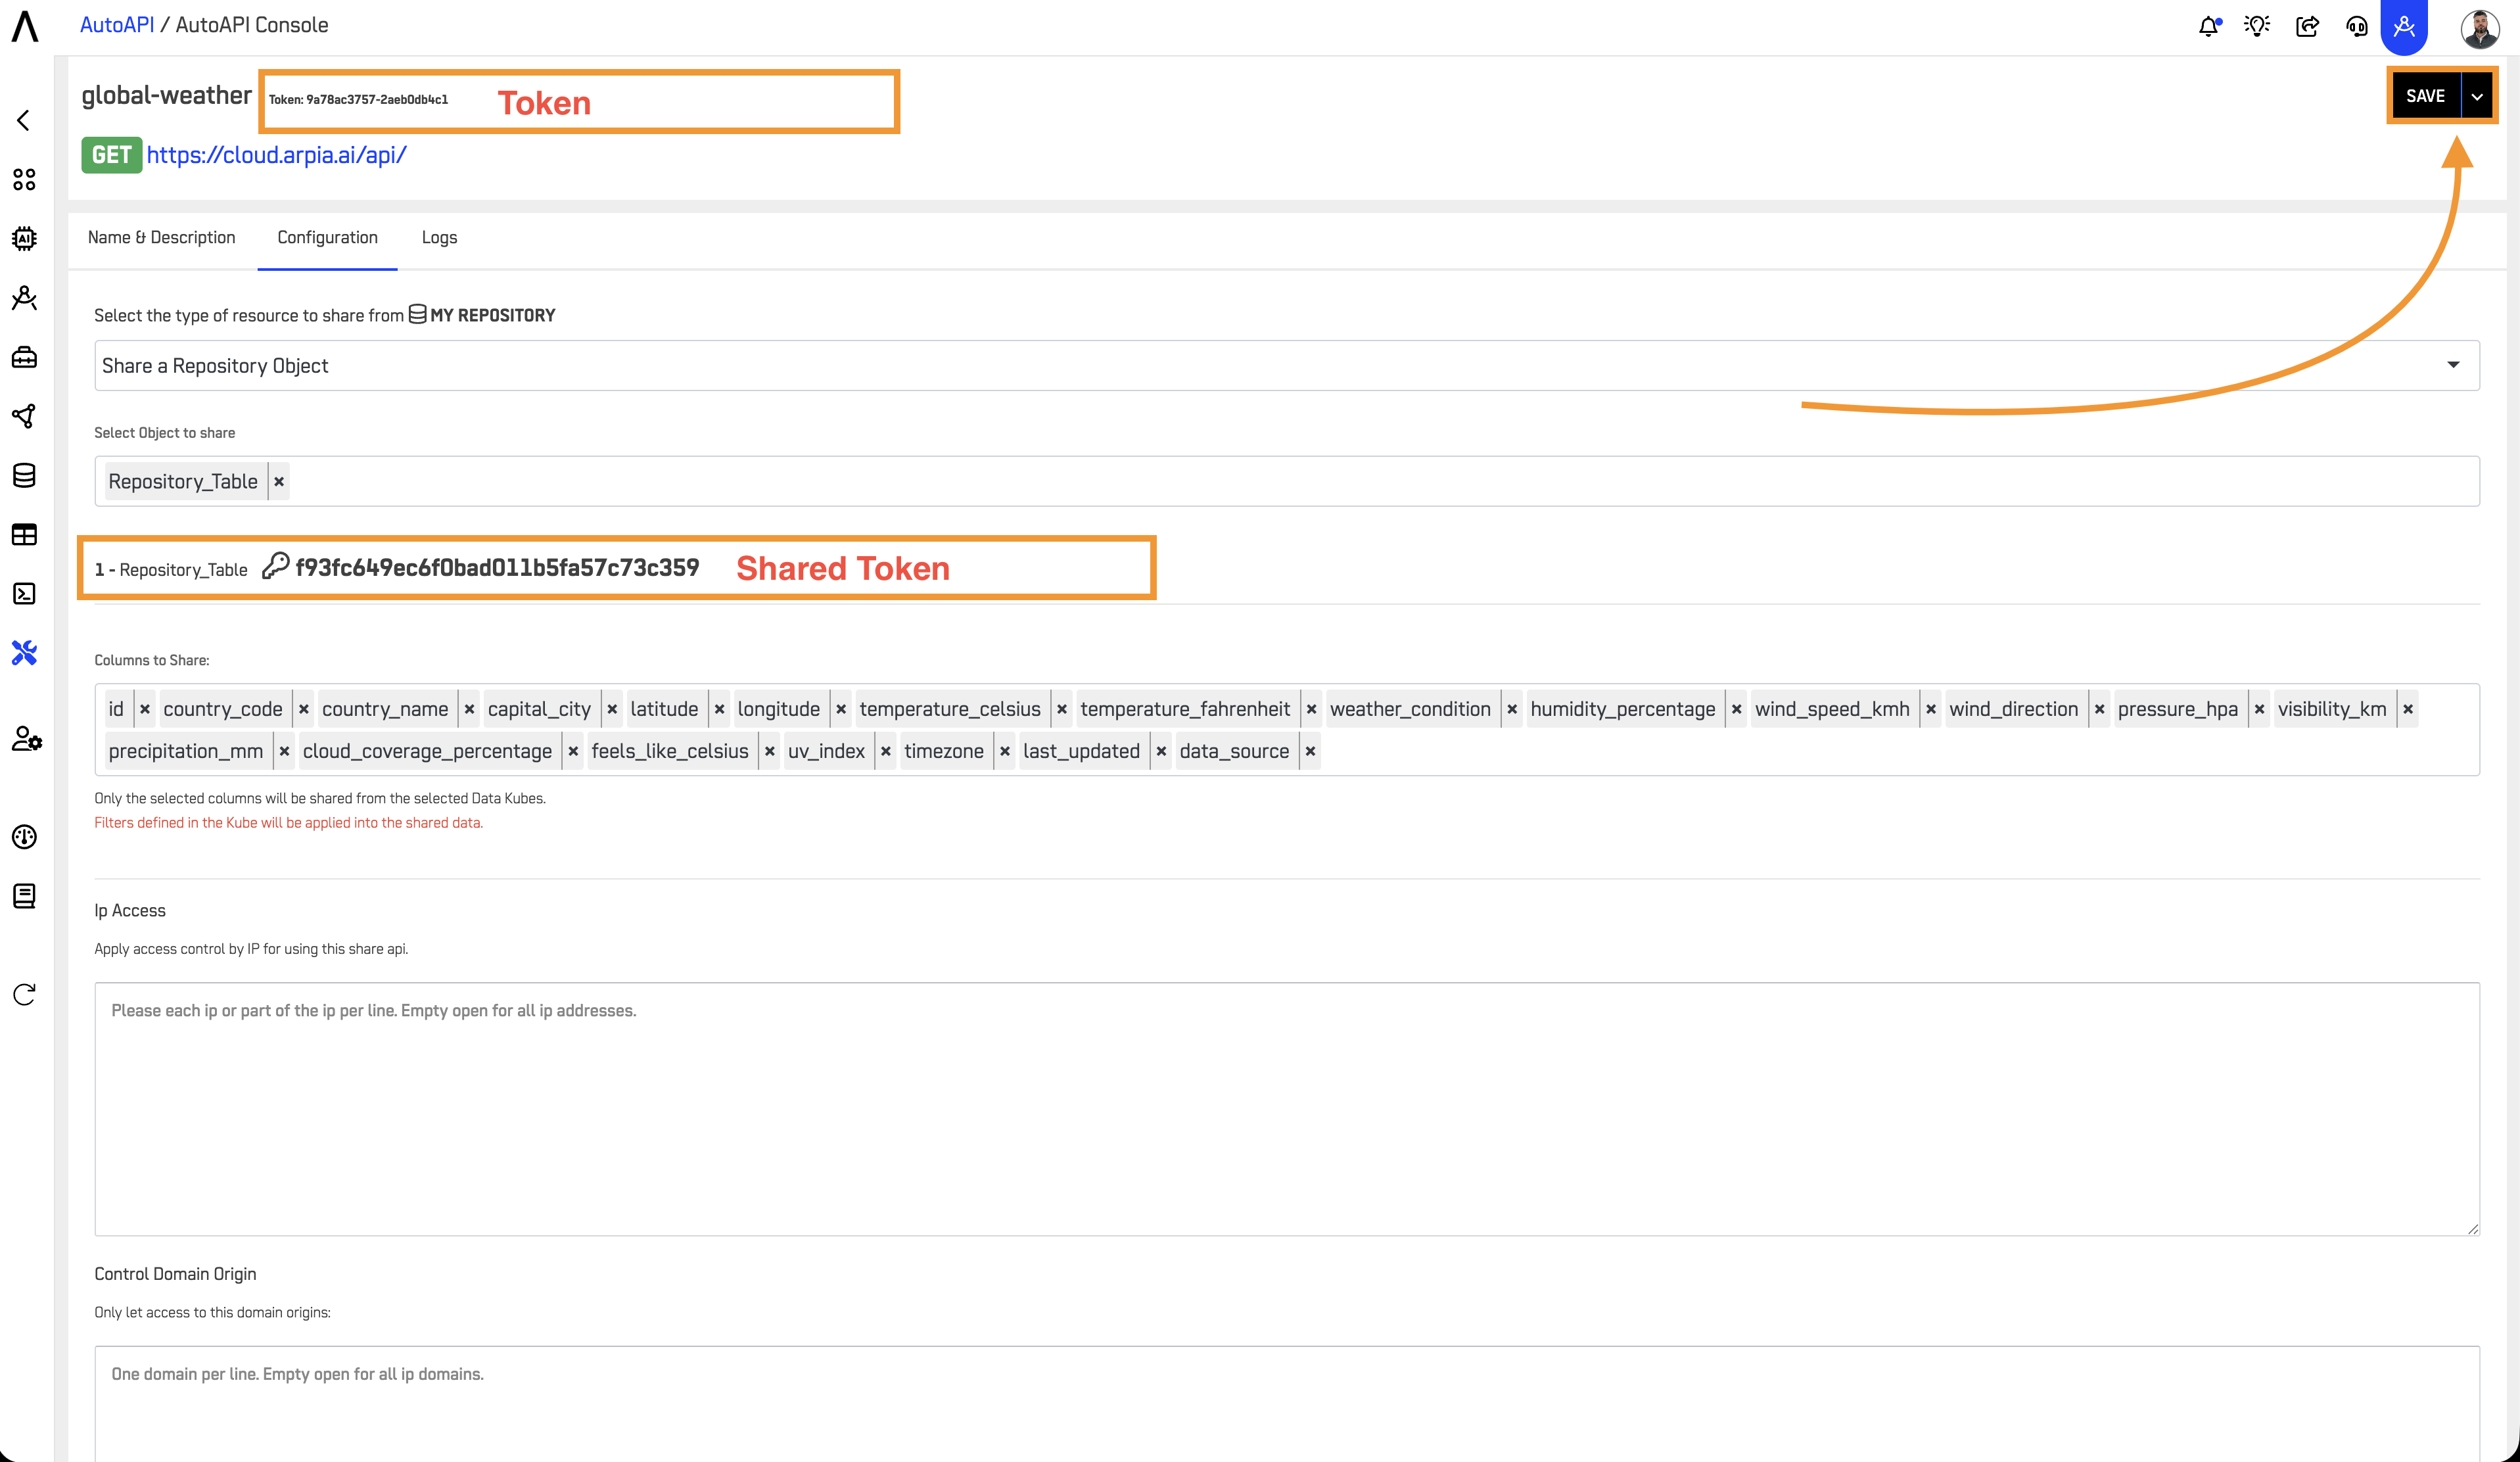
3.4 Locate Your Resource Token
After saving your AutoAPI endpoint:
- Navigate back to the Tools & Resources tab
- Find your resource in the list
- The Resource Token (Shared Token) is displayed in the resource details
- Copy this token - you'll need it for testing individual endpoints
📝 Step 4: Configure POST AutoAPI (Submit Data)
If you selected "Receive Data [POST]" as your endpoint type, follow these additional configuration steps.
4.1 Define Input Schema
In the Configuration tab:
- Map Input Fields: Define which fields your endpoint will accept
- Set Field Types: Specify data types (string, number, date, boolean)
- Mark Required Fields: Indicate which fields are mandatory
- Add Validation Rules: Set constraints (min/max values, regex patterns, allowed values)
4.2 Configure Data Destination
Specify where submitted data should be stored:
- Target Table/Object: Select the destination in your repository
- Field Mapping: Map input fields to database columns
- Default Values: Set automatic values for fields not provided in submissions
4.3 Security Settings for POST Endpoints
POST endpoints require additional security considerations:
- Enable request validation to prevent malformed data
- Set rate limits to prevent abuse
- Configure allowed IP ranges if applicable
- Enable audit logging for all submissions
- Consider requiring variant tokens for write operations
🧪 Step 5: Test Your Endpoints
5.1 Test Individual AutoAPI Endpoint
Once your AutoAPI is activated, you can test it using the following URL format:
https://cloud.arpia.ai/api/?token=YOUR_RESOURCE_TOKEN&shared_token=YOUR_RESOURCE_TOKEN
Parameters:
token: Your Resource Token (found in the resource details)shared_token: Same as token (legacy parameter support)
Finding Your Tokens:
- Resource Token: Go to Tools & Resources → Click on your resource → Copy the token displayed
Example:
If your resource token is: b3cb7ee2af-2c6f4ef6b5
Your complete URL would be:
https://cloud.arpia.ai/api/?token=b3cb7ee2af-2c6f4ef6b5&shared_token=b3cb7ee2af-2c6f4ef6b5
Expected Success Response:
{
  "status": "success",
  "data": [
    {
      "id": 1,
      "name": "Sample Record",
      "created": "2025-11-25T10:00:00Z"
    }
  ],
  "count": 1,
  "page": 1
}
Common Error Responses:
// 401 Unauthorized - Invalid token
{
  "error": "Authentication failed",
  "message": "Invalid or missing token"
}
// 403 Forbidden - No access to resource
{
  "error": "Access denied",
  "message": "Your token does not have permission to access this resource"
}
// 400 Bad Request - Invalid parameters
{
  "error": "Invalid request",
  "message": "Invalid filter format in 'filters' parameter"
}
// 500 Internal Server Error - Server issue
{
  "error": "Internal server error",
  "message": "An unexpected error occurred. Please contact support with transaction ID: abc123xyz"
}
5.2 Test Your MCP Collection
Test the entire MCP collection endpoint:
https://cloud.arpia.ai/mcp/?token=YOUR_COLLECTION_TOKEN
Parameters:
token: Your Collection Token (found at the top of your collection details page)
Finding Your Collection Token:
- Go to AutoAPI / MCP Server
- Click "Edit" on your collection
- Copy the token displayed at the top of the page
Example:
If your collection token is: 9a78ac3757-32198783416d2bc6ef3b
Your complete URL would be:
https://cloud.arpia.ai/mcp/?token=9a78ac3757-32198783416d2bc6ef3b
Expected Success Response:
A successful connection returns JSON with the MCP server capabilities:
{
  "name": "ARPIA MCP API",
  "version": "1.0.1",
  "protocol": "MCP (Model Context Protocol)",
  "mcp_methods": [
    "resources/list",
    "resources/read",
    "tools/list",
    "tools/call"
  ],
  "resources": [
    {
      "name": "Customer Information",
      "description": "Customer and sales information",
      "token": "b3cb7ee2af-2c6f4ef6b5"
    }
  ]
}
Common Error Responses:
// 401 Unauthorized - Invalid collection token
{
  "error": "Authentication failed",
  "message": "Invalid collection token"
}
// 404 Not Found - Collection doesn't exist
{
  "error": "Collection not found",
  "message": "No collection exists with this token"
}
Troubleshooting Testing Issues:
-
Can't find your token?
- Collection Token: AutoAPI / MCP Server → Edit collection → Top of page
- Resource Token: Tools & Resources tab → Resource details
-
Getting 401 errors?
- Verify you copied the entire token without spaces
- Check that the token hasn't been regenerated
- Ensure the collection/resource is still active
-
Getting timeout errors?
- Check your data source connection is active
- Verify repository is accessible from ARPIA
- Test with smaller result sets using
results=10parameter
-
No resources appearing?
- Ensure Arpia Intelligence is configured on your data sources
- See the Arpia Intelligence configuration guide for setup instructions
🔌 Step 6: Connect AI Agents
6.1 Connecting to Claude (claude.ai)
For Enterprise and Team Plans (Owners and Primary Owners)
Note: Only Primary Owners or Owners can configure connectors on Claude for Work (Team and Enterprise) plans. Once configured, individual users must connect to enable the connector.
Configuration Steps:
- Navigate to Admin settings → Connectors
- Click "Add custom connector" at the bottom of the section
- Add your MCP server URL in this format:
https://cloud.arpia.ai/mcp/?token=YOUR_COLLECTION_TOKEN
Example: https://cloud.arpia.ai/mcp/?token=9a78ac3757-32198783416d2bc6ef3b
-
(Optional) Click "Advanced settings" if you want to configure OAuth:
- OAuth Client ID: Leave blank (not required for token-based auth)
- OAuth Client Secret: Leave blank (not required for token-based auth)
- These fields are only needed if you've configured custom OAuth for your organization
-
Click "Add" to finish configuration
What Happens Next:
- The connector appears in the organization's connector list
- Individual users will see it available in their Settings → Connectors
- Users must individually connect and enable the connector to use it
For Pro and Max Plans
- Navigate to Settings → Connectors
- Locate the "Connectors" section
- Click "Add custom connector" at the bottom
- Add your MCP server URL:
https://cloud.arpia.ai/mcp/?token=YOUR_COLLECTION_TOKEN
- (Optional) Configure OAuth in Advanced settings if needed
- Click "Add"
Enabling the Connector in Claude
After adding the connector:
- Open any Claude chat
- Click the "Search and tools" button (lower left of chat interface)
- Find your ARPIA connector in the list
- Click "Connect" to authenticate (if required)
- Toggle on the specific tools you want to enable
- Start using natural language to query your data
Example Claude Query:
Show me active customers from the Production CRM Data
Claude will automatically:
- Discover available resources from your MCP collection
- Query the appropriate endpoint
- Format and present the results
6.2 Removing or Editing Connectors
To modify or remove your connector:
- Navigate to Settings → Connectors
- Locate your ARPIA connector
- Click "Remove" to delete, or click the three dots (•••) to edit
- Follow the prompts to make changes
6.3 Development Tools (Cursor)
For AI-powered development environments, add to your configuration file:
For Cursor:
// .cursor/config.json
{
  "mcpServers": {
    "arpia": {
      "url": "https://cloud.arpia.ai/mcp/?token=YOUR_COLLECTION_TOKEN"
    }
  }
}
6.4 ChatGPT Integration
ChatGPT integration requires creating a custom GPT with an OpenAPI specification:
- Go to ChatGPT → Explore GPTs → Create
- Configure your GPT with ARPIA MCP capabilities
- Add OpenAPI specification:
{
  "openapi": "3.0.0",
  "info": {
    "title": "ARPIA MCP Server",
    "version": "1.0.1"
  },
  "servers": [{
    "url": "https://cloud.arpia.ai/api",
    "description": "ARPIA MCP Server"
  }],
  "components": {
    "securitySchemes": {
      "bearerAuth": {
        "type": "http",
        "scheme": "bearer",
        "bearerFormat": "token"
      }
    }
  },
  "security": [{
    "bearerAuth": []
  }]
}
- Configure authentication with your Collection Token
🔒 Step 7: Configure Variant Tokens (Optional)
Variant tokens add an additional security layer by applying role-based access rules to resources.
7.1 What Are Variant Tokens?
Variant tokens allow you to:
- Create multiple access levels for the same resource
- Apply row-level security filters automatically
- Grant time-limited access to specific users
- Implement role-based access control (RBAC)
7.2 Creating Variant Tokens
- Navigate to your resource → Configuration tab
- Scroll to Security Variants section
- Click "Add Variant"
- Configure variant settings:
| Setting | Description | Example |
|---|---|---|
| Variant Token | Auto-generated token | toMBmPXFmf |
| Variant Name | Descriptive identifier | "Sales Team Access" |
| Access Rules | Filters applied automatically | region = 'North' |
| Expiration | Optional time limit | 90 days |
| Allowed IPs | IP whitelist (optional) | 192.168.1.0/24 |
7.3 Using Variant Tokens
Pass the variant token as an additional parameter:
https://cloud.arpia.ai/api/?token=YOUR_RESOURCE_TOKEN&variant=YOUR_VARIANT_TOKEN
The variant rules are applied automatically to all queries, ensuring users only see data they're authorized to access.
7.4 Variant Token Best Practices
- Create separate variants for each role or department
- Set expiration dates for temporary access grants
- Use IP restrictions for sensitive data access
- Monitor variant usage in the Logs tab
- Rotate variant tokens when team members leave
🔑 Authentication Methods
ARPIA supports multiple authentication methods with the following priority order:
Priority Order (Highest to Lowest)
- Authorization Header (Recommended for production)
Authorization: Bearer YOUR_COLLECTION_TOKEN
- URL Parameters (Convenient for testing)
?token=YOUR_COLLECTION_TOKEN
- Custom Headers (Legacy support)
X-ARPIA-Token: YOUR_COLLECTION_TOKEN
Security Recommendation: Use the Authorization header in production to prevent tokens from appearing in server logs and browser history.
🔄 MCP Operations Flow
1. Resource Discovery
AI agents first discover available resources:
// Request
{
  "method": "resources/list"
}

// Response
{
  "resources": [
    {
      "name": "Customer Information",
      "description": "Customer and sales information",
      "token": "b3cb7ee2af-2c6f4ef6b5",
      "type": "data"
    },
    {
      "name": "Order History",
      "description": "Historical order data",
      "token": "c4de8ff3bg-3d7g5hg7c6",
      "type": "data"
    }
  ]
}
2. Schema Inspection
Before querying, AI agents inspect the available fields:
// Request
{
  "method": "tools/list",
  "resource": "b3cb7ee2af-2c6f4ef6b5"
}

// Response
{
  "name": "Customer Information",
  "fields": [
    {"name": "id", "type": "integer", "description": "Unique customer ID"},
    {"name": "name", "type": "string", "description": "Customer name"},
    {"name": "status", "type": "string", "description": "Account status"},
    {"name": "created", "type": "datetime", "description": "Creation date"}
  ],
  "filterable": ["status", "created"],
  "sortable": ["name", "created"],
  "aggregatable": ["status"]
}
3. Data Query
Finally, AI agents query the data:
// Request
{
  "method": "tools/call",
  "operation": "resource_read",
  "resource_token": "b3cb7ee2af-2c6f4ef6b5",
  "params": {
    "filters": [
      {"field": "status", "type": "=", "value": "ACTIVE"}
    ],
    "orderby": [
      {"field": "created", "type": "DESC"}
    ],
    "results": 50,
    "page": 1
  }
}

// Response
{
  "status": "success",
  "data": [
    {
      "id": 1001,
      "name": "Acme Corp",
      "status": "ACTIVE",
      "created": "2025-11-15T08:30:00Z"
    },
    {
      "id": 1002,
      "name": "TechStart Inc",
      "status": "ACTIVE",
      "created": "2025-11-14T14:22:00Z"
    }
  ],
  "count": 50,
  "page": 1,
  "total_records": 247
}
⚡ Performance & Limits
Query Performance
- Target Response Time: <1 second for typical queries
- Maximum Timeout: 30 seconds
- Optimization Tips:
- Use filters to reduce dataset size
- Index filtered columns in your database
- Use pagination for large result sets
- Request only needed columns
- Configure appropriate Dimension Limiting in Arpia Intelligence settings
Rate Limits
| Tier | Requests/Minute | Burst Capacity | Daily Limit |
|---|---|---|---|
| Standard | 100 | 150 | 10,000 |
| Enterprise | Configurable | Configurable | Unlimited |
Rate Limit Response (HTTP 429):
{
  "error": "Rate limit exceeded",
  "message": "You have exceeded 100 requests per minute",
  "retry_after": 45,
  "limit": 100,
  "window": "1 minute"
}
Handling Rate Limits:
- Implement exponential backoff retry logic
- Cache frequently accessed data
- Use pagination to distribute load
- Contact support for enterprise rate limit increases
Data Limits
- Page size: 1-1,000 records per request (recommended: 100)
- Maximum payload size: 5MB per response
- File uploads (POST endpoints): 100MB maximum
- Query complexity: Maximum 10 filters per request
- Sort fields: Maximum 3 sort criteria per request
📊 Monitoring & Troubleshooting
View Activity Logs
- Navigate to your collection
- Click the Logs tab
- Review operation details:
| Column | Description |
|---|---|
| Transaction ID | Unique identifier for support requests |
| Timestamp | When the request occurred |
| IP Address | Source of the request |
| Status | NORMAL, ERROR, WARNING |
| Method | resources/list, tools/call, etc. |
| Resource | Which endpoint was accessed |
| Duration | Response time in milliseconds |
| Payload | Request details (click to expand) |
Common Issues & Solutions
| Issue | Cause | Solution |
|---|---|---|
| Timeout (30s) | Large dataset query | Add filters, reduce page size, index database columns |
| Auth Failed (401) | Invalid token | Verify collection token, check token hasn't been regenerated |
| Access Denied (403) | Insufficient permissions | Check variant token restrictions, verify user has resource access |
| Missing Fields | Column restrictions | Review endpoint configuration, ensure columns are selected |
| Slow Queries (>5s) | No indexes | Add indexes to filtered/sorted columns in your database |
| Empty Results | Overly restrictive filters | Review filter criteria, check data exists in source |
| Rate Limited (429) | Too many requests | Implement retry logic with exponential backoff, cache results |
| Malformed JSON | Invalid filter syntax | Validate JSON structure, check filter operator compatibility |
| Resource Not Found | Arpia Intelligence not enabled | Configure Arpia Intelligence on data source |
| No Dimension Data | Dimension Limiting too low | Increase Dimension Limiting in Generative Query Settings |
Troubleshooting Decision Tree
Is the endpoint responding?
├─ NO → Check collection/resource token validity
│       Check ARPIA service status
│       Verify network connectivity
│
└─ YES → Are you getting data?
    ├─ NO → Check filters aren't too restrictive
    │       Verify data exists in source
    │       Check variant token restrictions
    │       Verify Arpia Intelligence is configured
    │
    └─ YES → Is performance acceptable?
        ├─ NO → Add database indexes
        │       Reduce result page size
        │       Add more specific filters
        │       Optimize Dimension Limiting settings
        │
        └─ YES → Monitor regularly for changes
Getting Support
When contacting ARPIA support, provide:
- Transaction ID from logs
- Collection Token (first/last 4 characters only)
- Timestamp of the issue
- Complete error message
- Request payload (sanitize any sensitive data)
- Arpia Intelligence configuration (if issue relates to data access)
✨ Best Practices
1. Security First
Token Management:
- Store tokens in secure environment variables, never in code
- Rotate collection tokens quarterly
- Regenerate tokens immediately if compromised
- Use variant tokens for role-based access
- Monitor logs for unusual access patterns (new IPs, off-hours access)
Data Protection:
- Apply least-privilege principle to column selection
- Use variant tokens to enforce row-level security
- Enable IP restrictions for sensitive endpoints
- Set reasonable expiration times for temporary access
- Audit logs monthly for security review
2. Performance Optimization
Database Optimization:
- Create indexes on columns used in filters
- Index columns used for sorting
- Use composite indexes for multi-column filters
- Monitor query execution times in your database
Arpia Intelligence Optimization:
- Set appropriate Temperature values (lower = more deterministic)
- Configure Dimension Columns strategically for better AI understanding
- Use Dimension Limiting to balance context vs. performance
- Choose correct Usage Type for your use case (Generative AI Query recommended for MCP)
- See the Arpia Intelligence configuration guide for detailed optimization strategies
Query Optimization:
- Use reasonable page sizes (recommended: 100 records)
- Implement pagination for large datasets
- Cache frequently accessed, slowly-changing data
- Use specific filters to reduce result sets
- Request only necessary columns
Caching Strategy:
# Example: Simple cache implementation
from functools import lru_cache
from datetime import datetime, timedelta

@lru_cache(maxsize=100)
def get_cached_data(endpoint, cache_key):
    # Cache for 5 minutes
    return fetch_from_arpia(endpoint)
3. Clear Documentation
Resource Naming:
- Use descriptive, consistent naming conventions
- Include data domain in name (e.g., "CRM_Customers", "Finance_Invoices")
- Document any business logic or calculations
- Keep descriptions under 200 characters but informative
Change Management:
- Maintain a changelog for schema modifications
- Version your API configurations
- Notify users before breaking changes
- Test changes in development environment first
Example Resource Documentation:
Name: CRM_ActiveCustomers
Description: Active customer records with contact info and account status (updated nightly at 2 AM UTC)
Filters: status, region, account_type, created_date
Sort: name, created_date, last_activity
Arpia Intelligence: Generative AI Query enabled, Temperature=1, Dimension Limiting=20
Notes: Excludes test accounts and deleted records. Region field uses ISO 3166-1 alpha-2 codes.
4. Error Handling
Implement robust error handling in your integrations:
import requests
import time

def query_arpia_with_retry(url, max_retries=3):
    for attempt in range(max_retries):
        try:
            response = requests.get(url, timeout=30)

            if response.status_code == 200:
                return response.json()

            elif response.status_code == 429:  # Rate limited
                retry_after = int(response.headers.get('Retry-After', 60))
                time.sleep(retry_after)
                continue

            elif response.status_code in [500, 502, 503]:  # Server errors
                time.sleep(2 ** attempt)  # Exponential backoff
                continue

            else:  # Other errors (401, 403, 400, etc.)
                response.raise_for_status()

        except requests.exceptions.Timeout:
            if attempt == max_retries - 1:
                raise
            time.sleep(2 ** attempt)

    raise Exception(f"Failed after {max_retries} attempts")
5. Testing & Validation
Before Production:
- Test with small datasets first
- Verify all filters work as expected
- Test error scenarios (invalid tokens, missing data)
- Measure response times under load
- Validate data accuracy against source
- Confirm Arpia Intelligence is properly configured
Ongoing Monitoring:
- Set up alerts for error rate spikes
- Monitor average response times
- Track API usage patterns
- Review logs weekly for anomalies
- Verify Arpia Intelligence performance
🚀 Quick Start Example
Complete example using curl:
#!/bin/bash

# Configuration
COLLECTION_TOKEN="9a78ac3757-32198783416d2bc6ef3b"
RESOURCE_TOKEN="9a78ac3757-2c6f4ef6b5"
BASE_URL="https://cloud.arpia.ai"

# Test 1: Check MCP collection is accessible
echo "Testing MCP collection..."
curl -s -X GET "${BASE_URL}/mcp?token=${COLLECTION_TOKEN}" | jq '.'

# Test 2: Query specific resource with filters
echo -e "\nQuerying resource with filters..."
curl -s -X POST "${BASE_URL}/mcp" \
  -H "Authorization: Bearer ${COLLECTION_TOKEN}" \
  -H "Content-Type: application/json" \
  -d '{
    "method": "tools/call",
    "operation": "resource_read",
    "resource_token": "'${RESOURCE_TOKEN}'",
    "params": {
      "filters": [
        {"field": "status", "type": "=", "value": "ACTIVE"}
      ],
      "orderby": [
        {"field": "created", "type": "DESC"}
      ],
      "results": 10,
      "page": 1
    }
  }' | jq '.'

# Test 3: Direct AutoAPI endpoint access
echo -e "\nTesting direct AutoAPI endpoint..."
curl -s -X GET "${BASE_URL}/api/?token=${RESOURCE_TOKEN}&shared_token=${RESOURCE_TOKEN}" | jq '.'
Expected Output:
{
  "status": "success",
  "data": [
    {
      "id": 1001,
      "name": "Example Record",
      "status": "ACTIVE",
      "created": "2025-11-25T10:00:00Z"
    }
  ],
  "count": 10,
  "page": 1
}
📚 Related Documentation
- Arpia Intelligence Configuration Guide: Complete setup guide for configuring AI capabilities on your data sources
- AutoAPI REST Guide: Complete API reference with all endpoints and parameters
- Data Governance: Security policies, compliance, and audit procedures
- Integration Examples: Sample code in Python, Node.js, and other languages
- Troubleshooting Guide: Comprehensive error reference and solutions
For technical support or questions, contact: [email protected]
Updated 8 months ago