How to create an AI RAG
Step-by-Step Guide: AI RAG
This guide provides a comprehensive walkthrough on creating an AI RAG and integrating it with an AI Assistant. With this integration, the chat can respond with a more context-aware approach, using specific data from the organization or providing answers within a specific rule set of the company.
Step 1: Make sure to already have all the required data objects
To create an AI RAG, it is important to meet certain requirements.
- SingleStore Repository: A vector database optimized for AI-based applications.

- Storage Bucket: Required for storing documents for processing.
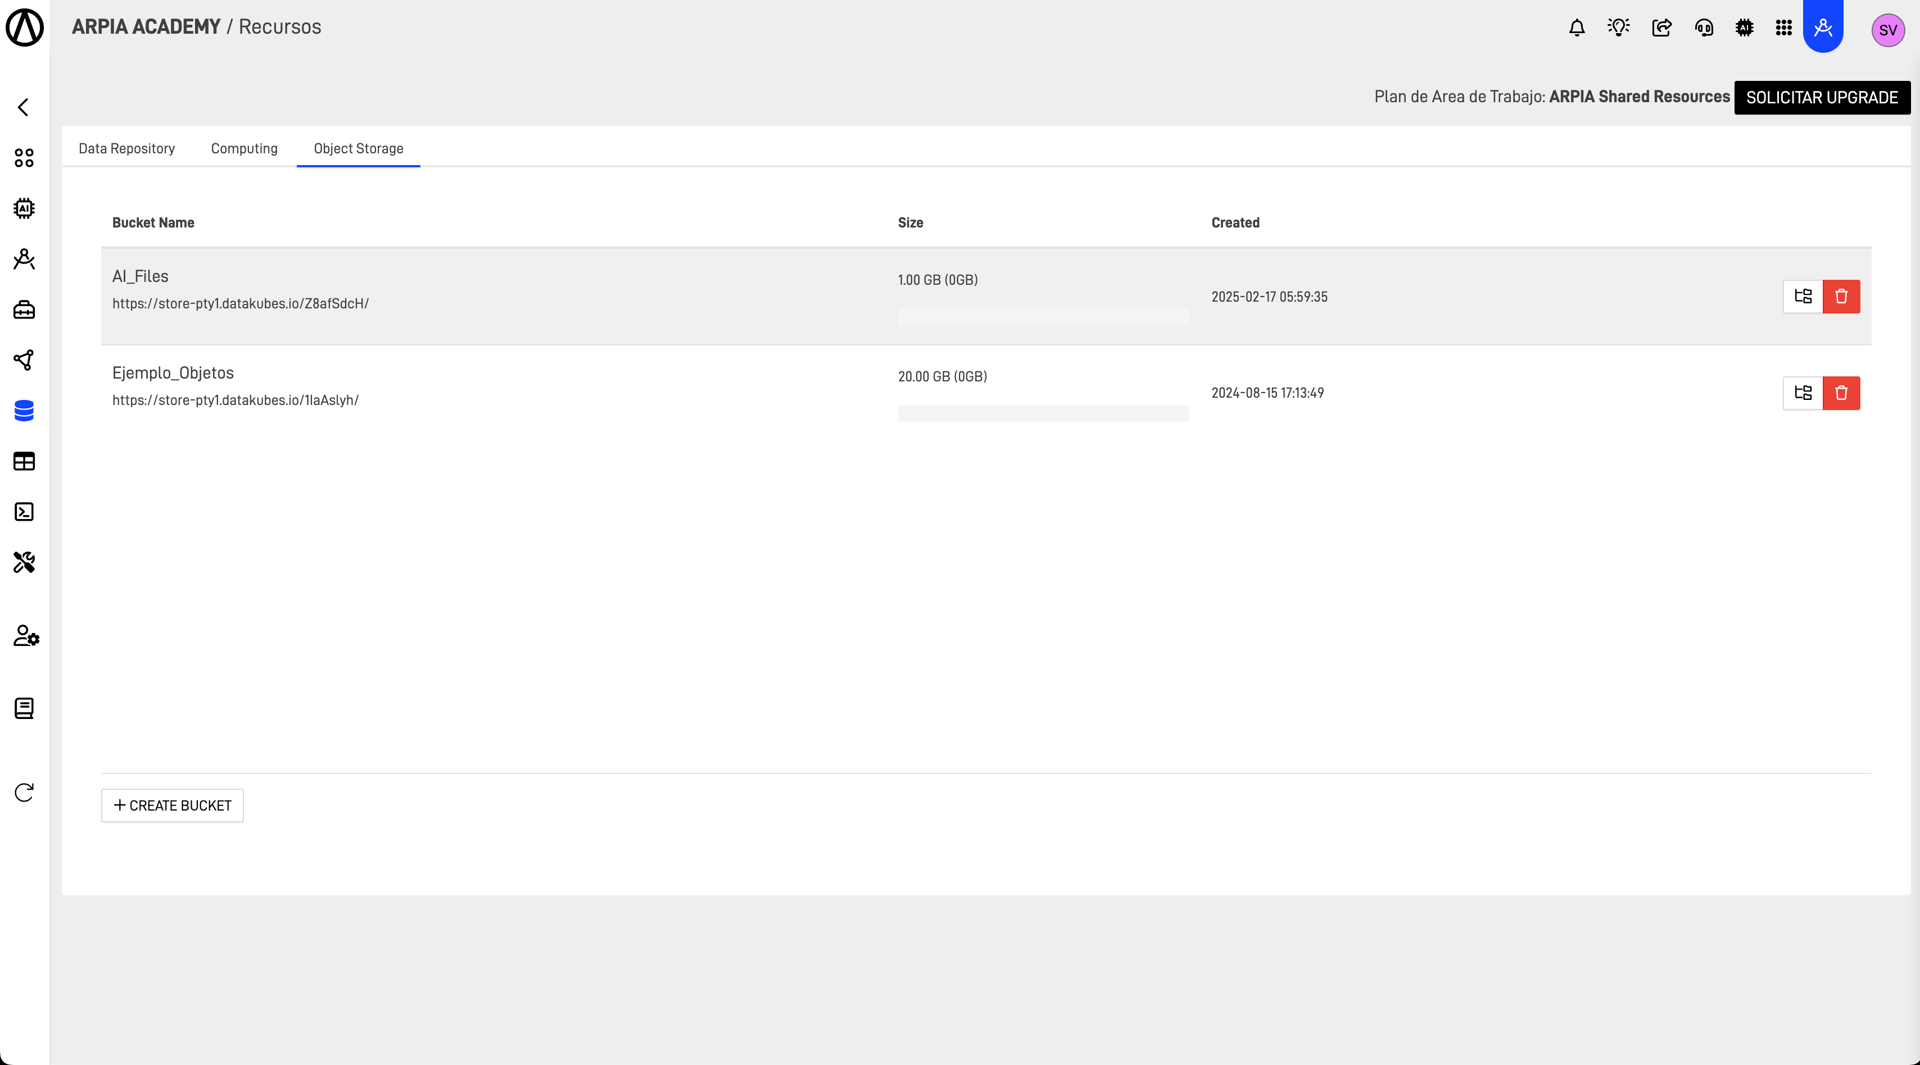
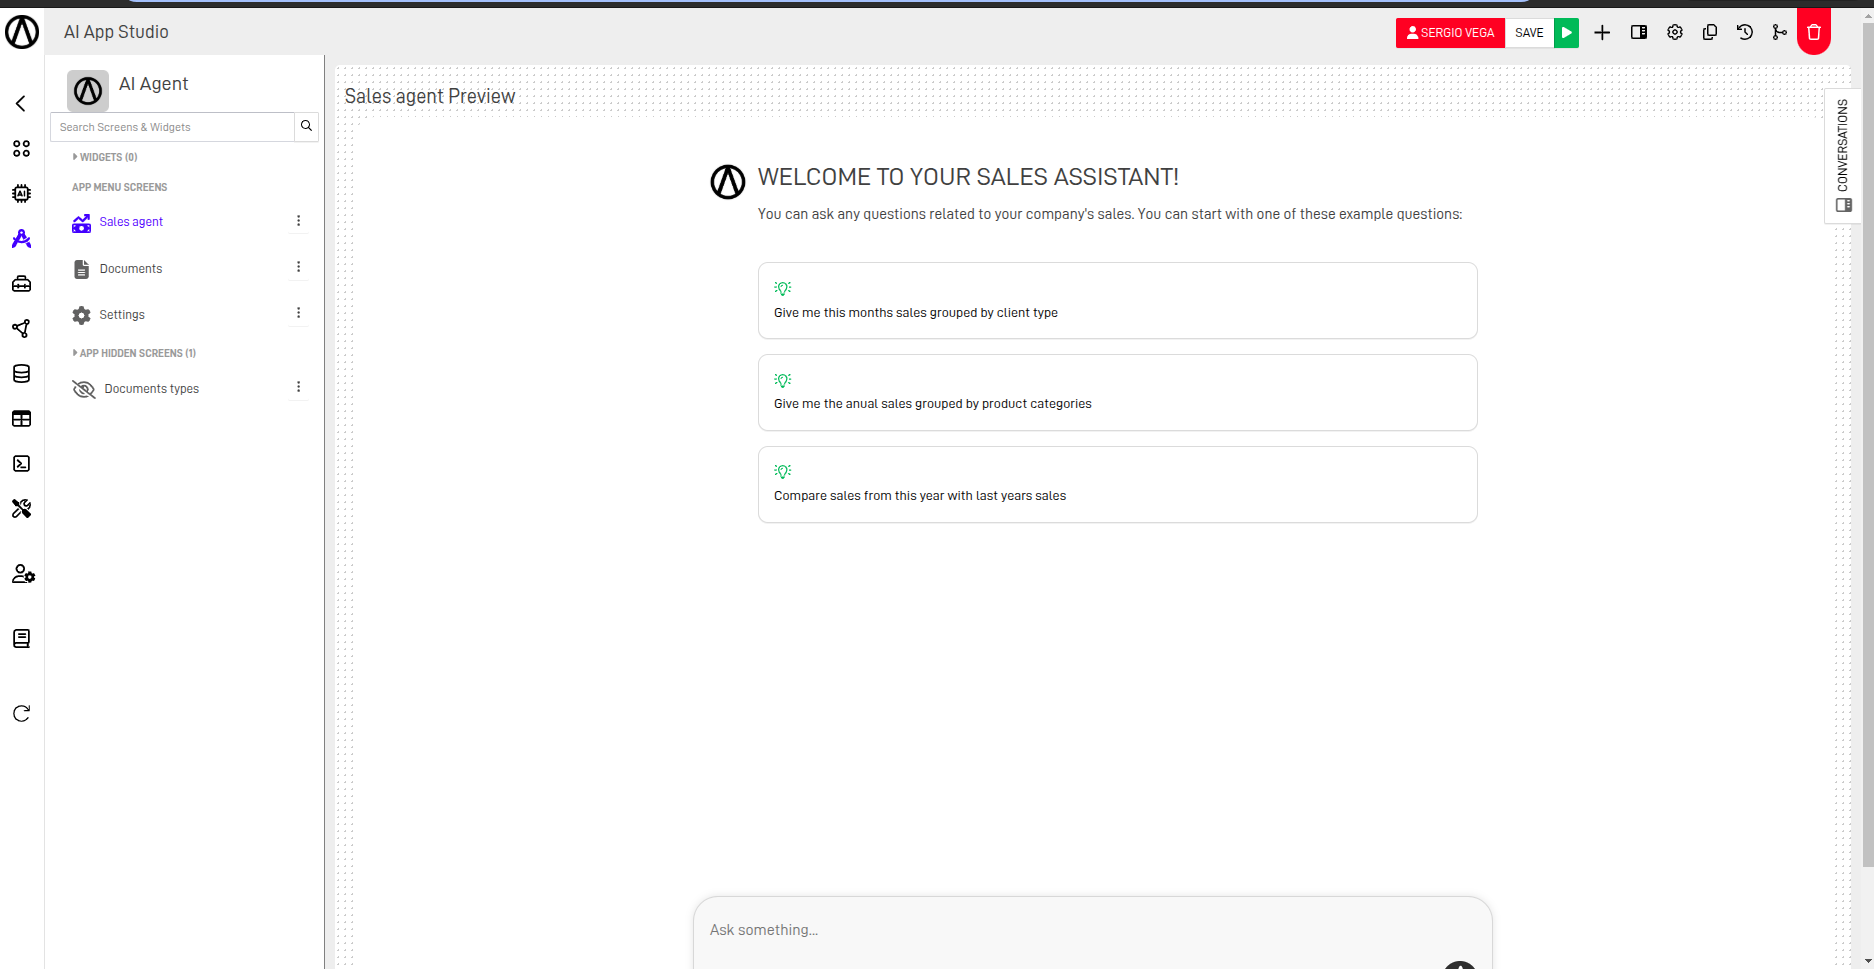
- An AI Assistant already created: required to integrate with the RAG output. This integration will provide the assistant with more context on the organization's internal rules, enabling it to answer user questions more accurately.
- Documents Table:
CREATE TABLE `documents` (
  `id` varchar(100) CHARACTER SET utf8 COLLATE utf8_general_ci NOT NULL,
  `type` int(10) NOT NULL,
  `file` varchar(200) CHARACTER SET utf8 COLLATE utf8_general_ci NOT NULL,
  `comments` text CHARACTER SET utf8 COLLATE utf8_general_ci NOT NULL,
  `registered_by` varchar(50) CHARACTER SET utf8 COLLATE utf8_general_ci NOT NULL,
  `registered_date` datetime NOT NULL,
  `status` varchar(50) CHARACTER SET utf8 COLLATE utf8_general_ci NOT NULL DEFAULT 'PENDING',
  `full_extracted_text` longtext CHARACTER SET utf8 COLLATE utf8_general_ci NOT NULL DEFAULT '',
  `summarized_extracted_text` mediumtext CHARACTER SET utf8 COLLATE utf8_general_ci NOT NULL DEFAULT '',
  `embedding_summarized_extracted_text` vector(768, F32) DEFAULT NULL,
  `embedding_summarized_status` varchar(20) CHARACTER SET utf8 COLLATE utf8_general_ci NOT NULL DEFAULT 'PENDING',
  PRIMARY KEY (`id`),
  SHARD KEY `__SHARDKEY` (`id`),
  SORT KEY `__UNORDERED` ()
) AUTOSTATS_CARDINALITY_MODE=INCREMENTAL
  AUTOSTATS_HISTOGRAM_MODE=CREATE
  AUTOSTATS_SAMPLING=ON
  SQL_MODE='STRICT_ALL_TABLES';
- Documents types table:
CREATE TABLE `documents_types` (
  `id` bigint(10) NOT NULL AUTO_INCREMENT,
  `name` varchar(50) CHARACTER SET utf8 COLLATE utf8_general_ci NOT NULL,
  PRIMARY KEY (`id`),
  SHARD KEY `__SHARDKEY` (`id`),
  SORT KEY `__UNORDERED` ()
) AUTO_INCREMENT=2
  AUTOSTATS_CARDINALITY_MODE=INCREMENTAL
  AUTOSTATS_HISTOGRAM_MODE=CREATE
  AUTOSTATS_SAMPLING=ON
  SQL_MODE='STRICT_ALL_TABLES';
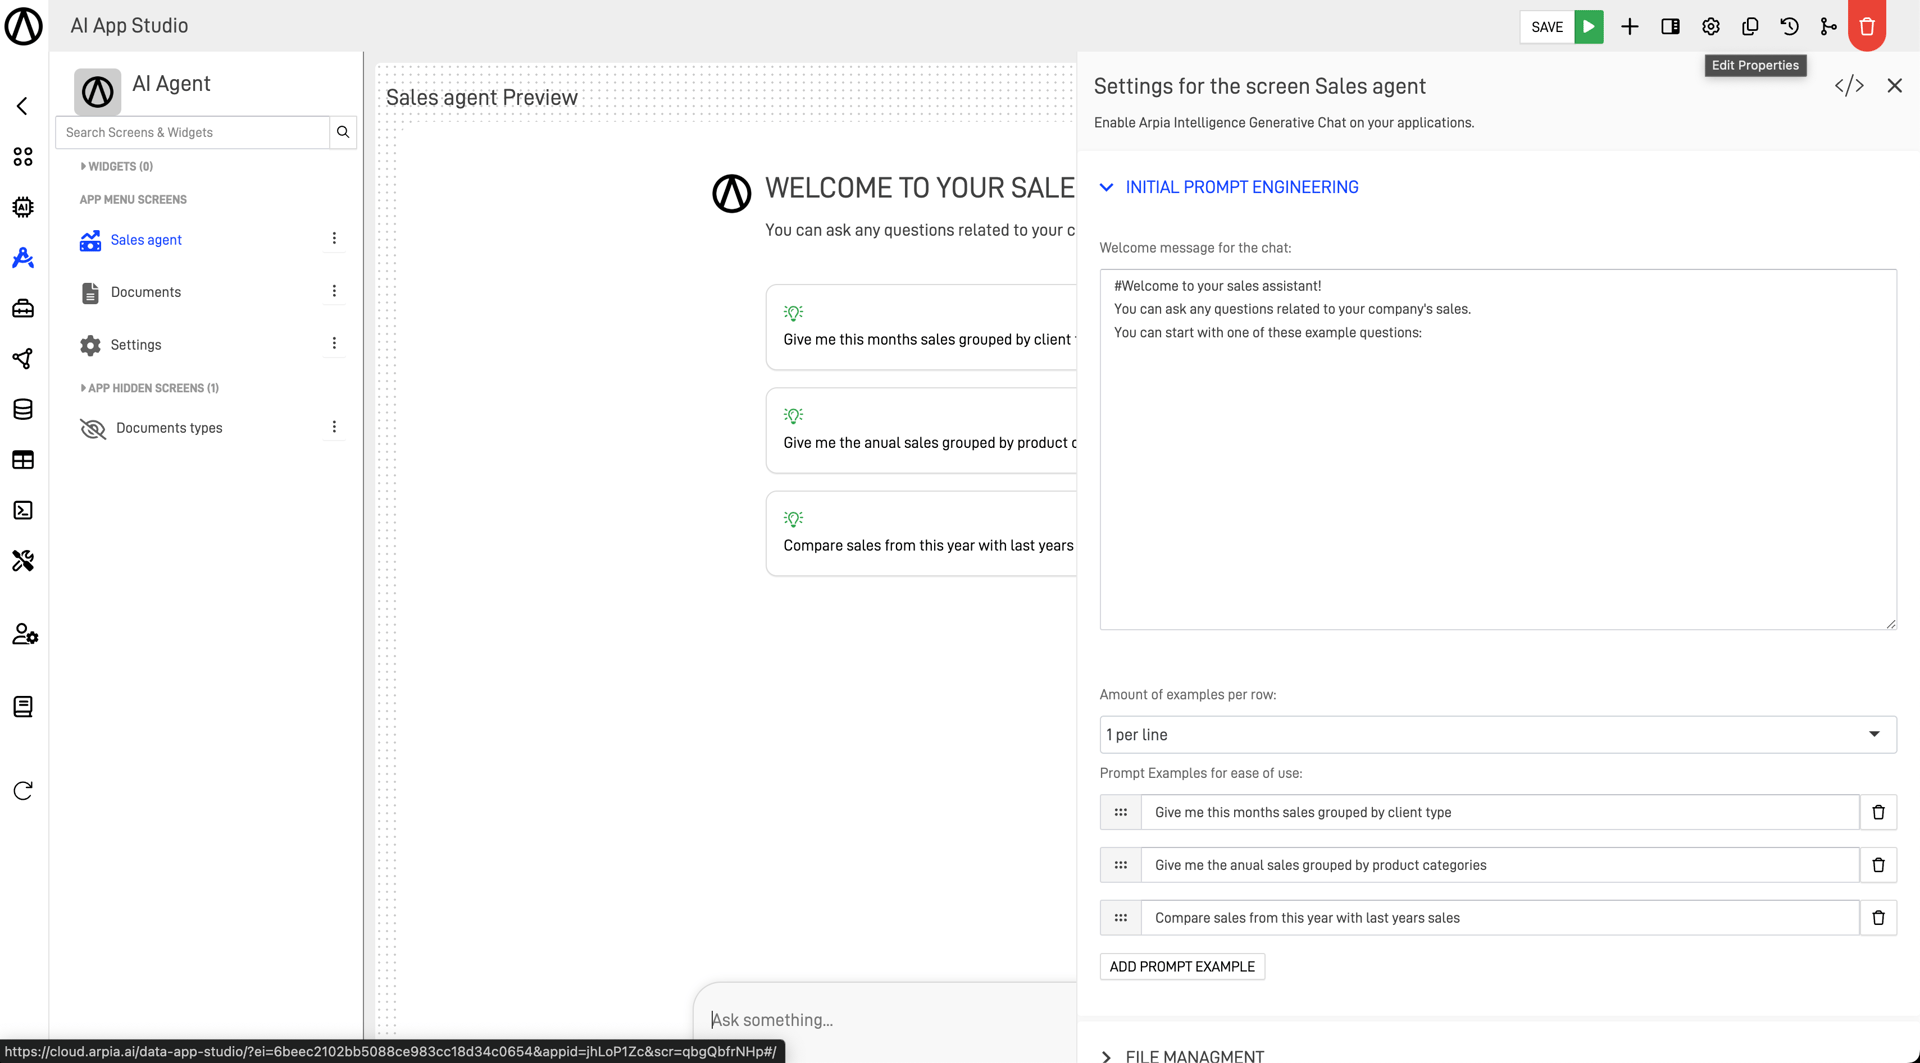
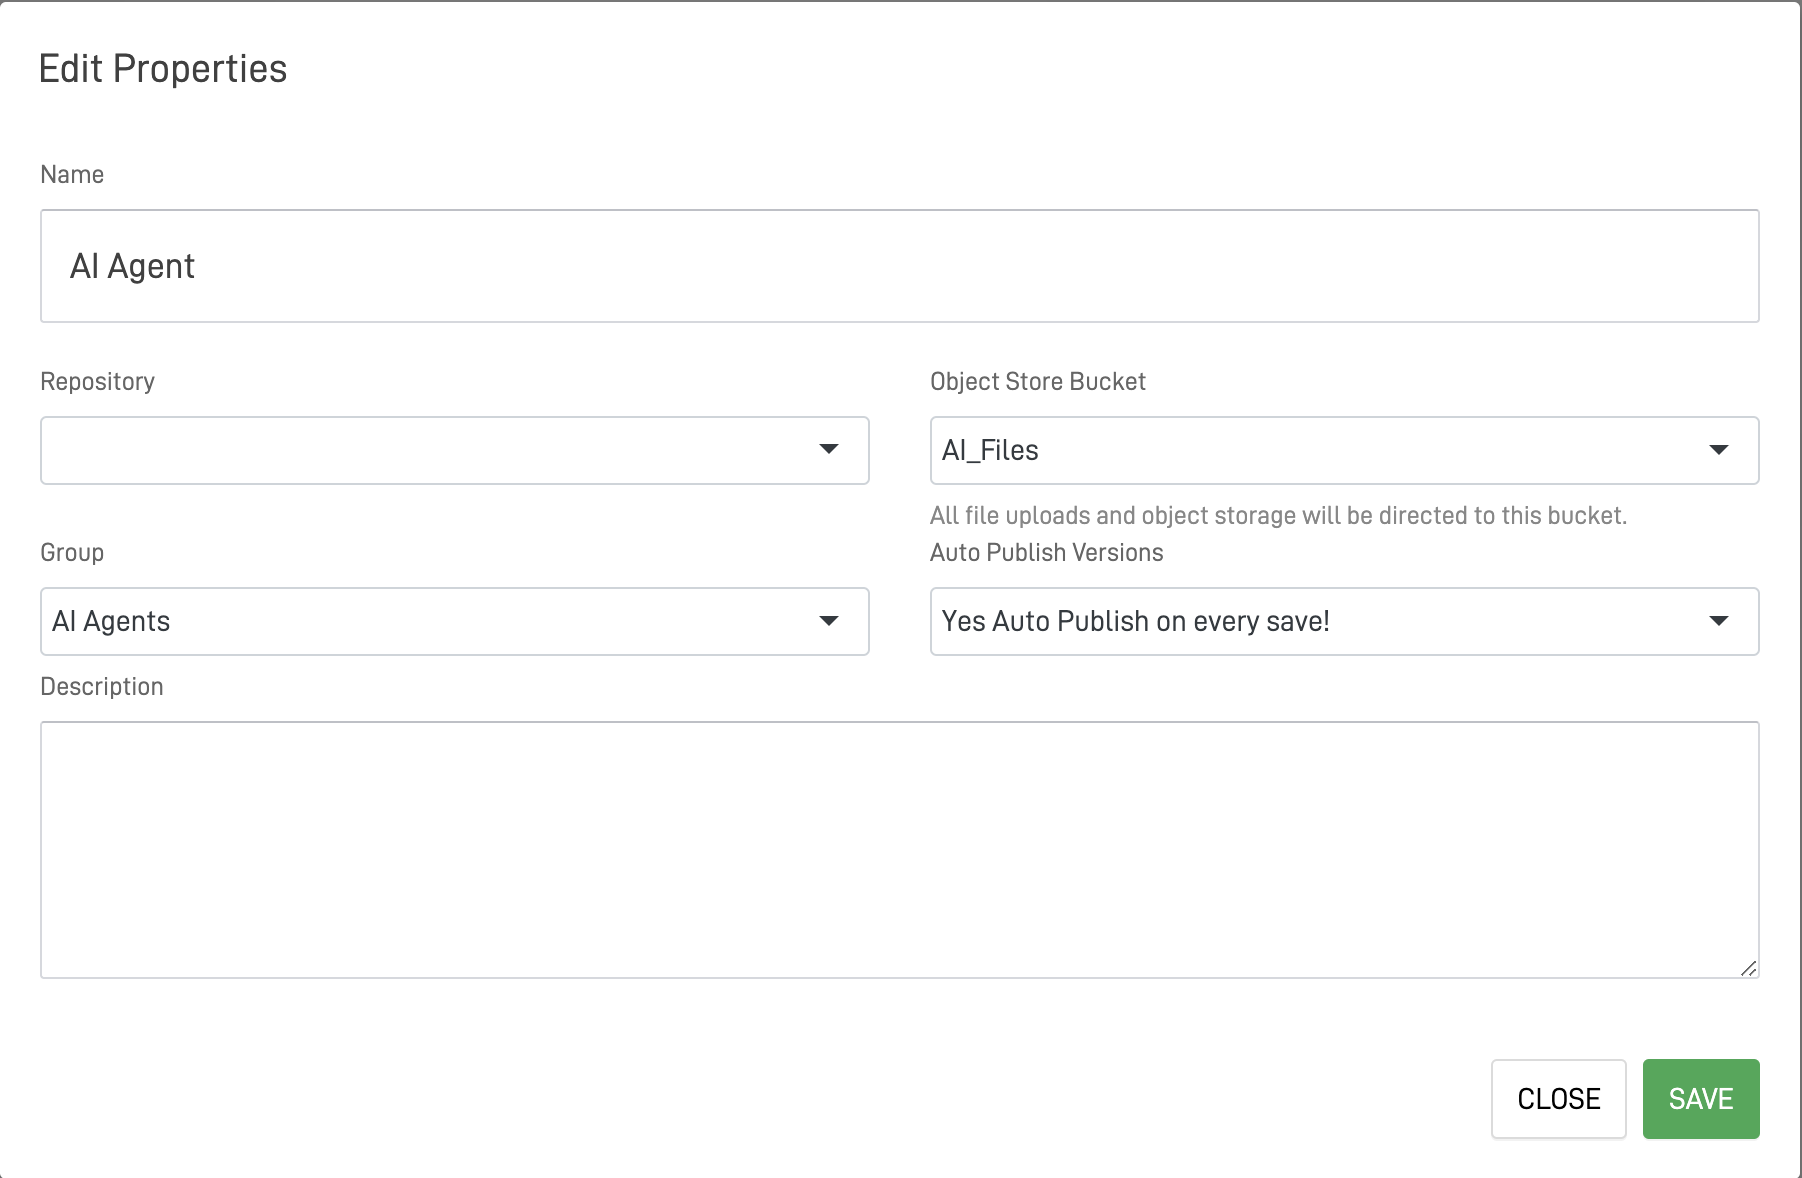
Step 2: Confirm Bucket Linkage
Ensure that the appropriate storage bucket is linked to your AI Agent App.
Step 3: Create Document Management Screens
To facilitate document processing and retrieval, configure the necessary screens within your AI Agent App.
- Register Document Types
Create a screen for defining and categorizing document types. Ensure that document attributes are properly configured.

- Store and Manage Documents
Develop a document storage screen to upload and manage files within the AI Agent App.
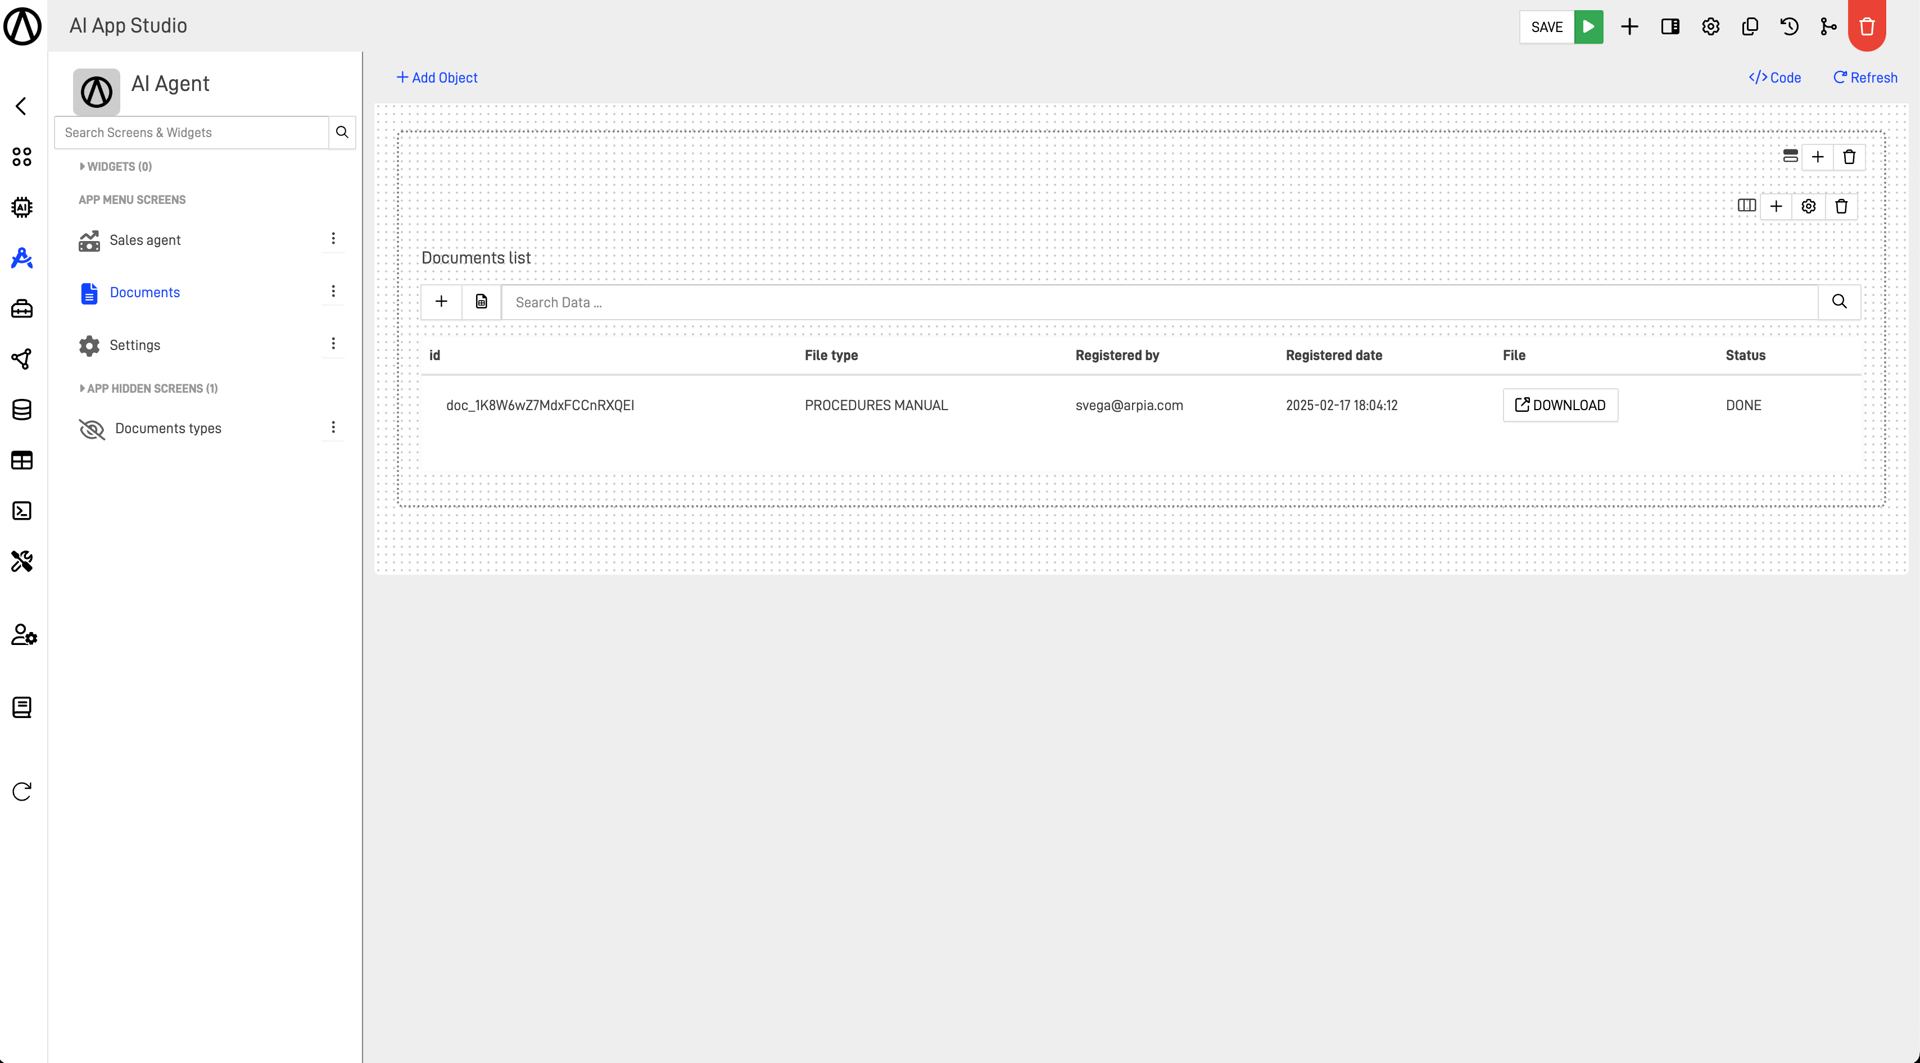
-
Open the documents registration form:
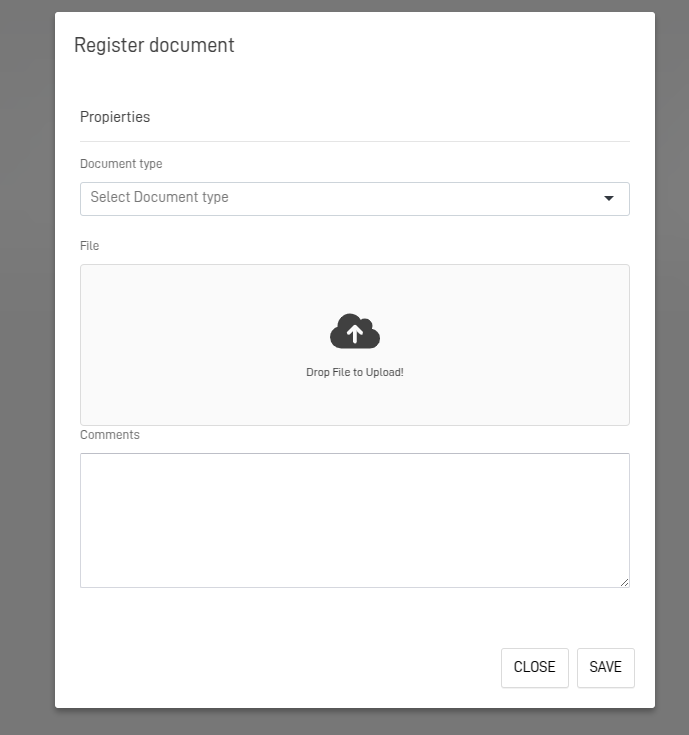
-
Upload a PDF Document:
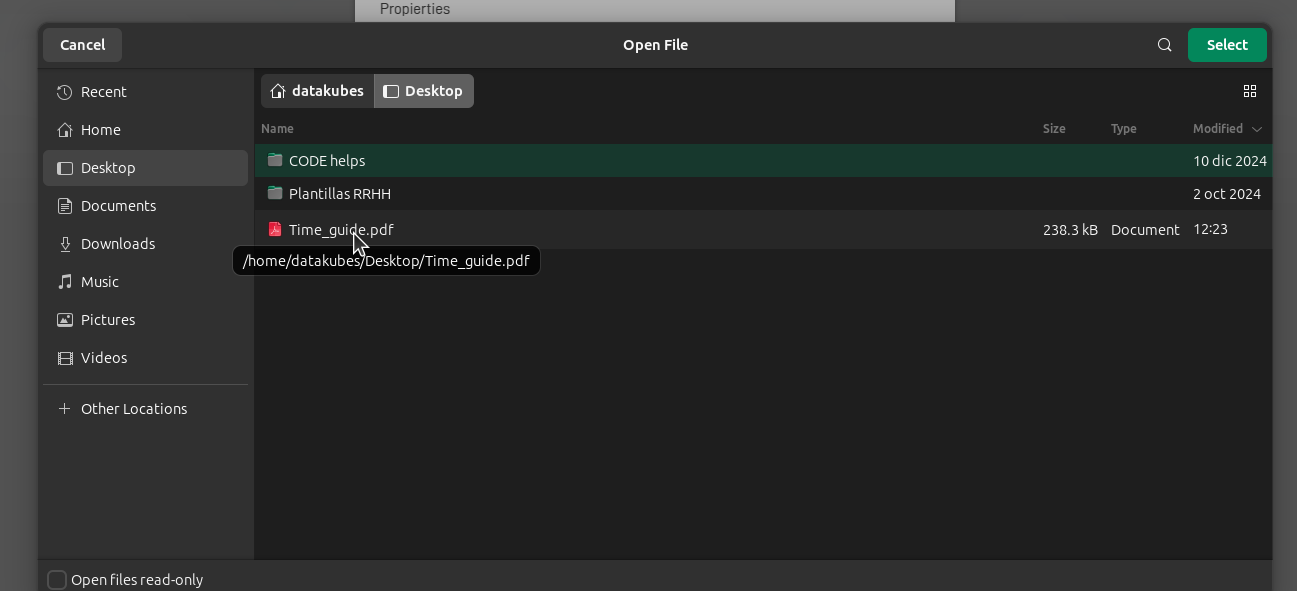
-
Verify the document is uploaded on the documents table:

Step 4: Building an AI Project
This object will serve as the workflow to process the document, transforming it from its uploaded format into an embedded format that can be used as rules by the assistant
- From the Orchestrator go to Start a Workshop Project
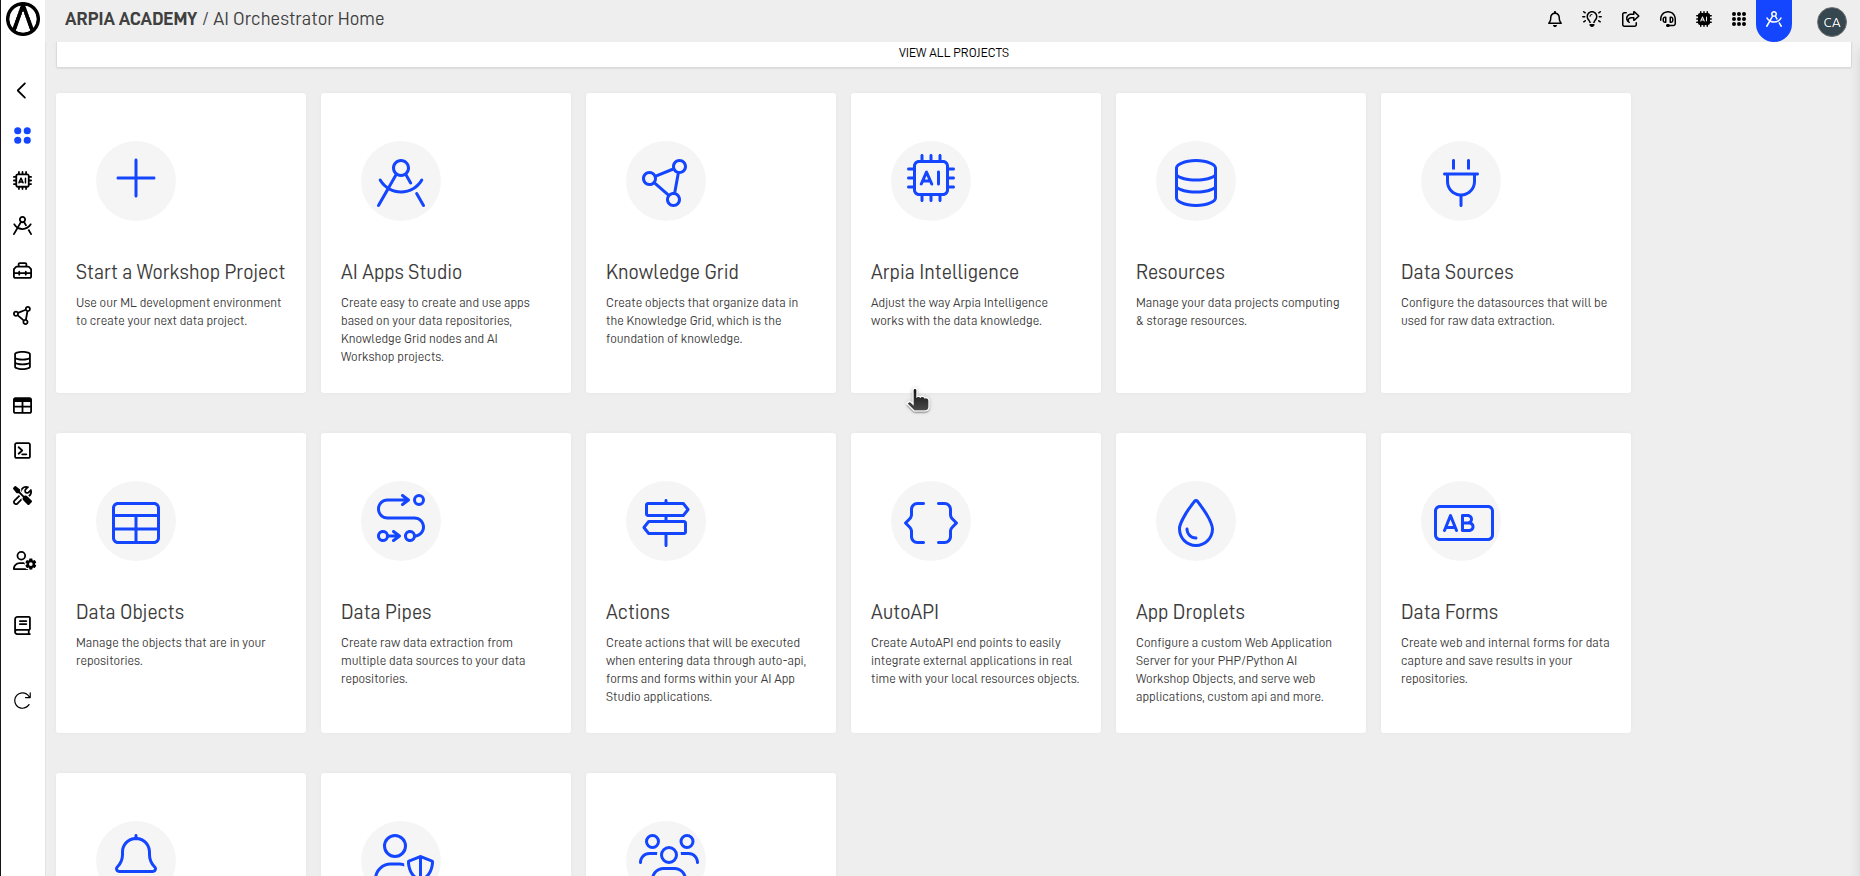
- Fill the form Selecting the repository, type of project and give the project a name

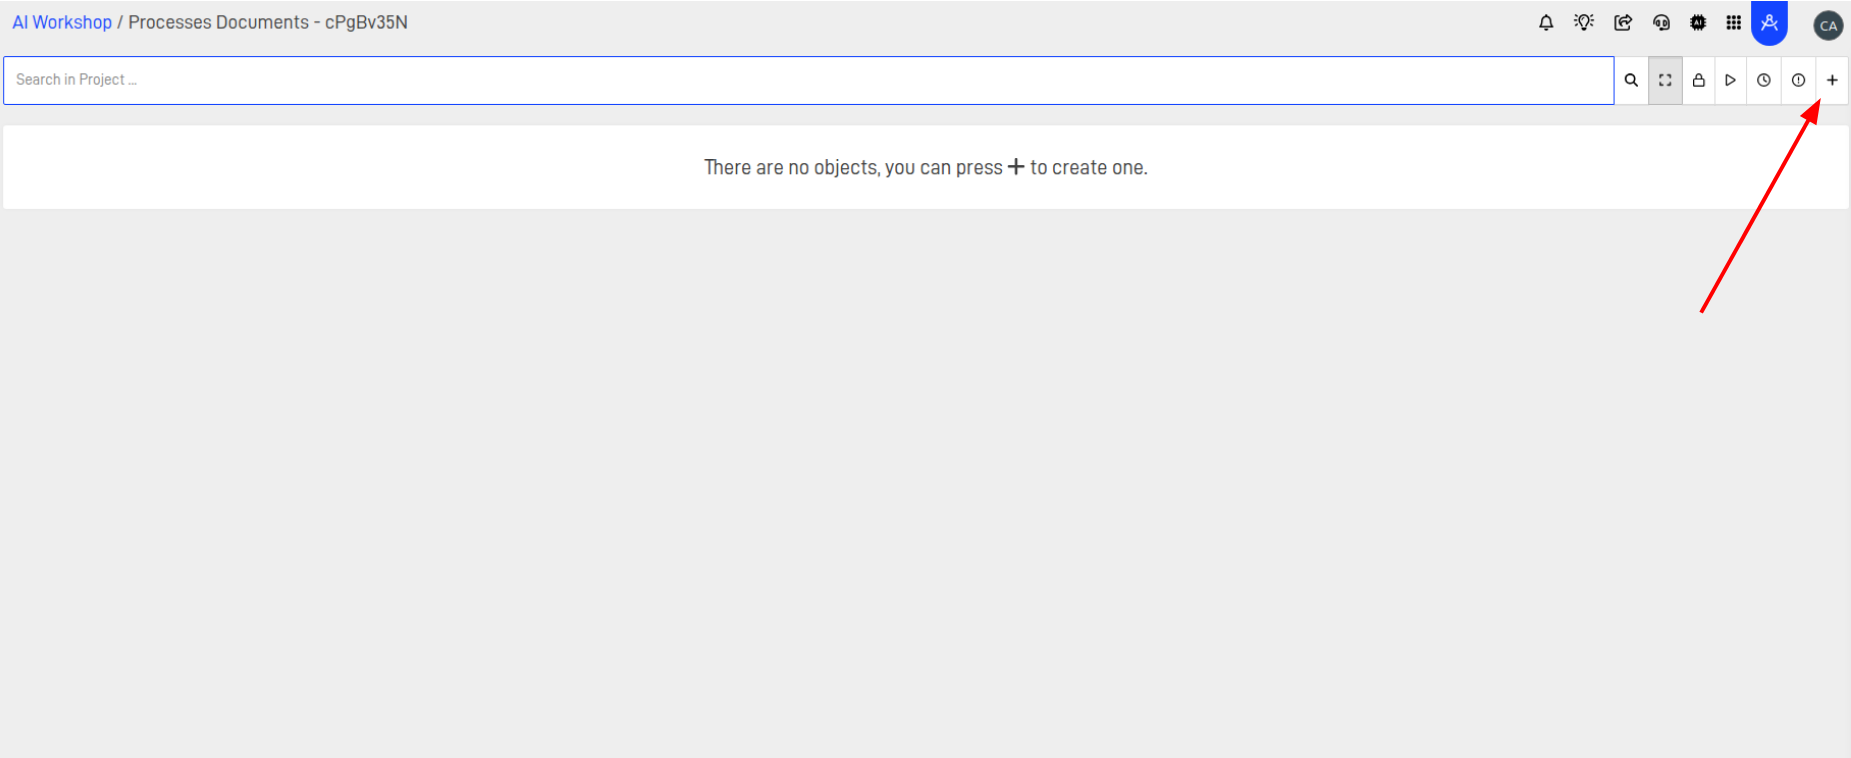
- Now you have an AI Workshop, you need to add a new object to the flow, fill up the form use the image as reference
Step 5: Create a Gen-AI WorkFlow Object
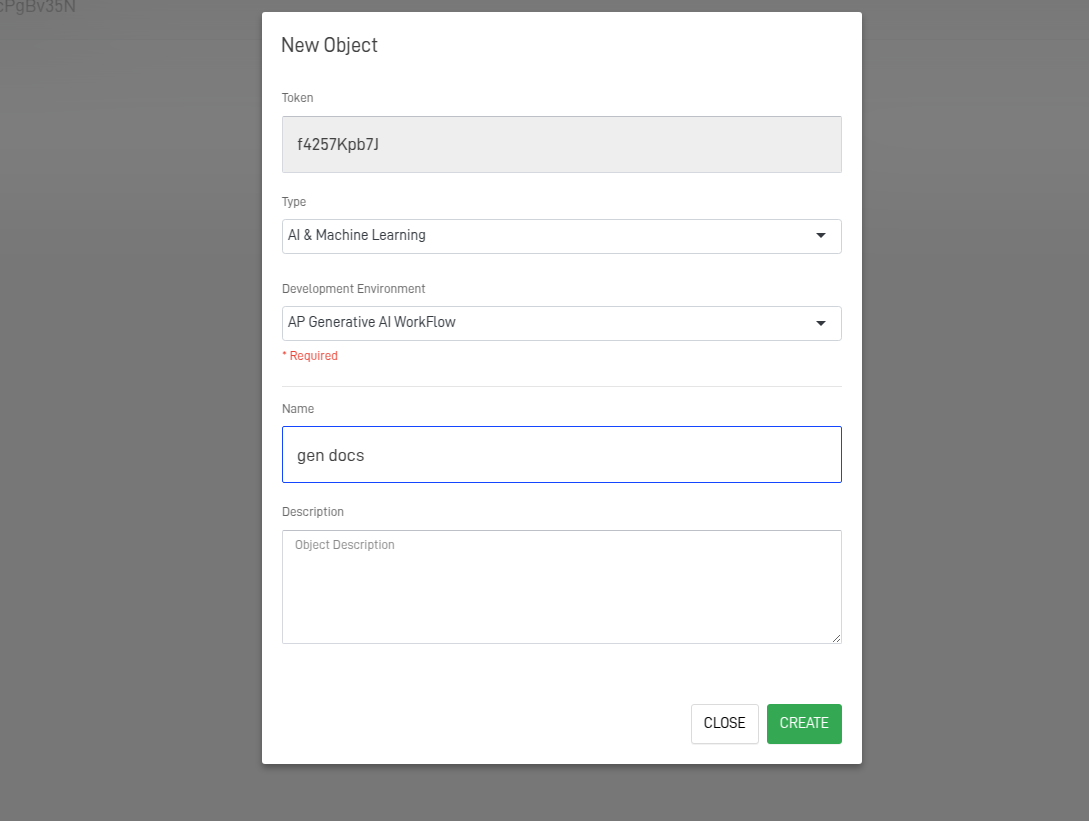
This Workshop object processes documents uploaded from the app, converting them into structured, meaningful text. These extracted strings enhance context and improve the accuracy and relevance of responses generated by the AI agent.
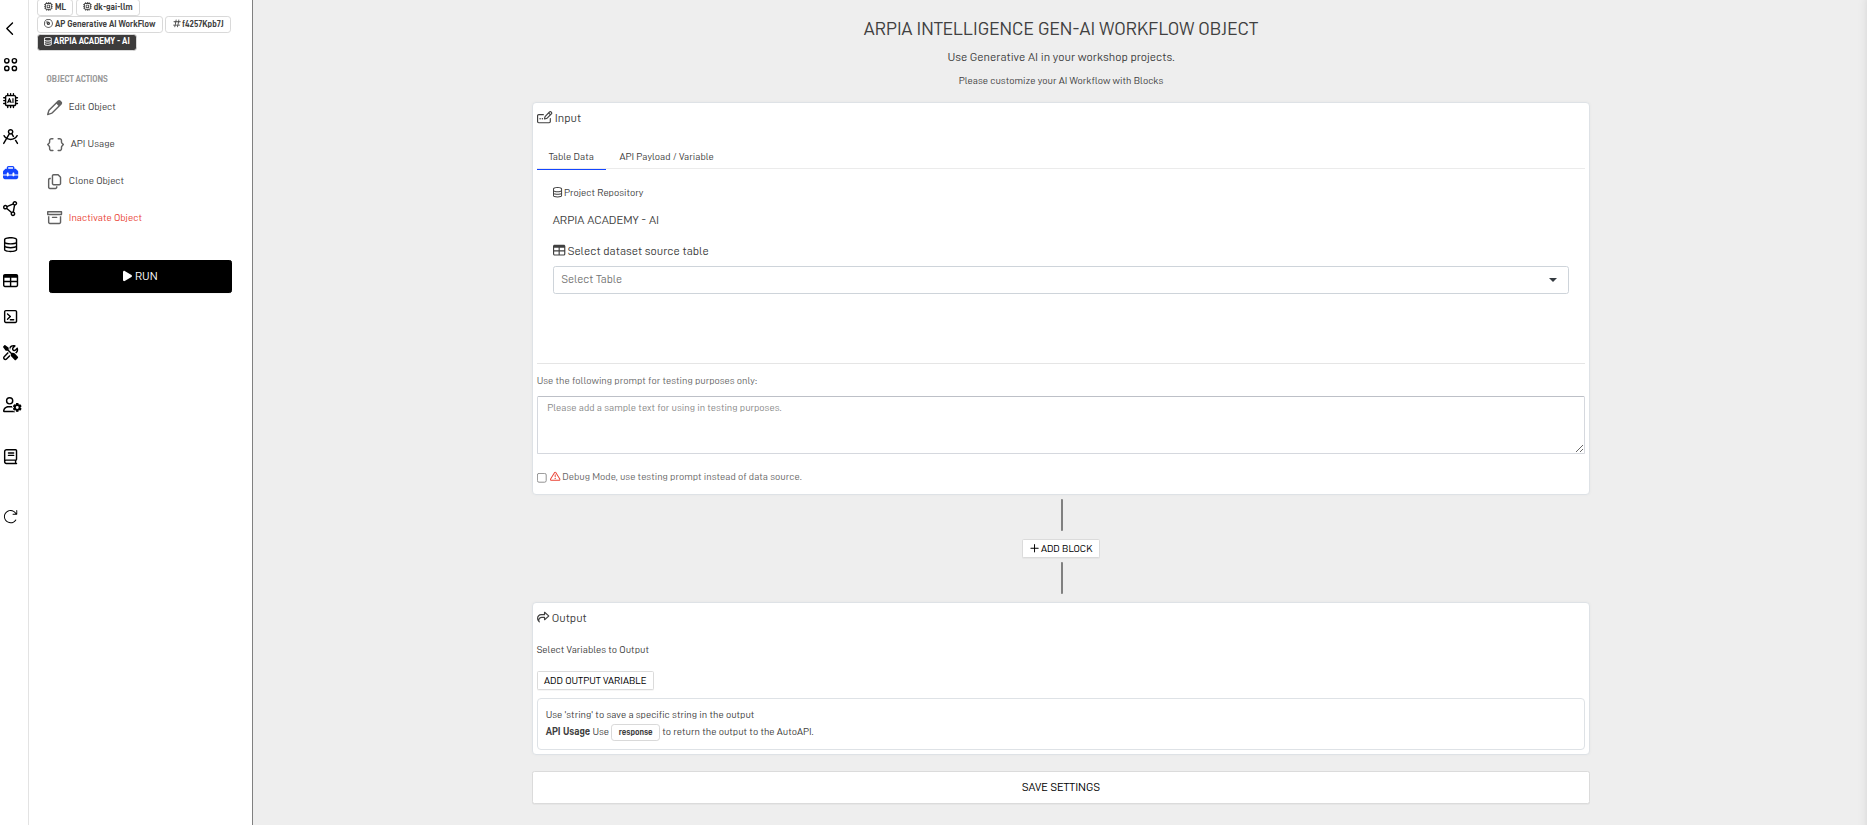
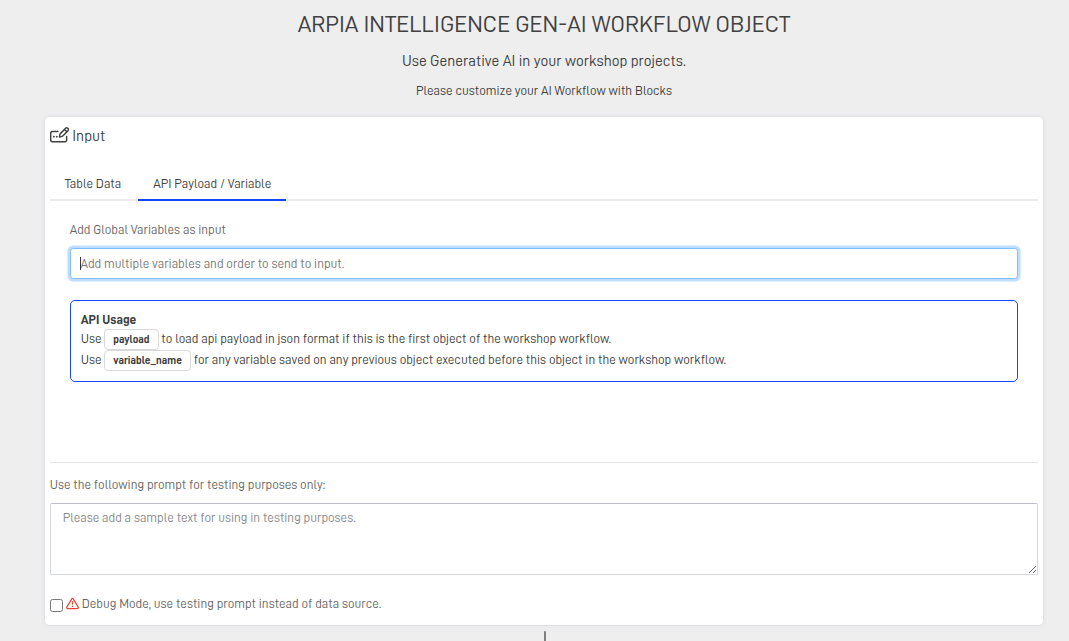
- Configure the Input Block
This block configures the data that the workflow will use as variables. It also defines the data accessible to different blocks, allowing them to provide input based on user prompts. This block can be set in two different ways.
Table data
This block utilizes a data table from the repository linked to the AI workshop. It allows the user to select specific fields to include in a JSON file and apply a WHERE condition to filter the table. The generated JSON will then be used as a variable throughout the workflow.
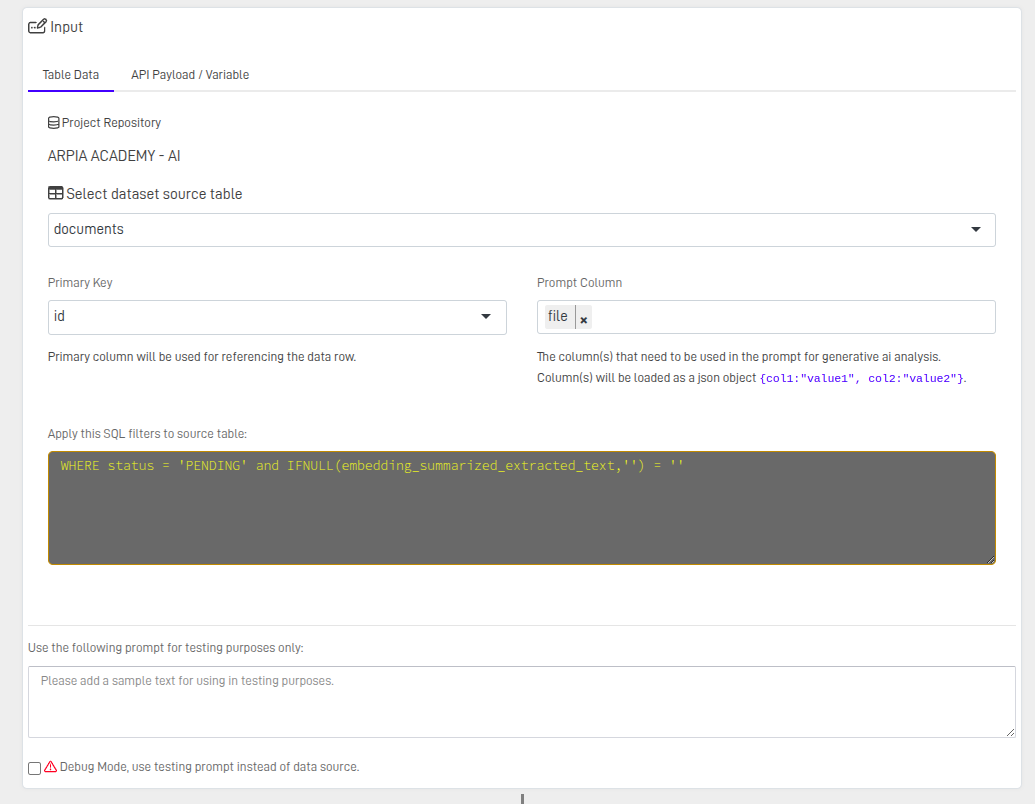
Note: You can write a JSON string and use it to debug the workflow. To view the answers at each step, enable debug mode and save the settings.
API Payload/ Variable
You can use the Payload as a variable to save in the workflow or select a previously saved variable for reuse.
- Configure the Vision Analysis block
This block uses an LLM model to extract text from a document and store it in a variable. You can choose the format type for saving the variable
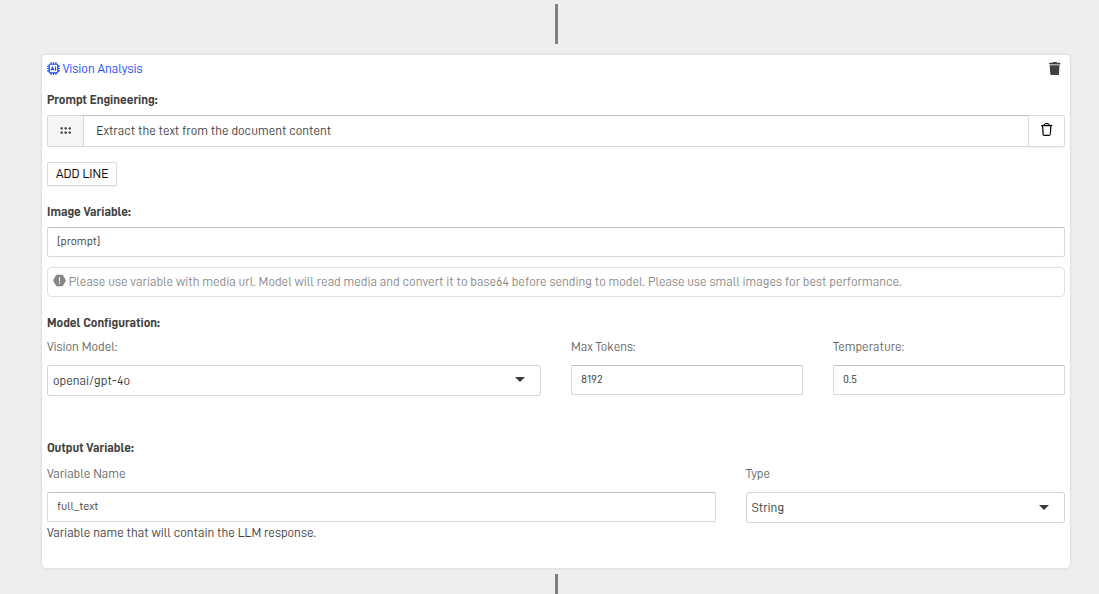
Note: ARPIA recommends using the model configuration exactly as shown in the image.
- Configure a LLM block
This block summarizes the text extracted and stored in the full_text variable from the last step of the workflow. The prompts are set to generate a summary, and the LLM response is saved in the summary_text variable.
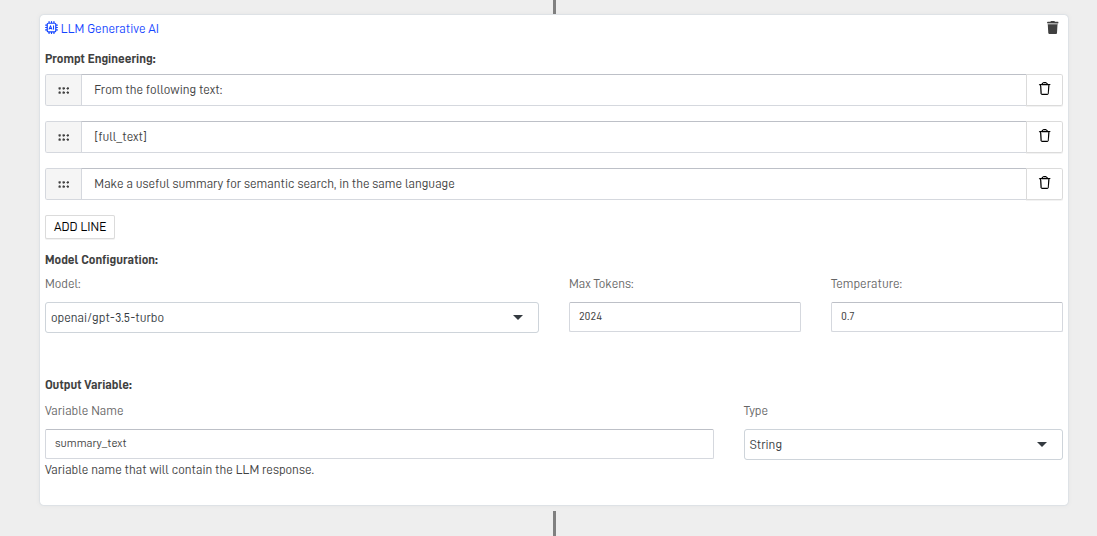
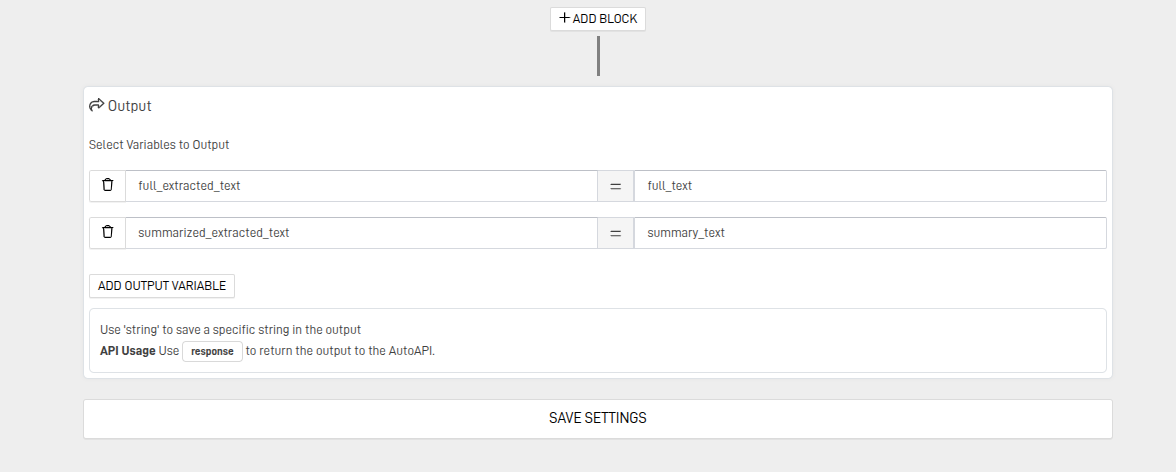
- Configure Output Block
You must relate the table columns with the variables extracted from the Workflow blocks, column at the left variables at the right, save settings
Step 6: Create a Singular AI Text Embedding
This block is used to manage the embedding and vectorization of the document into ARPIA's data objects
- Create a new Workshop object type singular AI Text Embedding,
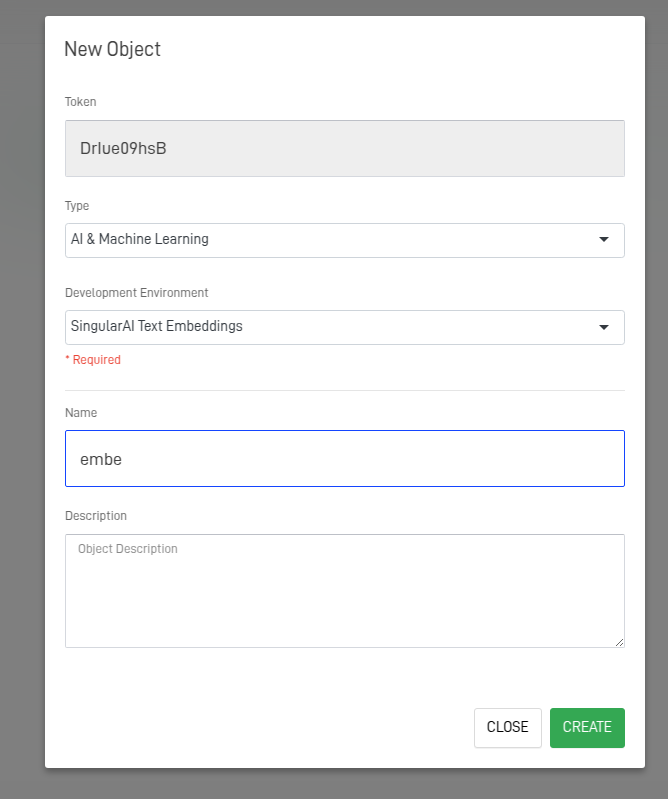
- Configure the Ai Text Embedding:
To configure this block, first select the repository where the table is stored. Then, choose the table to be used and specify the columns that will store the text for generating embeddings. Next, define the column where the embeddings will be stored. Optionally, you can select a column to filter the process so that embeddings are generated only when needed. Finally, choose the model that will perform the embedding.
Configuration Steps:
- Select the repository where the table is stored.
- Choose the table to be used.
- Specify the columns that will store the text for generating embeddings.
- Define the column where the embeddings will be stored.
- (Optional) Select a column to filter the process, ensuring embeddings are generated only when needed.
Choose the model to perform the embedding.

Step 7: Updating Documents Status
Once all the information is vectorized and stored in its respective columns, the document must be flagged as Done to prevent reprocessing. This optimizes resource usage and ensures faster workflows.
- Create a prepare and transform object
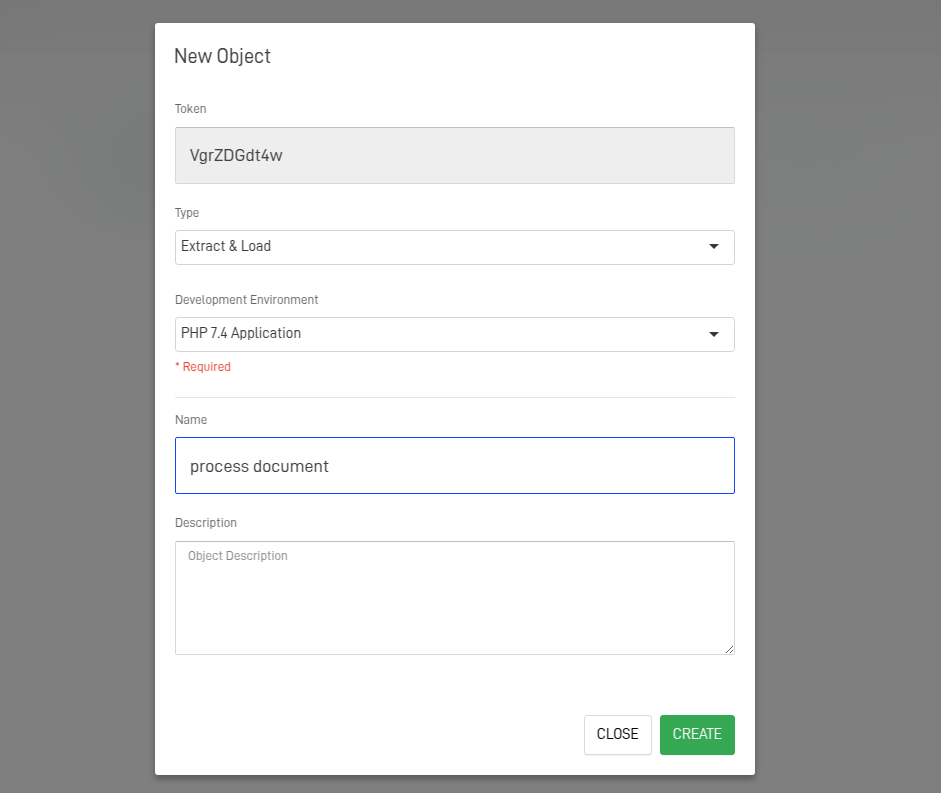
- Write the query to Update the table Documents
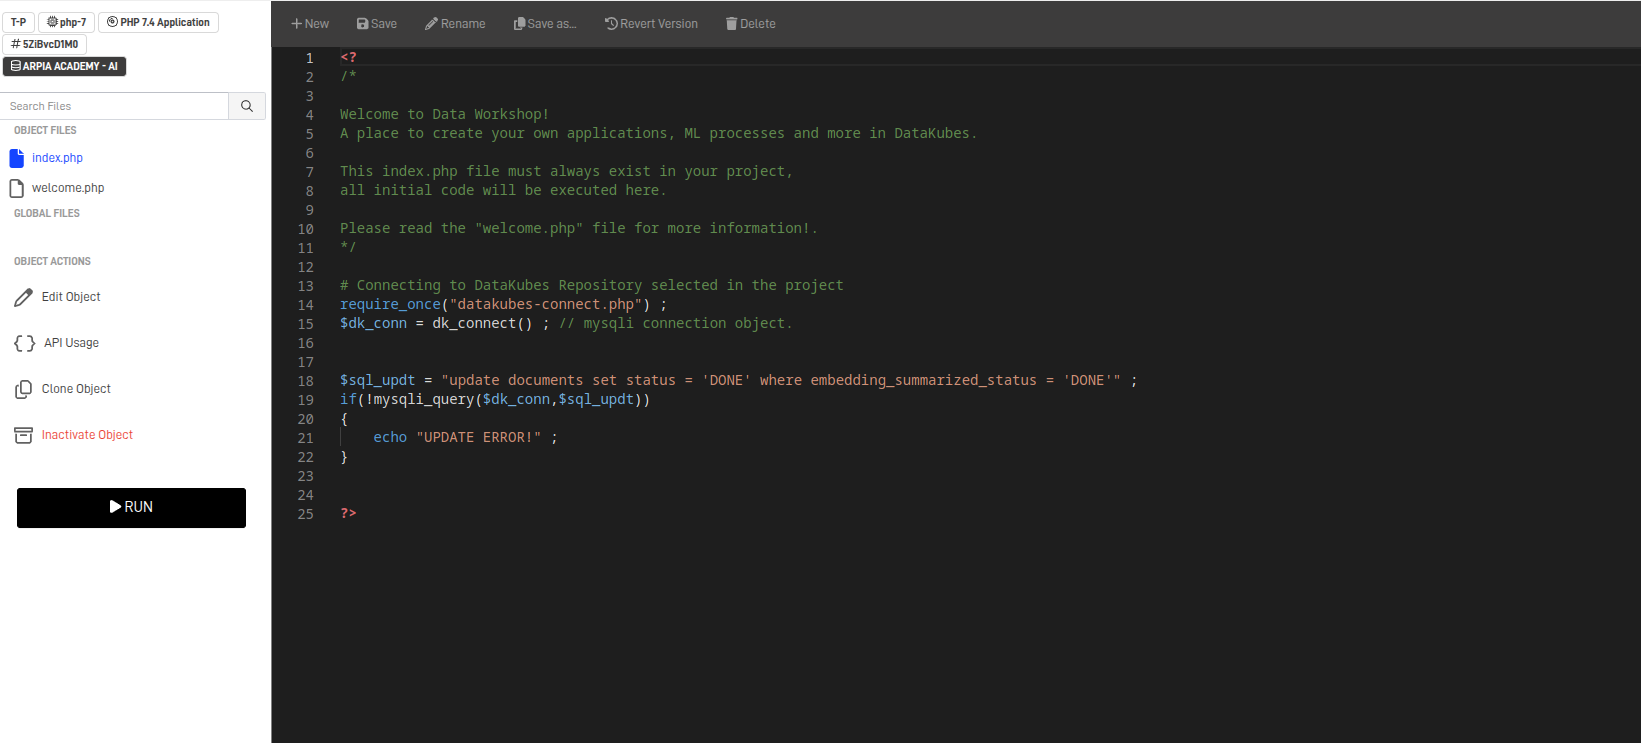
<?

require_once("datakubes-connect.php") ;
$dk_conn = dk_connect() ; // mysqli connection object.


$sql_updt = "update documents set status = 'DONE' where embedding_summarized_status = 'DONE'" ;
if(!mysqli_query($dk_conn,$sql_updt))
{
    echo "UPDATE ERROR!" ;
}


?>
Step 8: Run the project
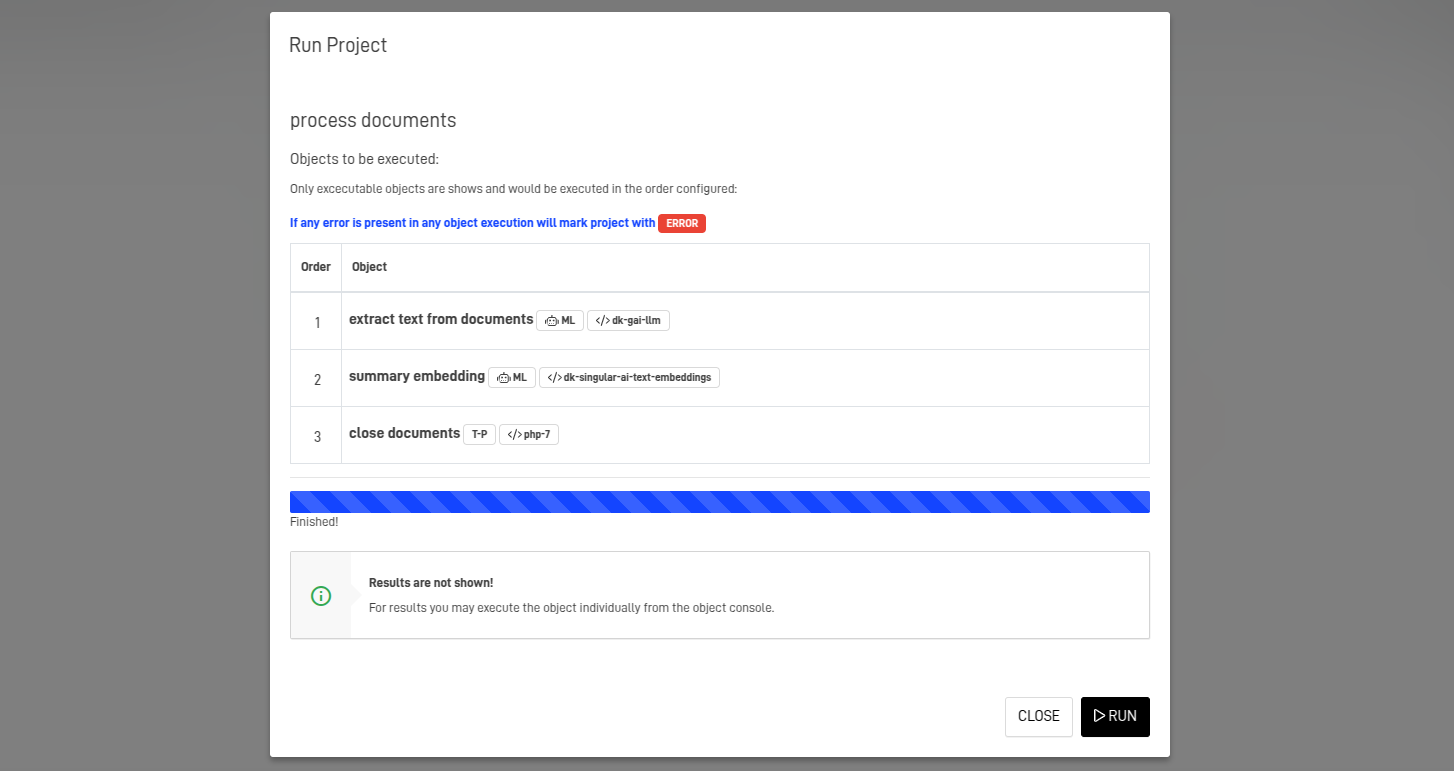
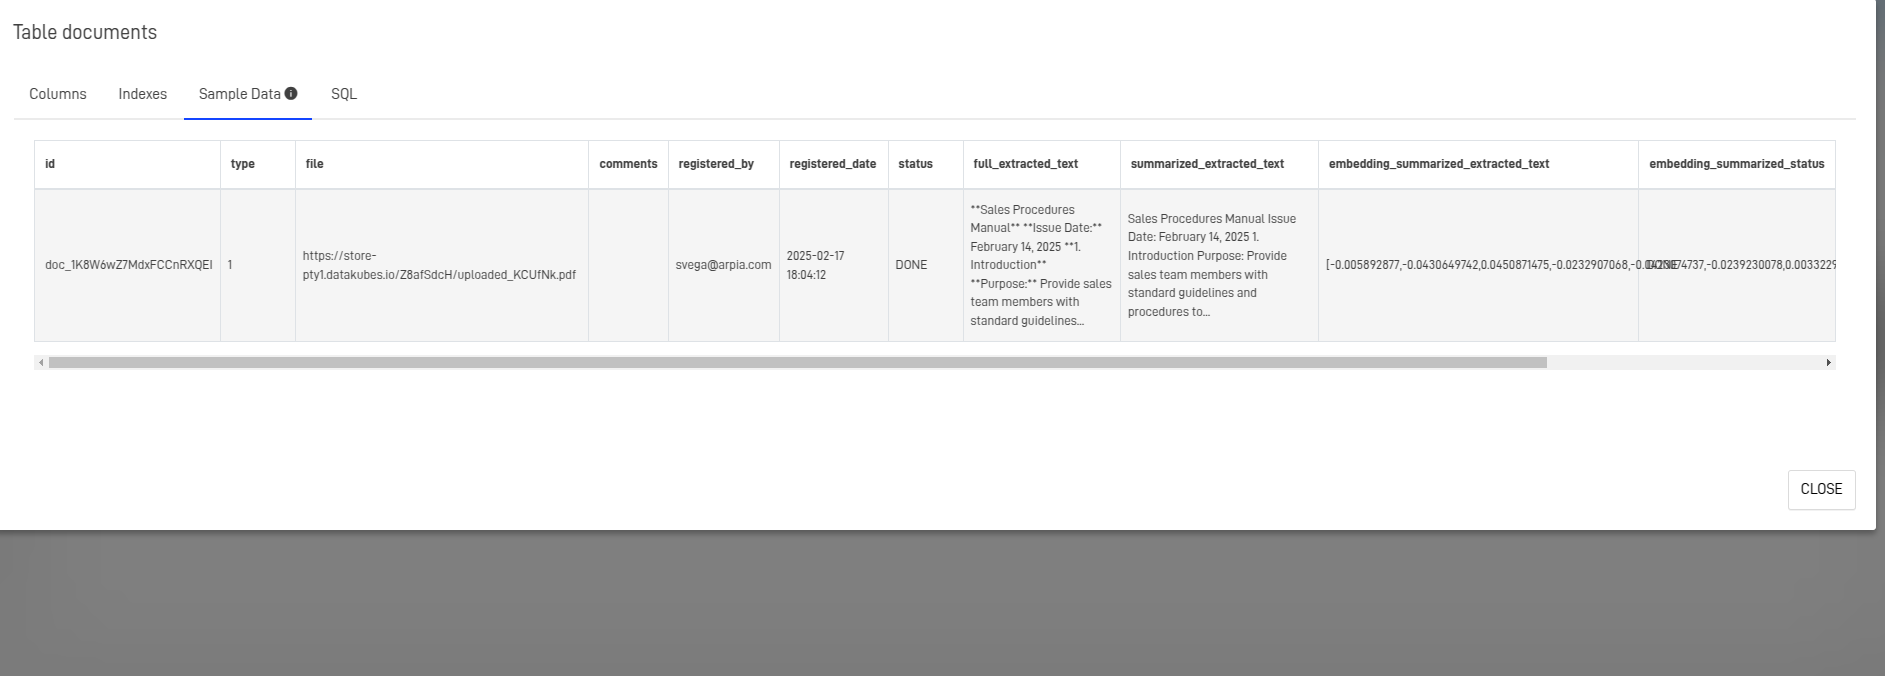
Note: A documents node must be pre-configured and enabled within the Neural Network, along with the appropriate embedding settings.
Step 8: Integrate AI RAG with the AI Assistant
Integrating your existing AI Assistant with AI RAG will enhance its responses by aligning them more closely with the rules and specifics found in its contextual documents. Whether it’s a set of regulations or nuanced details about products on sale, the assistant will generate more accurate and relevant answers.
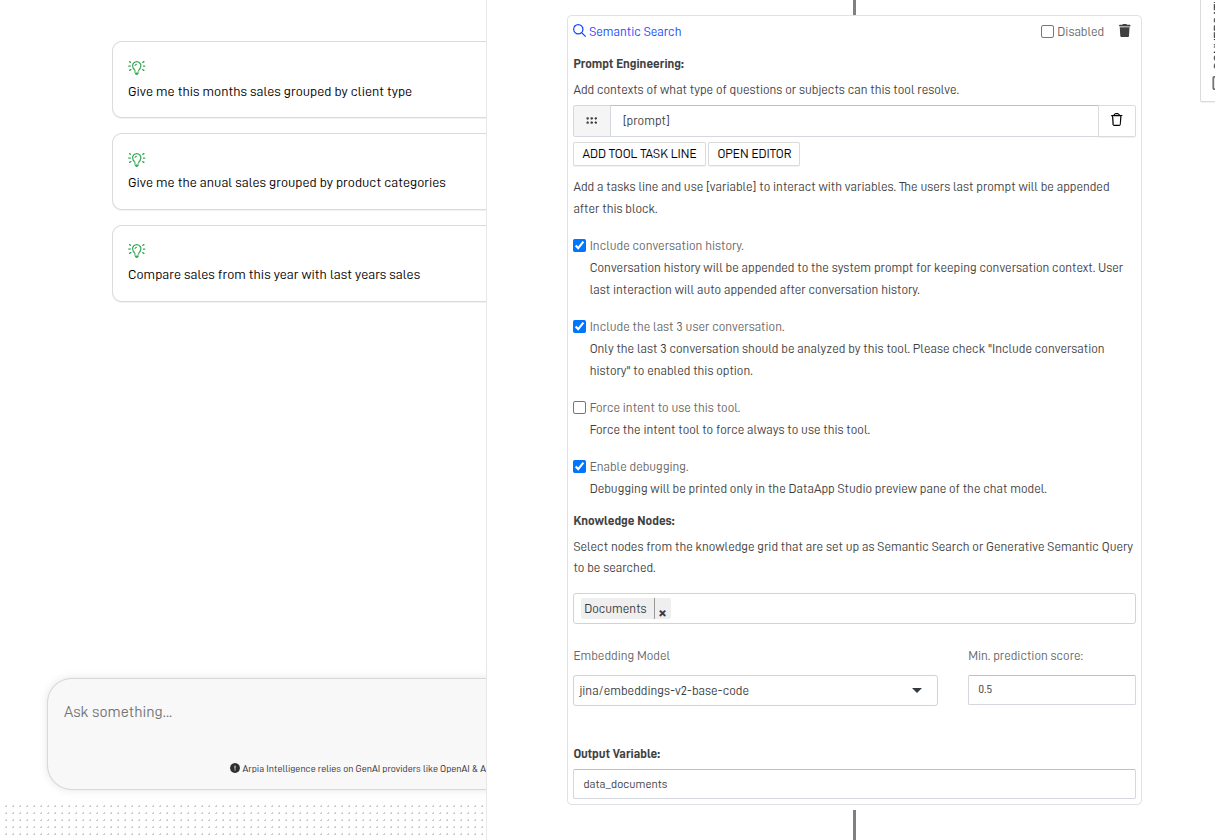
- Add a Semantic Search Block
Configuring this block can affect how the assistant responds. If a specific format is required to reference a part of a document, it should be defined in the prompt block. Additionally, the assistant can retain awareness of past conversations. The output of this block will be a variable containing the LLM’s response.
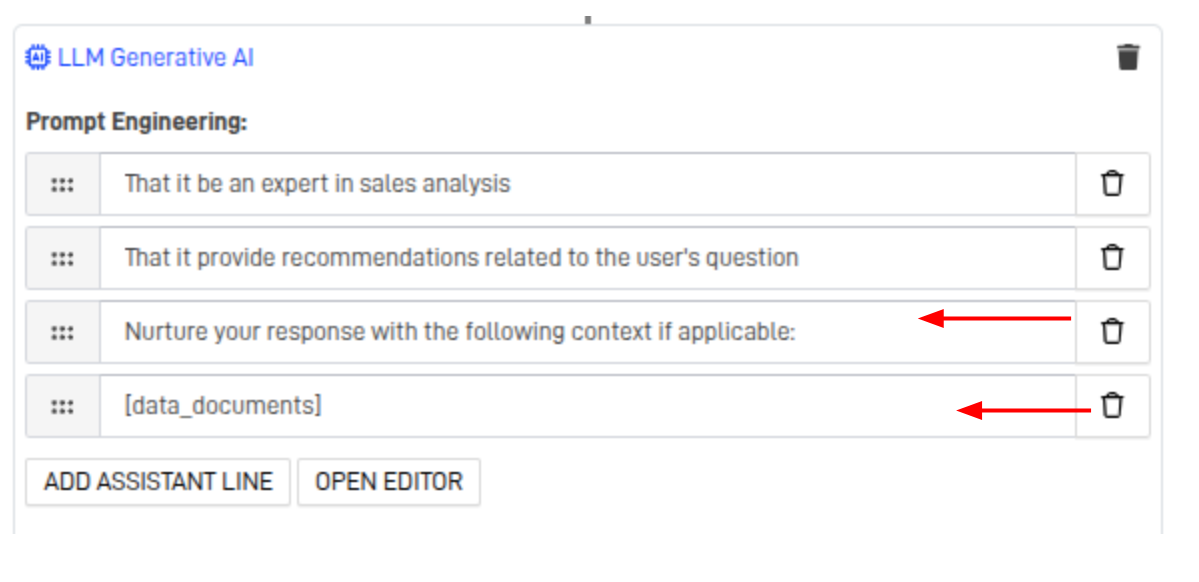
- Modify Prompts in the LLM response
This new Prompts will give the answer from the LLM enough context on the documents.
Step 9: Testing
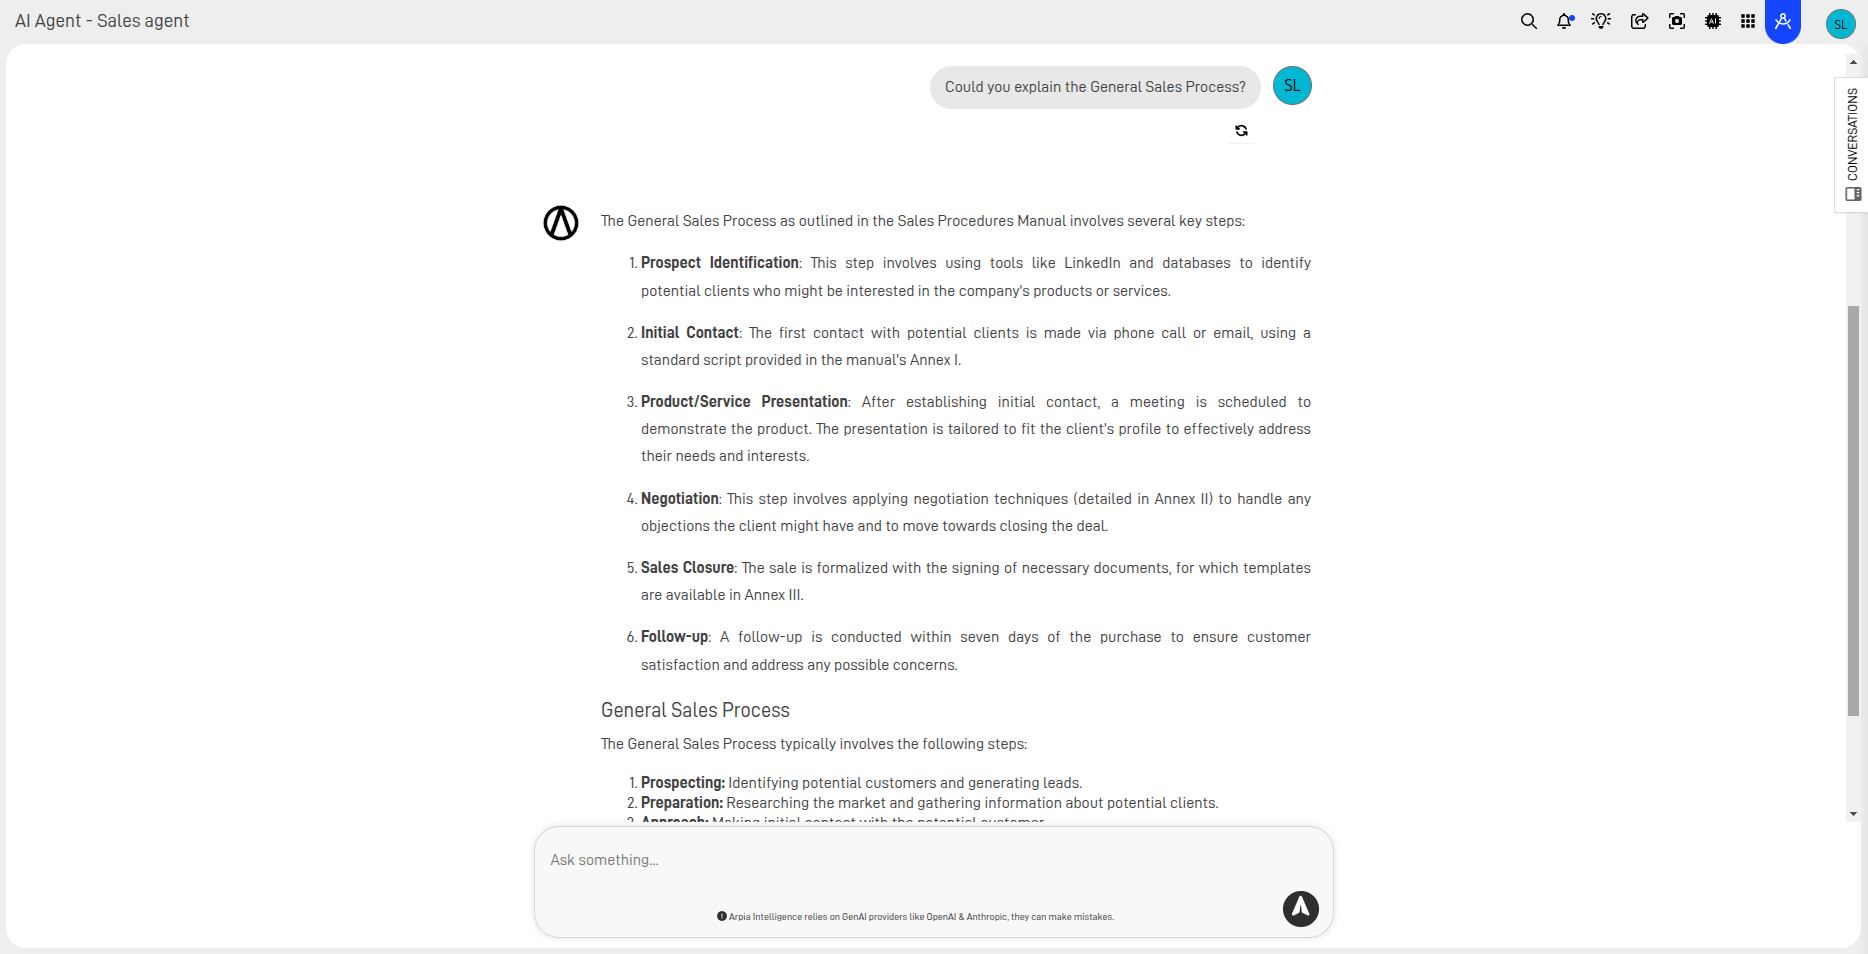
Write a query in natural language and analyze whether the responses demonstrate sufficient awareness of the documents. To improve alignment with the source material, you can adjust the temperature setting to reduce creativity and make the answers more precise.
Updated 11 months ago
