
How-To Guide for "Create Multiple Options"
Overview
The "Create Multiple Option" field allows users to input multiple custom choices, offering a flexible solution for scenarios where predefined options are not sufficient. This field enables users to freely add as many options as needed, making it ideal for capturing a wide range of user-generated data that requires flexibility and adaptability.
Key Features
- Multiple User-Generated Entries: Users can add as many options as needed, ensuring the form captures diverse input.
- Dynamic Input: Each custom option is added interactively, giving users control over the options they provide.
- Real-Time Updates: As users add new options, they instantly appear in the field, making the input process seamless and interactive.
Steps to Configure the Field
Step 1: Select Field Type
- Navigate to your Data Form configuration.
- Add a new field or edit an existing one.
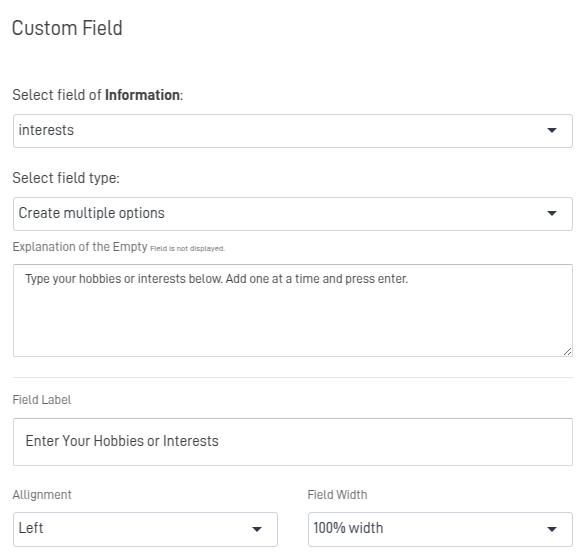
- From the Field Type dropdown, select Create Multiple Options.
Step 2: Configure Field Details
- Field Name: Provide a unique name for the field (e.g.,
Interest). - Field Label: Enter a user-friendly label to display in the form (e.g., "Enter Your Hobbies or Interests").
- Explanation of the Empty Field:
- Add guidance to users (optional). Example: "Type your hobbies or interests. Add one at a time and press enter."
- Alignment: Choose the field's alignment:
- Left: Default option.
- Center or Right: Depending on your form layout.
- Field Width: Set the width of the field (e.g., 100% width for a full-row layout).
Step 3: Configure Advanced Options
- Required Field: Check this box if users must insert at least one option.
- Blank on Load: Enable this option to keep the field empty by default until the user selects a value.
Step 4: Save and Test
- After configuring the field, click SAVE or EDIT FIELD.
- Test the form:
- Ensure that the user can add as many options as they want.
- Verify that selections are saved as JSON in the destination table.
Example Configuration
Scenario: User insert their interests or hobbies.
Field Details:
Field Name: Interests
Field Label: "Select Your Hobbies or Interests"
Field Type: Create Multiple Options
Options added by the user:
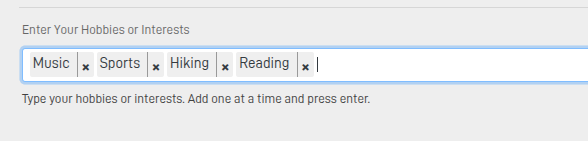
Example JSON Output:
["Music","Sports","Hiking","Reading"]
Best Practices
-
Encourage Meaningful Entries:
Guide users to input relevant and concise values to maintain data quality. -
Provide Context for Input:
Use a clear field label and description so users understand what type of information is expected. -
Review and Confirm:
Encourage users to review their added options before submitting to prevent accidental or unnecessary entries.
Summary
The "Create Multiple Option" field allows users to dynamically add multiple custom entries without predefined restrictions. It provides flexibility for collecting diverse user inputs, making it ideal for scenarios where standard options may not be sufficient. By enabling real-time additions and seamless interaction, this field enhances data accuracy and ensures a more personalized user experience.